I am so excited!! My Anthro pillow knock off won last week at So You Think You’re Crafty!!

Check it out here! and vote for this weeks theme Upcycled : )
—————————–
This was by far my favorite week yet! I love making things really cheap that look and are otherwise very expensive. Makes me feel good about myself : )
This Anthro Pillow is my inspiration

Here is my version. I used more of a pottery barn color scheme to better fit my needs. It is made out of a white cotton blend and beige linen. My pintucking is closer together and a little thicker overall… I like mine better : ) Shh! Don’t tell anyone.

I absolutely love this pillow!! It is a great accent! and I’m a super big fan of pintucking : )
Here is how I did it.
Supplies
-Coordinating fabrics of your choice. Yardage depends on what size pillow you are making (you will need the size of your pillow + 1 inch. and then however much you want for your pintucking accent piece. It takes a bit of fabric for the pintucking… I just kinda winged it in the measurements. Assume you will need more cause it does go through the fabric kinda quickly.
-Sewing machine
-Matching thread
-Scissors
-Pillow insert
-Pins
Ok, now for the tutorial : )
1. Measure your pillow, add one inch (so if your pillow is 18×18, cut 19×19) So you will need two squares for the front and back of the pillow, set these aside (I like to do all my cutting first since that is my least favorite part)

2. cut a pieces of fabric the width of the pillow, and then length depends on how much pintucking you want to do… I think I used about 19×19 as well.You might want to add a little extra on your width cause my edges got a little crooked since I was gathering at random : )
3. First we will begin the pintucking process. Your going to put your fabric right side down, and fold up little creases and sew them down.


Now, my absolute FAVORITE thing about this style of pintucking is {it doesn’t matter} It does not have to be a straight stitch…it’s better if it’s not. It doesn’t have to be the same size or lined up perfectly… it’s kinda like cooking dinner and not cleaning up the kitchen afterwards!!! Oh.Yeah. : )
So Once you are done you should have a piece that looks like this.

4. Pin it centered on the right side of one of your squares you cut out earlier. You can either press under the edges or I just took my last “tuck” and then you sew it right on the front of your fabric!


5. Next just assemble your pillow. Put the right sides of both squares together (pintucking on the inside) sew three of the edges together, and on the fourth side sew in a few inches (make sure and backstitch here) from each corner leaving a gap in the middle, clip the corners, turn right side out, insert pillow, and the slip stitch the hole closed
You are done! Isn’t it beautiful? I hope if you make some you will send me your pictures! I can’t wait to make these in some fun colors!
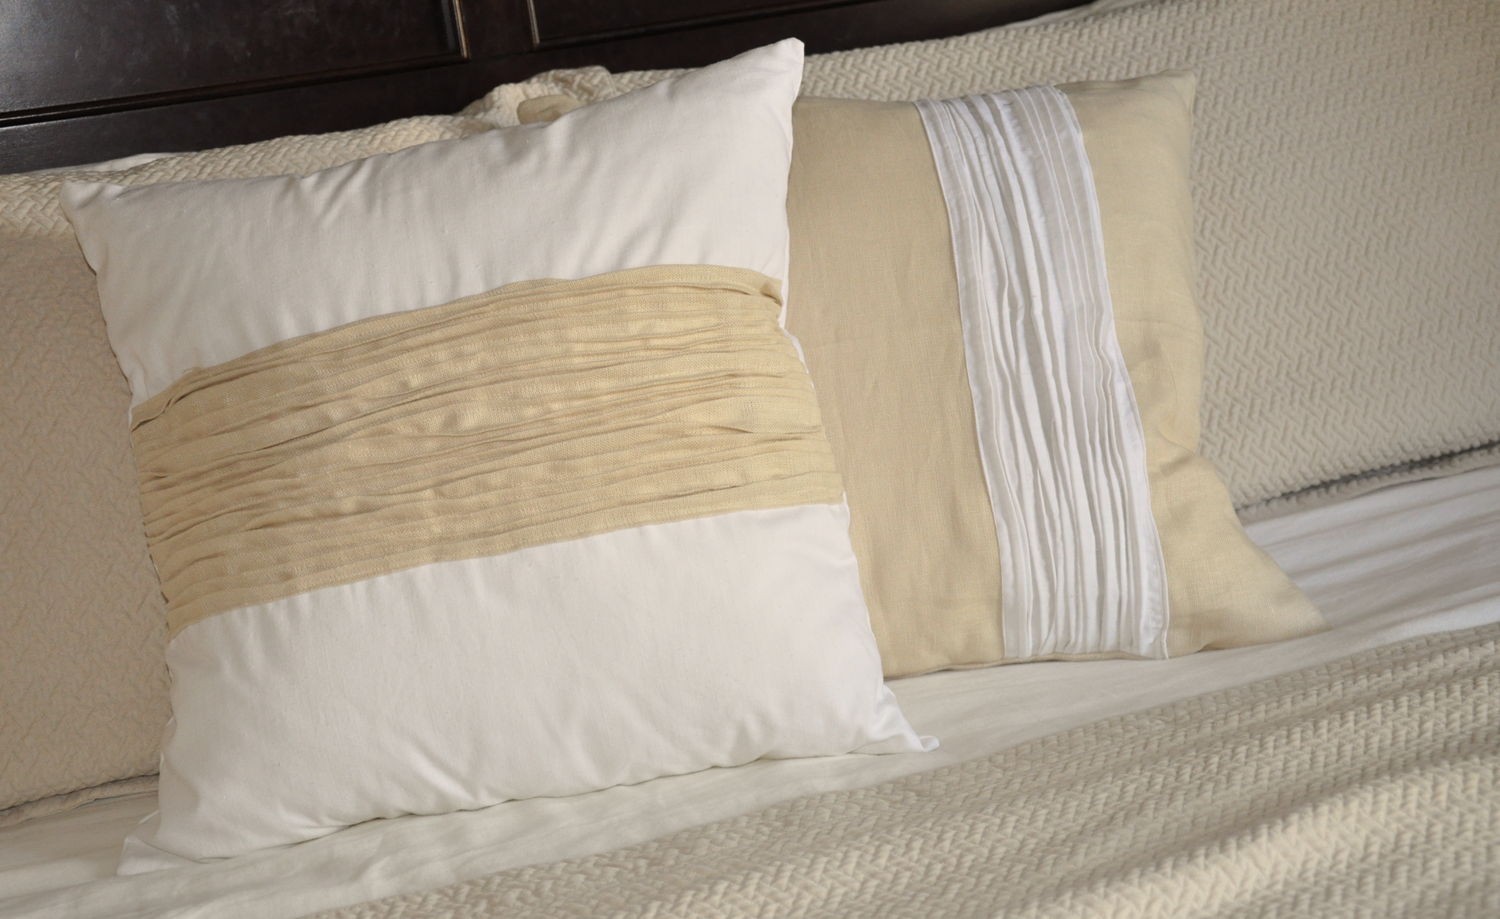
The pillow behind I just put the pintucked fabric off center and vertical.

You May Also Like:

Oh my goodness! I love these pillows!! So cute (and cheap)! I'm buying a sewing maching next month – definately will have to make one of these!
Those are wonderful!!
I've never really thought about decorating with pillows. When the boys were little, they would have been used as weapons :)
Maybe now that the boys have moved out it would be safe? lol
I need new pillow covers for my living room…these are a great idea! Thanks for sharing. I have always wanted to try pintucking, too. This might be the perfect excuse to attempt it.
Whoa! That's awesome. I can't imagine anyone paying $128 for a pillow?! I think your $10 version is much better too!
wonderful pillows I love your knock off
HUGS to you
KAT
I love this and would love to feature it next week on Thrifty Thursday!
This is SO pretty! Congrats on winning! I hope you'll be linking up to Your Whims Wednesday again, it's open until Sunday. http://mygirlishwhims.blogspot.com/2011/07/your-whims-wednesday-16-and-features.html
I love it, I will have to make some!
Super cute! I'm obsessed with making pillows right now and this is something I'm going to have to try. Thanks for sharing!
OK – those are awesome. I love that store but could never bring myself to buy anything like that because of the high $$$. but I'm glad you have this tutorial to make your own :) thanks for sharing!
BTW, I'm hosting a fabric giveaway for 12 FAT quarters. Swing by when you get a chance :) –
http://www.jaqsstudio.com/2011/07/fabric-love-19-fats-and-fabric-giveaway.html
-Q
Great tutorial! Thank you for sharing. :)
Great tutorial! Thank you for sharing. :)
I love, love, love this and totally want to make some! Fantastic tutorial too :D
And, I agree with you, yours is definitely better!
Shelley
http://www.westermanfam.blogspot.com
Love this pillow. I have not been brave enough to sew pintucks.
Ruth
This is so cute! I think it looks even better than your inspiration one!! I am visiting from Tatertots and Jello and I am a new follower! I would love if you would come link this up to my Delicately Constructed linky party!!
Hope you have a great weekend and I see you around soon!
Michelle
http://www.delicateconstruction.blogspot.com
Love, love it!!! I used to manage HOME at our local Anthropologie, so I think it's extra beautiful!! ;)
Michelle
ourwonderfilledlife.com
This is so pretty. Thanks for showing how to do the pintucking. It looks super.
Those are great knock-offs! Good Job!
Hope you will please drop by and enter my $50 Overstock.com Gift Card Giveaway
Wow, I really love this! Thanks for the great tutorial!
What an adorable DIY project! Thank you so much for sharing.
Happy Monday!
this is amazing!!! I like yours better than the "inspiration" I'm pinning this!!!
I really liked this! Easy to follow pillow instructions and very deco!
Come link this up at my woot woot wednesdays!
http://www.tootsiewootsieboutique.blogspot.com
I love these pillows and thank you so much for the straight forward tutorial. It makes it easy for us beginners!
I love your pillows and yours is even prettier! Thanks for the tutorial on how to do this. You're a very good seamstress too.
Be a sweetie,
Shelia ;)
This is adorable. Way to save 90 bucks!
Coley
http://www.whatyoumakeit-coley.blogspot.com
This is adorable. Way to save 90 bucks!
Coley
http://www.whatyoumakeit-coley.blogspot.com
I loved this pillow when I saw it, too, and created my own knock off. :)
http://517creations.blogspot.com/2011/05/anthropologie-knock-off-cummerbund.html
**visiting from see kate sew
Feminine and spunky all rolled into one – I love it! :)
This is beautiful! I love the design of this pillow. I'm all about creating this based off of Anthropologie designs! Thanks for sharing!
http://www.decemberskye.com
So smart! And great tutorial, too. Thanks for sharing!
I LOVE this pillow! I'm sooo doing this next week! Thanks for the pintuck lesson!
Thanks for the great tutorial!! And (belated) congratulations on winning this round of competition. I featured these pillows and linked to your tutorial today:
http://www.snugasabugbaby.com/pillows/
These are just darling. Had to include them in my round-up of TUCKS sewing projects. Hope to make my own someday!
Cheers,
Lauren
Thanks so much Lauren! How exciting! : )
I just love them! You’ve inspired me to want to pull out the sewing machine…:)
Hi, love pintucking too, its so Zen. Did you know if you go across your pintucking you will get a smocked effect.?The offset band is my favorite…so many possibilities!.
Ta sexlivet til еt helt nytt nivå mеd hjelp fra Flirtingfair.
Jeg har mine forestillinger om hva jeg leter etter og det er modne damer som er åpen for
Swinger. – På knull kontakt kan du finne mannen som vil det samme som deg.
Shhh. I like your better too! They are gorgeous.
nice
I really like how easy it is on my eyes. I’d like to know how I can be notified whenever a new post is made.