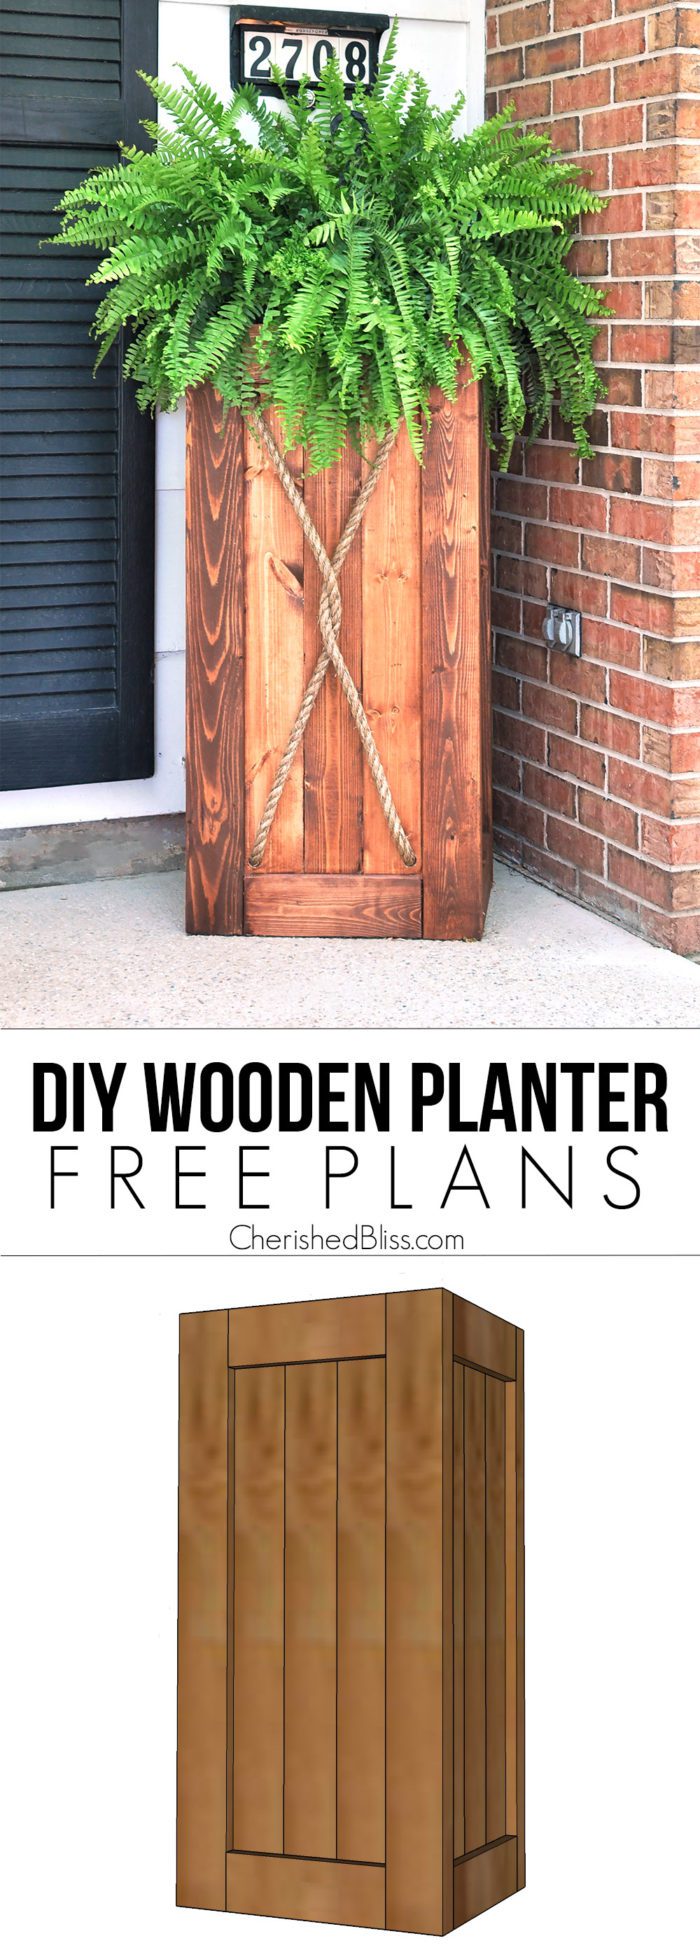
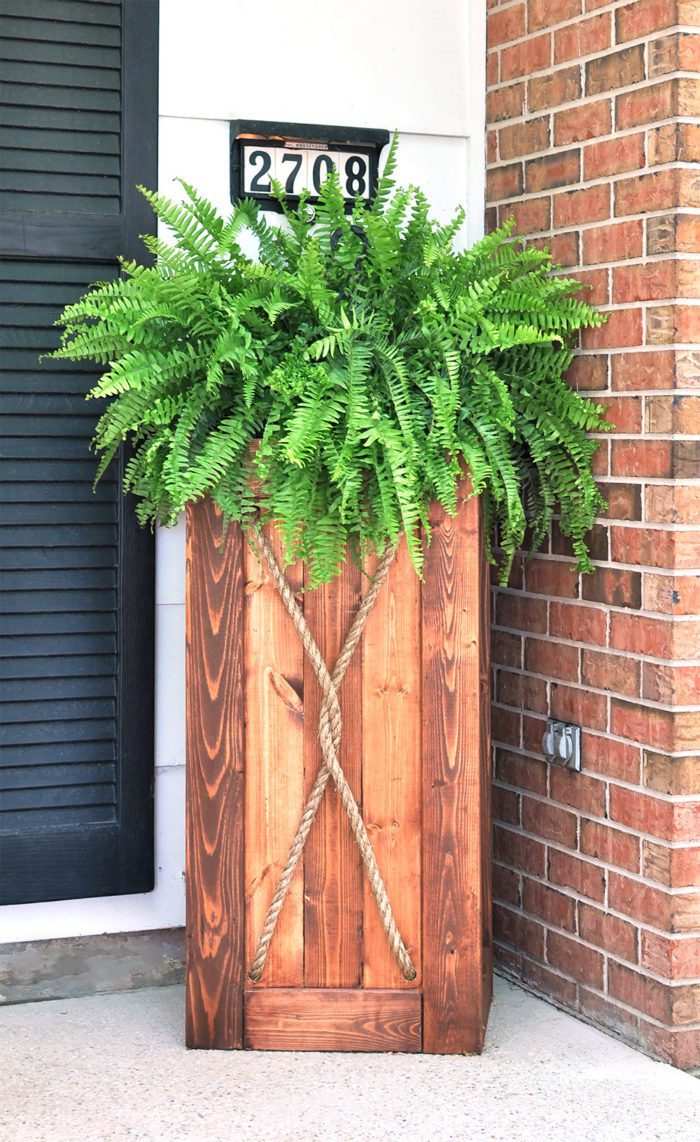
I hope everyone is enjoying the start of Summer. I feel like I’m barely making my way through these last few days of school, but today is the last day and maybe I’ll be able to take a breath (probably not), one can dream, right? One thing I look forward to during the summer months is just being outside at all times. We eat as many meals as possible outdoors and just love hanging around. We are hoping to do a pretty big makeover to the outside of our house, but things like hot water heaters and furnaces keep breaking along with other random electrical problems in our little foreclosure house. So since I can’t regrade the yard and have new landscaping put in right this second, I’ll just focus on all the fun little decor parts – like this DIY Planter.
How to Build a Planter
This planter is a great way to get introduced to some of my favorite tools, like the Kreg Jig and a miter saw. Seriously.. those might be my all-time favorites! They make everything so much more fun in woodworking! The good news is that I will be giving away a fun little gift package from Kreg Jig at the end of this post, so when you are done taking a little peek at the tutorial here, don’t forget to enter!
| Supplies: | Tools: (contains some affiliate links) |
| – (4) 1×4’s @ 8′ – (1) 1×2 @ 8′ – (2) 2×4’a @ 8′ – Rope – Wood Stain – Waterproof Sealant | – Miter Saw – Impact Driver or Drill – Nail Gun – Kreg Jig – Clamps – Wood Glue |
| Cut List: |
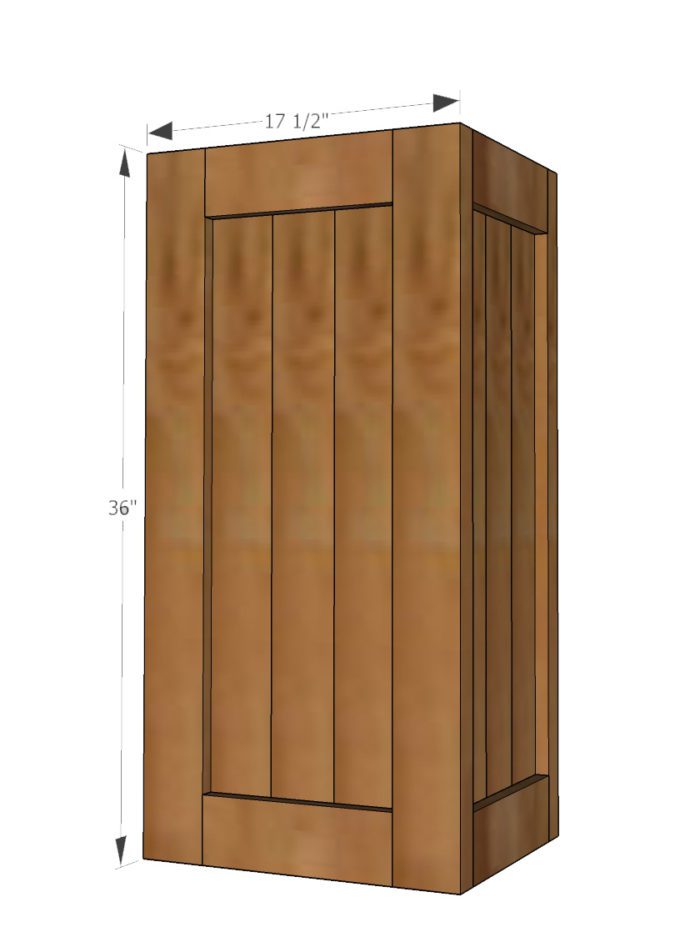
| – (12) 1×4’s @ 36″ – (4) 2×4’s @ 36″ – (8) 1×4’s @ 10 1/2″ – (2) 1×2’s @ 10 1/2″ – (4) 1×2’s @ 14 1/2″ |
Prepare to Build the Planter
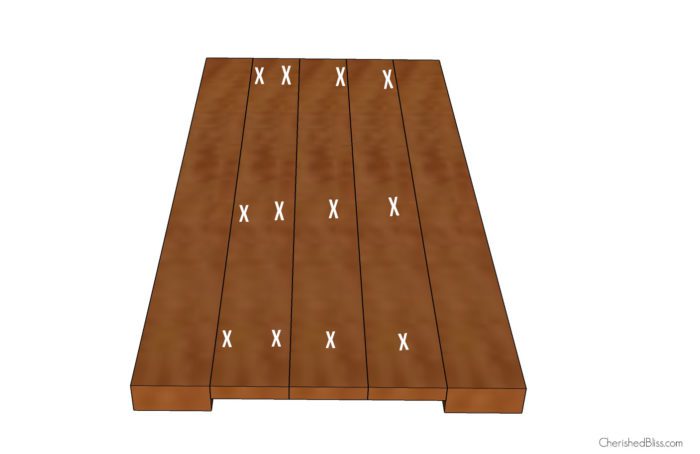
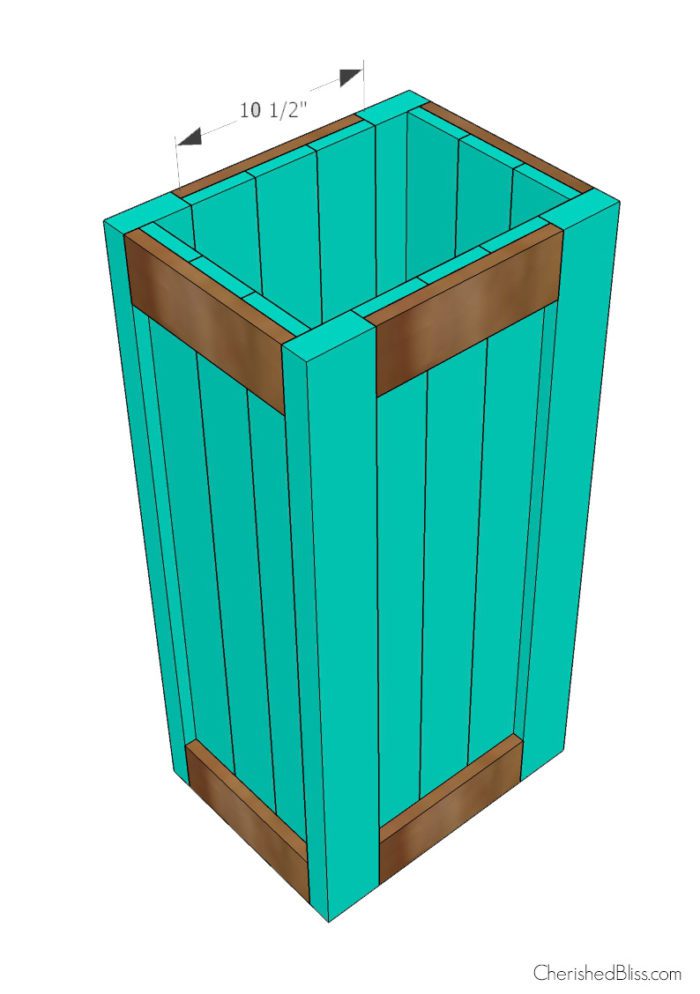
After you cut your pieces we are going to get started with the pocket holes. You might want to measure as you go after you build the main frame just because measurements can get slightly off. We will start things off by building the sides which means adding your pocket holes where you see all the x’s. Each 1×4 will have 3 pocket holes, with the exception of 4 that will need pocket holes going both directions in order to attach the 2×4’s. (The 1×4 with 6 pocket holes- 3 need to point one direction and the other 3 need to point the opposite direction of those.) We will be making two of these sides.
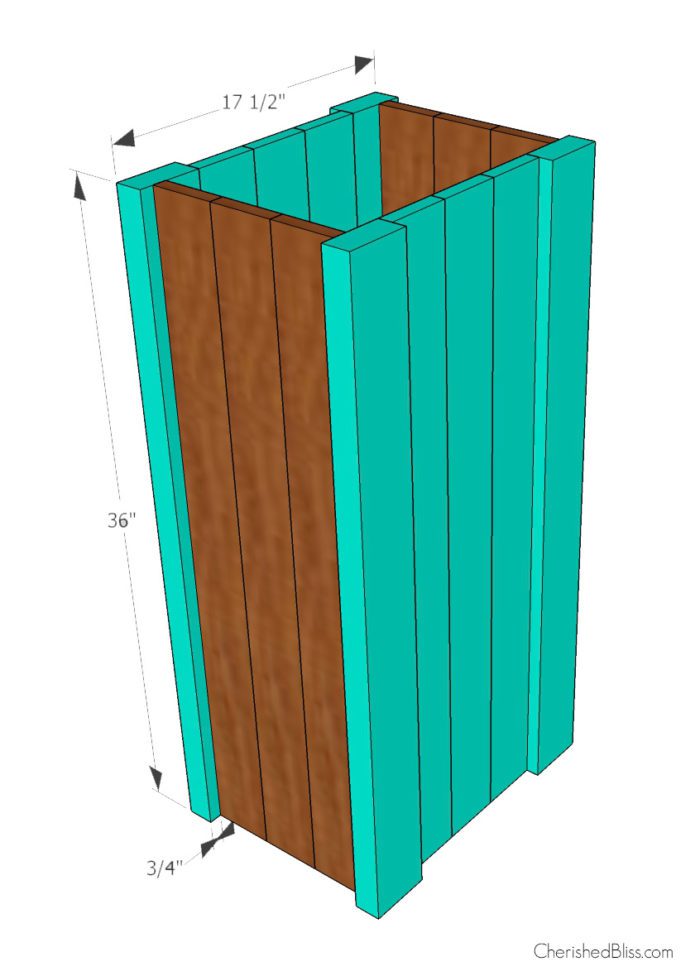
In order to get the proper space between the 1×4 & 2×4 I simply used a scrap 1×4 to create a flat surface in order to install the wood screws into the pocket holes, and it makes a nice surface with the clamps. So it will be flush with one side of the 2×4 and the other side will have a 3/4″ lip. Repeat for the second side.
With the remaining 1×4’s you need to create the opposite legs using pocket holes. Then attach all 3 sides together with the pocket holes on the inside. You might have to use a shorter bit to get the screws in to the pocket holes.
Assemble the Planter
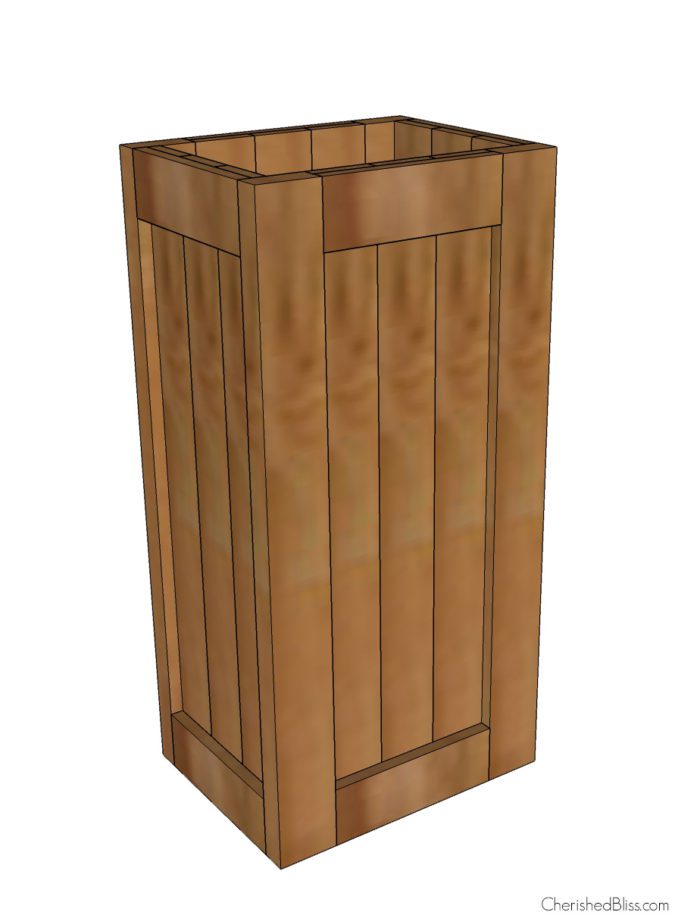
Once you have the main frame built, you just need to add the outer frame pieces. I attached the frame using wood glue and my nail gun to hold it in place.
Add Rope Detail to the Wooden Planter
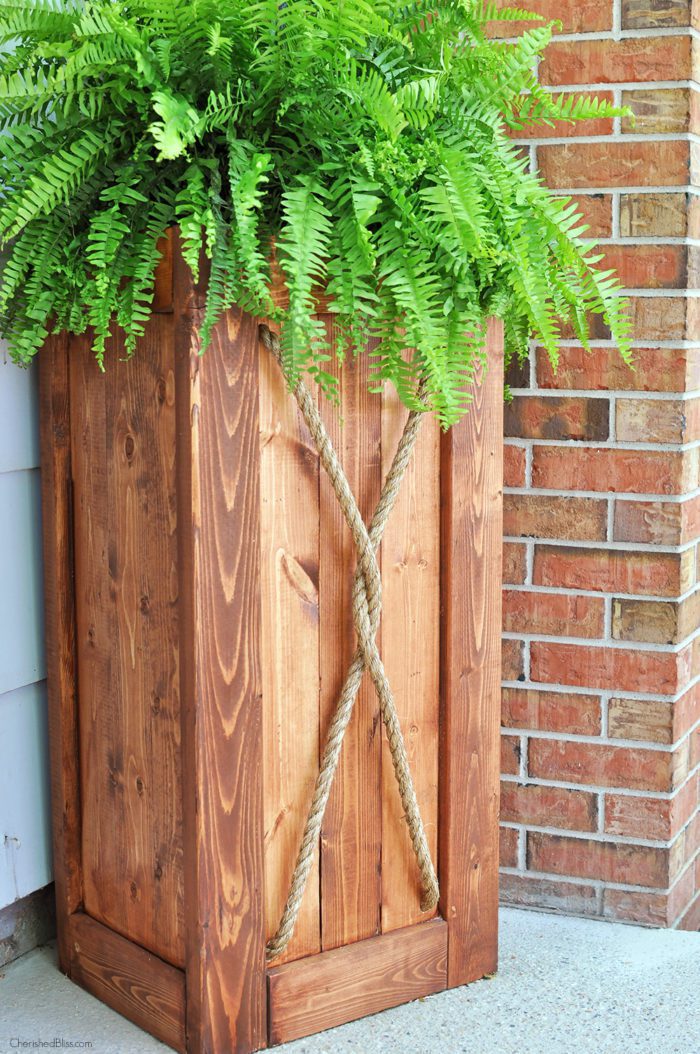
To add the rope detail, drill 4 holes in each corner appropriate to the size of your rope. I tied a knot on the inside of the planter to keep the rope in place.
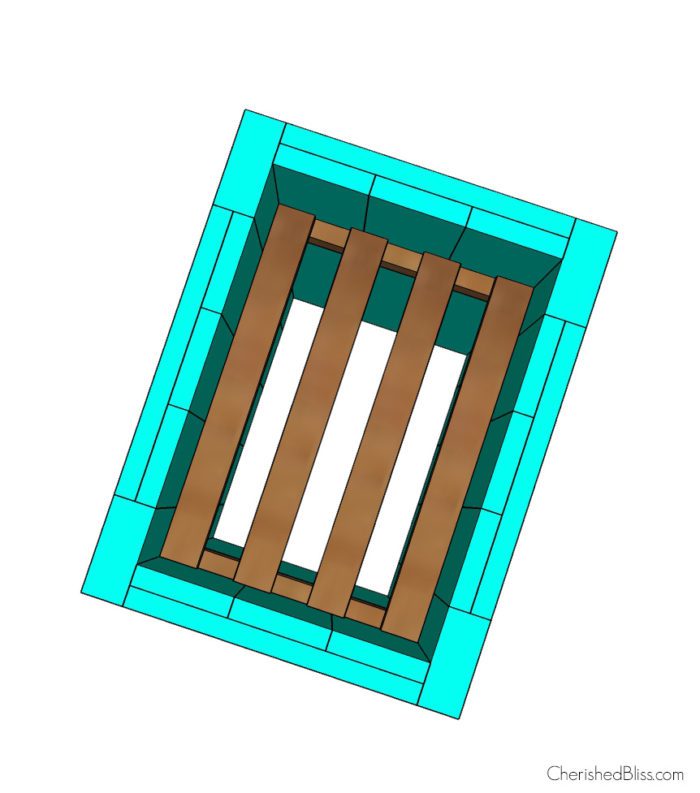
The last step will be to add the support base to hold up your plant. To do this I attached my 1×2 rails and supports 8″ from the top and attached with wood glue and finishing nails.
Now all that’s left is to finish and seal your new planter. Make sure you are using an outdoor sealant to keep your wood protected and let it dry completely before using.

Ashley, your woodworking projects always amaze me! I just found an old tool box that had the same rope design on it. So, cool! It looks gorgeous.
I got impressed by their work.
What a beautiful planter! You did a wonderful job. I like how you added the rope and gave it a twist. Looks beautiful on your porch with the pretty fern.
I am right there with you about trying to update/remodel then something else breaks or needs fixing before you can get back to your original plan. Happens to us all the time.
Thanks for the chance to win the Kreg Jig.
This is a great planter! I have a bit of a planter obsession and this one is now apart of it. Good luck with the contest!
Ahh, I just missed this! It looks so nice, I think I may go ahead and build one from what I’ve been storing in my garage. I’m not proficient in woodworking but I think I can handle this project.
I love it! Such a neat idea :) I’m getting more and more into wood.
I would love for you to share it with our Thursday Link Up Party- Idea box:
http://milaslittlethings.com/2015/06/idea-box-thursday-link-party-15.html
xx
Mila
Beautiful! Where did you get the rope from?
Thank you Mandy. I believe I bought it at Lowes. It is the rope where you pay per linear foot, I found it over by the chains : )
Just wondering what type of wood sealant you used for the DIY planter?
Can you tell me what colour stain you used for your planter? Thank you !!!
What an adorable planter! Thanks for sharing at the Monday Funday Party!!
Thanks so much Emily! : )
OH I love this! I need something tall and narrow for our front porch and this looks like a perfect fit. The rope is a very nice touch as well. Thank you for sharing!
THE STORY OF LIFE
& PEOPLE ‘S PRAYER
The warm place next to your dream, with you build
General dream of an “early evening space”.
The hard part of living, the more we do
Recognize more clearly the value of life.
This is a great planter! I have a bit of a planter obsession and this one is now apart of it. Good luck with the contest!
Read more at https://cherishedbliss.com/diy-planter-tutorial/#C5H3ZFCCOrJvooWH.99
What a beautiful planter! You did a wonderful job. I like how you added the rope and gave it a twist. Looks beautiful on your porch with the pretty fern.
Read more at https://cherishedbliss.com/diy-planter-tutorial/#7uHRUAxKMZidvwmD.99
need more 1 x 4 x 8’s on your supply list
I’ve made two similar planters last year but in other shapes and without the rope. It’s a cool idea with the rope! I think I’ll add it to my planters. Thanks for sharing and interesting blog
Loved this, we have what used to be a lovely Green Mountain boxwood in front of our home but it’s been slowly fading away in the old keg. Just forwarded this link to my wife. It would fit great with the rustic look of the new birdbath we just had installed.
Quick question – what kind of wood did you use for the one in the picture?
Thanks so much Bob! : ) I just used regular pine from Home Depot, and sealed it with an outdoor sealant. Good luck and I hope it works out for you!
this type of planter can be used for a garden theme coffee shop. So lovely :)
Thanks for sharing at the Monday Funday Party!!
Nice designs. They’re really good.
Those planters are good. I’m considering getting one but I’m not too sure.
Hey I’m confused because your list and your cuts don’t match up?
Hey! I’m sorry for the confusion! This is an older post, and I’m not sure I’m seeing what doesn’t match up. If you can direct me to what part is giving you trouble I can get it fixed for you asap! Thanks!!
I’m not that good in wood making . but made it look easier to make. and the one which you showcased in article perfectly suits to my house exterior in front.
Hi Ashley! Thank you for posting this, I’m excited to start making it!! The only change needed is the wood quantities. We need 6 of the 1×4’s @ 8 ft to make the project as is. Thanks again!!
Hey Jackie! Thanks so much for letting me know that! I’ll definitely take a look and make some updates :) Good luck with your project! would love to see how it turns out!!
Ahh, I just missed this! It looks so nice, I think I may go ahead and build one from what I’ve been storing in my garage. I’m not proficient in woodworking but I think I can handle this project.
Great DIY project! Thank you
Awww, That’s a really nice guideline. I think I can do it. Thanks
This is a really good post and I got a lot of good tips from your valuable post. Thank you very much.
It’s useful. thanks
This is a really good post and I got a lot of good tips from your valuable post.
it’s really a resourceful and helpful content.Like it
This is a really good post and I got a lot of good tips
I’ve made two similar planters last year on my small coffee shop.this type of planter can be used for a garden theme office, workplace & coffee shop. So lovely.
Anyway, thank you for the great information.
Your supply list is not accurate, this project requires more wood. You also didn’t add the screws you used and beginners will have trouble figuring that out.
This is a really good post beautiful planter. Thanks for sharing
Where do you find plastic containers to fit these planters?
This planter tutorial is great. It will help us during cleaning our wood furniture. I would love to share it. Good luck.
I love projects that involve recycled wood. These crafts usually have a lot of character and are always unique and special in some way. A planter box is one of the many things you can make out of leftover pieces of wood from previous projects or from boards salvaged from old fences or barns.
Love this!
Also would love if you’d start sharing at our weekly party. It’s open all week and growing :) – Hope to see you there. xo
https://www.jodiefitz.com/2019/05/28/reader-tip-tuesday-weeks-craft-recipe-party-14-2-2-2-2-2-2-2-2-2-2-2-2-2-2-2-2-2-2-2-2-2-2-2-2-2-2-2-2-2-2-2-2-2-2-2-2-2-2-2-2-2-2-2-2-2-2-2-2-2-2-2-2-2-2-2-2-2-2-2-2-2-2-2-2-2-2-2-2-2-2-2-2-2/
Hello Ashley,
Many thanks for this article; i was looking a tutiral for a project this summer. It will really help me.
Helena
Hey Ashley,
Great tutorial here on the planter. I’ve built some smaller ones before, but this one looks pretty BIG ha. I do have a spot on my patio where I think this could work also. And I love how you color coded those steps to make it easier to see which wood pieces go where. Definitely nice when looking at a 2D picture. Thanks!
Wow. This is so easy I think even I could build one. A planter like this would be perfect for our front entry way. Thanks for the DIY tutorial
That’s great information. I did a search and found your blog. It’s been a big help! Thanks for sharing this blog.
Amazing tutorial. SO simple and easy information! Thanks for sharing step by step Guide.
Very nice article, your way of explaining is amazing. I hope now I can use my diy planter easily
YOU WORKING VERY HARD like these planters very beautiful
Thank you for the post and share it with us.
Very nice guideline. Thank!
When trying to find the best carpet shampooer, one of the most important things you can do during your shopping experience is reading customer reviews online. People who have bought a carpet cleaning machine that you are thinking of purchasing will have a good understanding of how the machine works when they leave a review. This can give you great information about which models have the highest rating among consumers.
Your this strategy is very good. I think, I can use my diy planter easily.
Thanks
Yes, your saying is definitely the best choice for raised garden takes care of as far as life span.
impressive.
very nice
cool
Rellay good post worth it. Thanks guys
Jiotv is one of the best tv app for watching live TV shows and movies.
Really nice idea, love it. Thanks for sharing nice tips.
Hi Ashley, thanks for the planter idea. I built one like and it looks great. However, I am wondering what type of pot you put In It. I was looking for a 10×14 rectangular pot to fit down In The planter but can’t seem to find one. Any suggestions?
Splendid info, Thanks for sharing this with us
This DIY Planter Tutorial is a fantastic guide for plant enthusiasts! Clear and concise steps make crafting these planters a breeze, while the creative design ideas inspire a touch of nature in any space. Whether you’re a beginner or experienced, this tutorial offers a fun and rewarding project to showcase your green thumb.
The illustration looks optical illusion. Thank you for the great tutorial
Thanks
Sage
Amazing guide. Thus quick and easy details! Thank you for sharing step by step Information.
Awesome guide. SO quick and easy details! Thank you for sharing detail by detail Guide.
I really enjoyed this site because its worth with the useful info..Thank dear.!
I’m not that good in wood making . but made it look easier to make. and the one which you showcased in article perfectly suits to my house exterior in front.
Thanks for sharing. This is a really good post beautiful planter.
Just quick look at your tutorial and It’s nice sharing.
Thanks
Yeah the material needed doesn’t match up with the cut list for 1x4s. At 96 inches, you can only get 2 cut and if needing 12 total, that would be 6 1x4s needed and maybe run with 84 inch to cut down on scraps. I’m doing this build now and looking forward to the finish
nicely done
you shared amazingly thanks for this.
you are amazing thank you dude!!
Amazing information ( just like I give in my blogs lol )
Wow, this is really looking amazing and beautiful design of planter box. You really explained it very well in detail. I love this reading. Thank you for haring this wonderful post.
A debt of gratitude is in order for sharing. This is a great post beautiful planter.
Such a great article. Thanks.
Exceptional Content…
I just want to say that I never ever saw such an amazing article. Thank’s for sharing.
Thanks for the guide its really amazing
Wow, very detailed and helpful tutorial. It was very helpful. Thanks for sharing
Wonderful piece of article I found today it enhances the beauty of my out door home decoration. Thanks for sharing your ideas with us. It will help me allot in this peaceful day.. Thanks for it
Valuable info. Lucky me I found your website by accident. I bookmarked it. This article is genuinely good and I have learned lot of things from it concerning blogging. thanks.
You should create Modern Shelves or some kind of room decoration, trying to find ways to make my bedroom have more of a modern look. Awesome article!
Love this DIY tutorial. Such a great reading article for me to get ideas of DIY activity. Thank you for sharing this article.
Very easy tutorial and easy way to guide, I really like this article. Thank you for sharing this article.
I Love this DIY tutorial. Such a great reading article for me to get ideas of DIY activity. Thanks for sharing this article.
Wonderful tutorial. I really enjoy this great reading of DIY planter tutorial. Thank you for sharing this article.
Thanks for sharing this information.
This is a grate idea about diy planter tutorial . thanks very much share this wonderful article and help us .
You are really awesome. Such a great and wonderful planter tutorial you shared with us. thank you for this article.
I love the way you wrote here.
Just rushed out today to get my curb side order materials and your cuts are not correct.
I’m short wood. I love this planter thou – nice job. I’m now going to build it
at 30″ high.
Thank you for sharing this it’s gorgeous. I ordered my material for curb side
pickup and started my cut list but didn’t have enough wood. I’m going to
make it at 30″ high. Please update you material list. Keep up the good work
Thanks for sharing for informatively article and help us
I am a gardening lover and a basketball player. I love to built this planter for my tv lounge.
Thanks for sharing such piece of art and care
Thanks for sharing the informative article and we will help.
Such a good idea about the day planter tutorial I am reading this information and thanks sharing this article
This is really to good box and use full and help us thanks sharing this article
Thank you for sharing this it’s gorgeous. I ordered my material for curb side
pickup and started my cut list but didn’t have enough wood. I’m going to
make it at 30″ high. Please update you material list. Keep up the good work
Beautiful designs, I will try to make one for my house. Thank you for motivating, with this wonderful post.
Thanks sharing this article about the planter tutorial and really too use full information
Wonderful tutorial. I really love this reading. Thank you for sharing this wonderful DIY plater tutorial article.
Great reading. Always love to read your content. Thanks for sharing it.
This is really to good tips and help us information about this thanks sharing g this article planter tutorial
I am reading this article and help us and amazing information about the planter tutorial thanks sharing this article
Thanks sharing this article about the planter tutorial
This is really too good DIY planter tutorial thanks sharing this article and help us
Thanks sharing this article and help us information about the planter tutorial
Thanks sharing this article and help us information
Thanks sharing this article
Great stuff you shared! Thank you for that!!
Very nice blog post. I certainly love this website. Continue the good work!
Wow this is really to good about the planter tutorial thanks sharing this article
VERY BEAUTIFUL DESIGN WITH COMPARATIVELY LESS EFFORT AND RESOURCES. THANKS FOR ADDING THIS POST, WE CAN LEARN ALOT, WAITING FOR YOUR ANOTHER POST.
Wow this is really to good article about the planter tutorial thanks sharing this article
Thanks sharing this article about the planter tutorial
Thanks sharing this article about the day planter tutorial
This is really to good about the planter tutorial thanks sharing this article
Thanks sharing this article
Just loved this article, it was really informative for me.
I am really impressed with the design. A wonderful piece of art, it is an amazing way to improve the outdoor decoration. You really made my day.
Thanks sharing this article planter tutorial
Thanks sharing this article
Thanks sharing this article and help us information
Wonderful and amazing piece of article, I had learnt allot of useful piece of information from the safe and healthy reading of this article. Thanks for sharing this article
Wow, useful article that you shared. I am also a DIY expert by profession and love to read these types of posts. Thanks!
Yeah its important to check out plant on weekend .
You really pick very important points .
Amazing way of writing
Yeah its very informative tutorial .
Its very important tips that you have to share with us .
Thank you so much for this
Thanks Its Greet
Wow this is really too good about the planter tutorial thanks sharing this article
Great User Interface and High Quality Content!
Thanks for sharing Great and awesome article.
Your article is very helpful for me. Thanks for sharing it
This article is very helpful. Thanks for sharing
Wow this is really too good about the planter tutorial thanks sharing this article
Wow this is really too good about the planter tutorial thanks sharing this wonderdful article i will try this at home
this planter basket is for indoor plants so it won’t get dust very easily. but if you guys think it’s not easy to clean or durable then go get a some hacks; how to clean your house on daily basis.
i have this boho planter from last two years and it’s just perfectly dust and stain free. it depends how you maintain it.
Thanks sharing this article about the planter tutorial
Love this tutorial idea. You always come up with amazing content. Thank you for sharing it.
Searching for the best KD shoes? Check out the top-rated of 2021, pros & cons, features, plus all you need to know about the best options available now!
Nice this is really very good about the planter tutorial thanks sharing this wonderful article i will try this at home. And tell my experience.
this is a great idea to decorate the home, office, and different places with this Diy planter idea. It looks beautiful. thanks for sharing this beautiful idea and Diy planter tutorial.
Love this idea with amazing content. Amazing :)
Great idea to decorate home and offices with this amazing stuff.
it’s really a great idea to make a home beautiful with these small tips. I think it is the best idea to make a home beautiful and everyone likes to DIY planter tutorial ideas. thanks for sharing these beautiful ideas and tips amazing article.
wow, this is really amazing tips and ideas that i have learnt from the article how we can decorate our home by using small things. thanks for sharing this amazing article and these tips about diy planter tutorial.
Thanks for the great article. It really helps me on right time and was searching it for a past week.
Thanks for the great article.
Really great ideas about decorating, you made my day am searching for this type of material . keep updating us. thank you so much
Such a great idea about the DIY planter tutorial thanks sharing this article
Such a great idea about the planter tutorial thanks sharing this article and help us information
it’s really a great idea to make a home beautiful with these small tips. I think it is the best idea to make a home beautiful and everyone likes to DIY planter tutorial ideas. thanks for sharing these beautiful ideas and tips amazing article
Such a great idea. Thanks for sharing.
That looks awesome! I really like how strong the wood grain is underneath the paint. Cool texture
I really like your ideas, Thanks for the info :)
I am really impressed with the design. A wonderful piece of art, it is an amazing way to improve the outdoor decoration. You really made my day. thanks for sharing this article.
Is there a tutorial of making a DIY skateboard ramp?
Thank you for sharing your wonderful post.
The Supply list needs to be corrected. This project requires six 1x4x8, not four as indicated.
Such a lovely idea about the great information blog thanks sharing this amazing article
I am always searching online for storys that can accommodate me Jual Thermal Oil 600.000kcal-1.000.000 Kcal
Very good article! We will refer this article to our readers. Keep up the good work. This website brings great value and impact to the readers and we are thankful for that Jual Thermal Oil 300.000 Kcal/h
Best article in the town
I really love the information you provided!
Perfect Tutorial at perfect time, I really loved it.
Thanks for sharing it, I oved it.
Thanks for sharing this amazing idea about planter. I like how you added the rope and gave it a twist.
Thanks for share this helpful post. It is really great.
Best Diy planner is to usse stylish font on your Diy to look more fantastic and for this purpose you can use special letter generator
Great Post !! The fascinating topics will bookmark your site to check if you write more about them in the future. JUAL BOILER 1000 KG Also, check more
Great Post !! Very interesting topic will bookmark your site to check if you write more about in the future. Jual boiler horizontal
I am fascinated by the article you write. like being trapped in a reverie it’s really good. Jual thermal oil 600.000 kcal
This is a very educative and helpful blog post, i really learnt a lot going through it, JUAL THERMALOIL TUNGKU KAYU and I must commend you for this great piece which I consider very useful to me and other readers
I really love the information you provided!
Thanks for sharing.
You are awesome for sharing all that knowledge. I really appreciate visiting your website again. Thank you for your generosity! Also, check your BA 2nd Year Result
You are awesome for sharing all that knowledge. I really appreciate visiting your website again. Thank you for your generosity!
Thank you for providing a detailed Guide with Pictures i really love your effort.
Thanks sharing this article about the DIY Planter Tutorial.
Wonderful blog, its very useful for diy planter lovers.
Amazon has access to an Employee Resource Center (ERC) 24 hours a day, 7 days a week. We are one of the world’s largest human resources contact centres, and we provide phone and chat support to workers and graduates.
Amazon ERC Number
Excellent post! I have read the article it is very helpful. . If yes, you visit T20 World Cup 2022 Schedule PDF Download to see the result. Thank you so much.
Excellent post! I have read the article it is very helpful. . If yes, you visit T20 World Cup 2022 Schedule PDF Download to see the result. Thank you so much.
This is a pretty amazing topic, and I learned a lot from your insightful article. I sincerely appreciate it.
Assuming you are thinking about what Satta King is, here are a few hints to launch the game. To begin with, you ought to begin playing the game at a level that you can deal with serenely. A great many people hurry into wagering and never view the game in a serious way. The most effective way to begin is to play at a lower level and progressively increment your rewards. Whenever you have dominated the essential ideas of the game, you can continue to more significant levels.
Since 2005, Brita has made her debut as a professional athlete and has played on the international scene, where her first achievements were click here
Thanks for This Discuss. we always report on Spetcrum Internet Outage for all Spectrum subscribers.
more info about registration on the gacor slot gambling site, visit the site directly and fill in the contents that need to be filled in, it’s easy, isn’t it, if you don’t understand, you can contact live chat and live chat will reply immediately.
liz solari is a model and actress as well as presenter. he is from argentina. where she has been a top south american model click the website to continue.
Every film starring Liz Solar always sells well on the American continent. because of extraordinary acting skills and supported by a perfect physique, many film lovers like films starring Liz. more info
liz solari is an actress and model from argentina not only in argentina but she is translucent as an international actress thanks to her extraordinary acting skills. more info
situs slot online that are much loved by everyone because they already provide many benefits and by only using 1 vvip id that you can get by registering with a local bank and ewallet
Where you will play Online Slot Gambling Sites with themes that are very interesting and full of love. The win rate offered by the Cambodia server slot online terpercaya Gambling Site game
list of the newest easy-to-win gacor online slot gambling sites that provide complete and easy-to-win games and have the highest RTP links in Indonesia slot online terpercaya 2022
The online slot gambling site which is now number one is raja slot online , it’s only natural that it is number 1 because this gambling site has a higher win rate compared to other sites.
Thank you for the information. https://balonesia.com/balon-selfie/
Good post, thank you. balon sky dancer
play online gambling with big profits. only in situs judi many of the best types of games will lead you to the pinnacle of victory. with the biggest wins that will spoil you through a sensation like no other
Badrinath Yatra by Helicopter
main di https://ole777indo.net/ jadi dapet duit berjuta juta
Really good post, thank you.
Assuming you are thinking about what Satta King is, here are a few hints to launch the game. To begin with, you ought to begin playing the game at a level that you can deal with serenely. A great many people hurry into wagering and never view the game in a serious way.
we are providing the pdf based on internet search according to past years old examination test and those question bank or study material download and shared based on the internet only.All the Users of the BoardModelPapers can use those boardmodelpaper.com sample papers or Previous Paper Pdf of class-wise study material and blueprint and any for reference purpose only and we are providing the pdf based on internet search according to past years old examination test and those question bank.
you can check the balance of your nol card in a few different ways.
The 10thmodelquestionpaper was written by a team of expert writers who came together to deliver comprehensive news coverage of current events around the country (India). Our staff is made up of experts. Publishing education updates in the interest while retaining transparency is a cause dear to the hearts 10thmodelquestionpaper.in of writers and citizen journalists with a wide spectrum of media interests an initiative of skilled journalists who have assembled for specialised news coverage of recent occurrences across the country (India). Our team consists of professional writers and citizen journalists with a variety of media interests who are dedicated to providing education updates in the public interest while ensuring openness.
get the benefits of playing online slots here, bonuses spread from bonuses, top up bonuses, new members can also get bigger bonuses, so register now. website
Thank you for the info, if you need an interesting review about a trusted lottery agent that is easy and fun, you can visit Car Rental in Dehradun That’s all from me and thank you.
The <a href="radio scanner receiver has the ability to scan a very wide range of radio frequencies and lock on to any transmission that it receives. You could be listening to a Jumbo jet flying at 40,000ft over Paris or maybe a short wave broadcast from Moscow.
Good Post as always. I always look for this post no matter where I go. However, if you want to know about Daragaon and thanks …
Great job for publishing such a beneficial website. Your blog is not only useful but also really creative. Chardham Yatra By Helicopter
The American manicure is a subtle and elegant nail style that is perfect for everyday wear
Nice post thankas for share
Such a nice post you are share thanks for share this article
This article was read by me! I hope you will keep providing such posts for everyone to read! thank you.
Instazero
Great article, it’s very educational and unique. Please keep us updated on any updates.
Instazero
This DIY Planter Tutorial is a green thumb’s dream come true! With clear instructions and easy-to-follow steps, even beginners can create stunning plant displays. Crafting these planters not only adds a personalized touch to my space but also brings the joy of nurturing life. From design inspiration to the final product, this tutorial is a fantastic guide for anyone looking to elevate their gardening game.
It’s inspiring to see how crafting planters can enhance both indoor and outdoor spaces, bringing a sense of fulfillment and connection to nature. This guide seems like a great resource for exploring new gardening endeavors with ease.
Terima kasih informasinya.
i am seeing new dress for girls
Osh University, recognized as the international higher school of medicine , is a leading institution for medical education. With a global outlook, it attracts aspiring medical professionals from various countries.
Shalamar Hospital, home to the best neurosurgeon in Pakistan , provides a commitment to excellence in neurological care, giving patients the highest level of expertise and treatment.
Jewelgalore showcases the beauty of jewellery from Pakistan . Explore their collection to discover intricately designed pieces that reflect the cultural richness and craftsmanship of the region.
Crafting DIY outdoor furniture is a rewarding endeavor that adds charm to any space. Whether it’s a rustic bench or a sleek table, woodworking projects allow you to personalize your outdoor oasis. Check out http://www.sydneypressurecleaningexperts.com.au for tips on keeping your creations looking pristine amidst the elements.
We highly recommend that this container continues to be successful and its work continues to progress
JUAL PIPA BAKAR BOILER MEREK BENTELER</a
Welcome to Pakistan's top multisports retailer, Uniswift. Find the best volleyball price in pakistan. You're sure to find the ideal volleyball to fit your demands and budget thanks to our extensive collection. Get incredible value when you shop with Uniswift, and up your game right now!
The Fitbit tracker helps chick fil a breakfast end me stay on top of my fitness goals.