Learn how to Build these Easy DIY Industrial Pipe Shelves. Complete with instructions this tutorial will guide you through step by step on recreating these industrial farmhouse-style shelves.

Our bathroom remodel might be one of the biggest transformations in our previous house (other than our kitchen of course). It’s packed full of DIY projects, like these industrial pipe shelves, and I’m honestly surprised how much I loved it when we completed it. When we started this remodel, we were literally doing it because we knew we were putting our house on the market. It was a room I always wanted to do, but selling our house sure gave me a shove to get it done. Ultimately I was just going as fast as I could to get this space showroom ready, but I was more than happy with the results!
The MOST asked question I get is about my bathroom shelves, and today is the day I’m finally going to share those with you! I have a feeling you’ll be pretty shocked at how easily they are to make, though I won’t lie… industrial pipe projects can get a little pricey, but the smaller projects aren’t too bad.
Supplies
This post contains some affiliate links. I receive a small commission when a purchase is made from these links, at no additional cost to you. This helps support Cherished Bliss and keep the free tutorials coming, thanks for your support!! : )
- (2) 3/4″ Black Iron Pipe @ 10″ length (in the plumbing section)
- (2) 3/4″ Pipe Cap
- (2) 3/4″ Flange
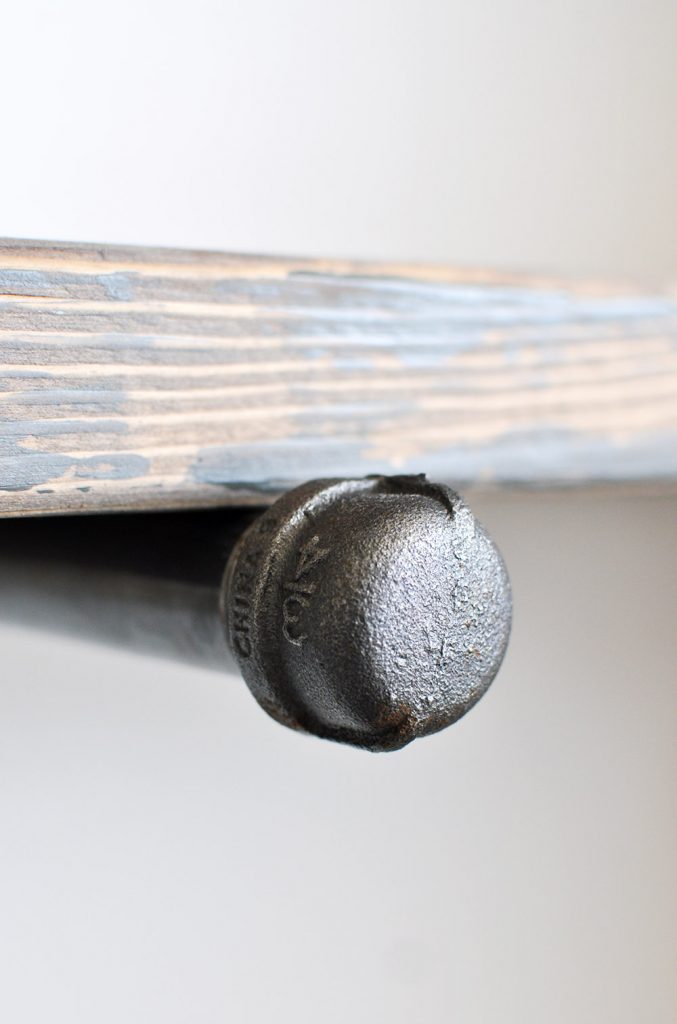
- (1) 2×10 cut to desired length
- Spray Paint Primer
- Black Hammered Spray Paint
- Wall Anchors
- Tutorial for finishing technique can be found HERE
How to Build DIY Industrial Pipe Shelves
I used the black pipes, which if not painted and sealed, will rust over time. I was ok with this, but if you don’t want yours to rust you can prime it and paint it with Rustoleum Paint.
These shelves are petty heavy so you will want to make sure they are properly secured to the wall. Once you have determined where the shelves will be located focus on where the metal flange will be, then mark inside each of the screw holes with a pencil. Making sure you are level (which is extremely important with these shelves), insert your drywall anchors into your markings and hang the flange. The flanges do not come with screws so make sure your screw head is large enough for the holes provided. Repeat for the 2nd flange.

Once the flanges have been attached with a drill and screw, screw on the metal pipes onto them.
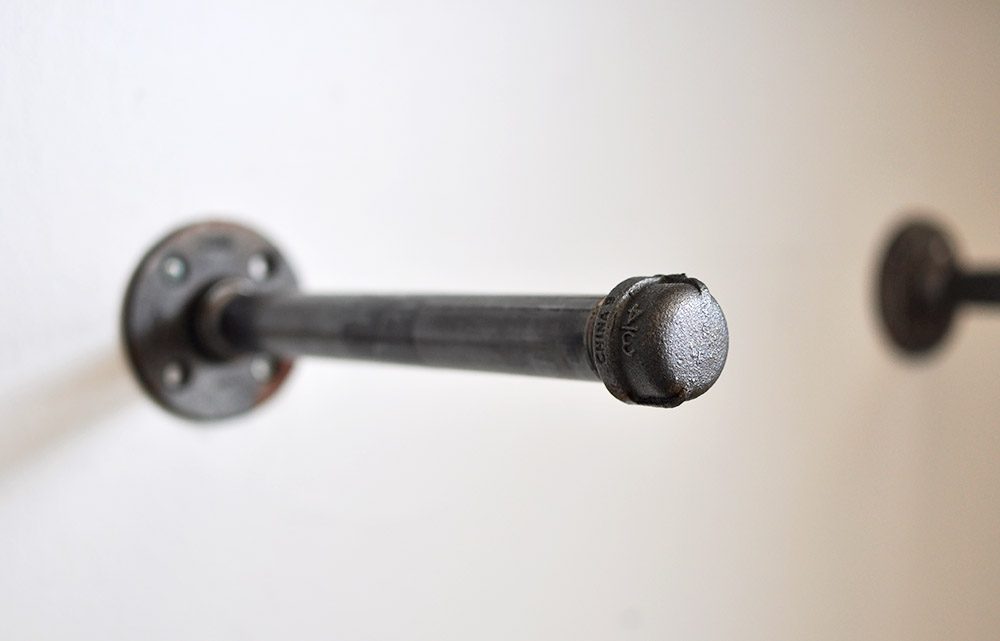
Attach the pipe caps to the end of the metal pipes.

Now put your 2×10 shelf on top of the metal pipes.

You can paint or stain your wood shelf any color you want. I followed this tutorial using minwax stain for these shelves in order to give them a farmhouse distressed look and to match my framed mirror.
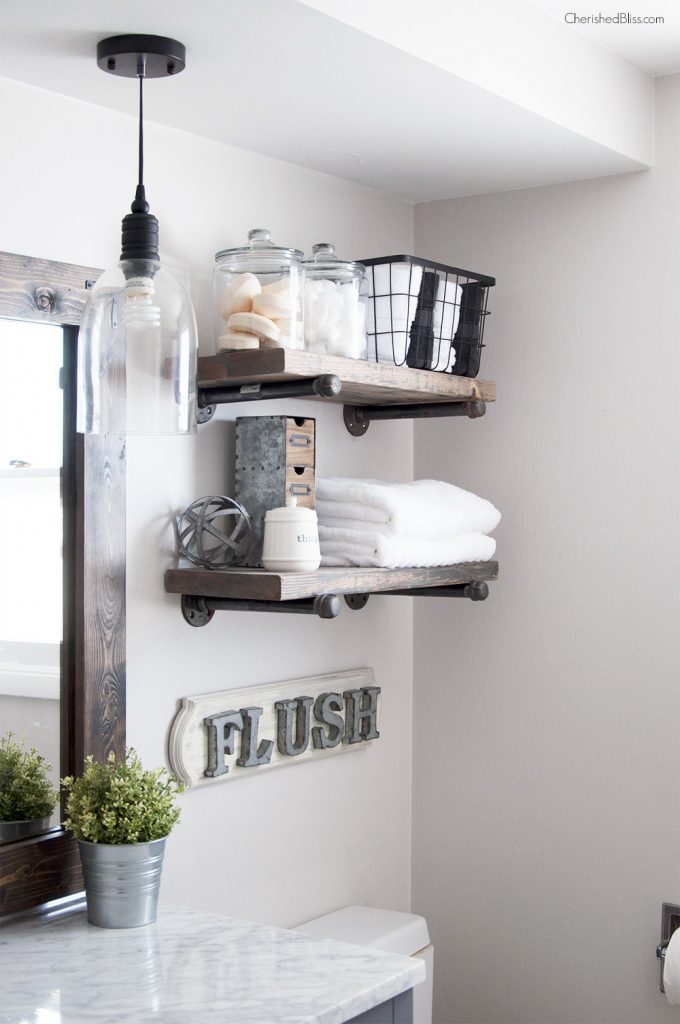
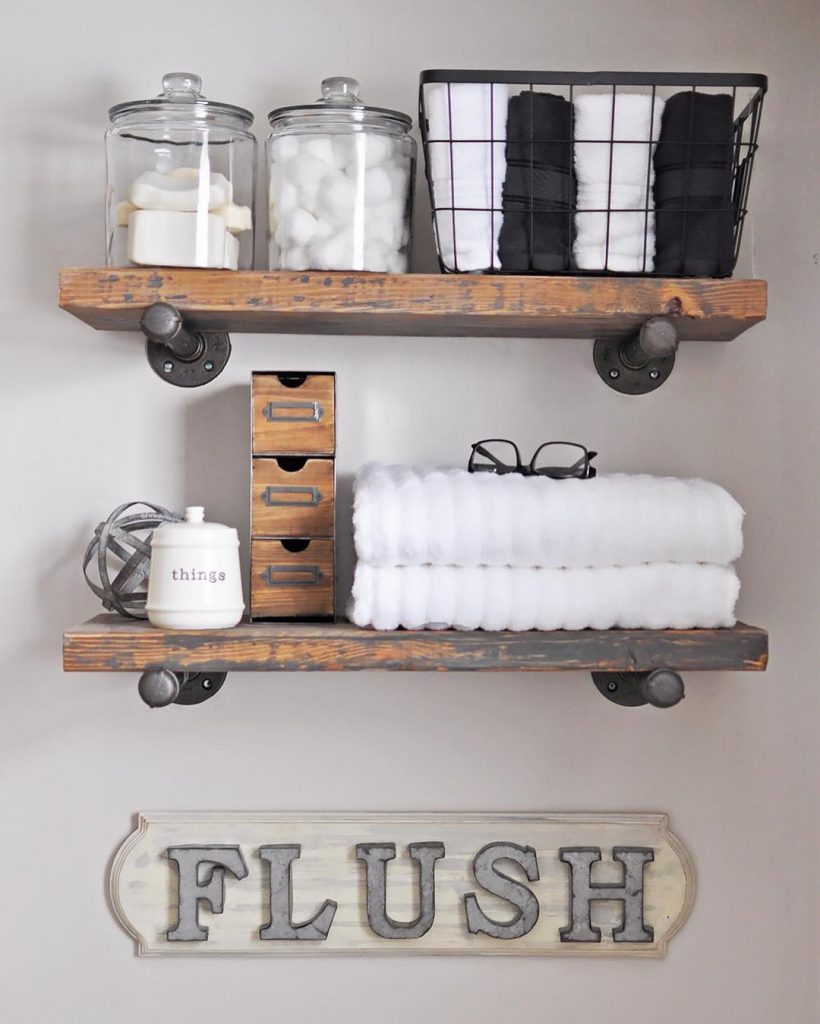
Now comes the fun part – decorating! These are perfect for an industrial look, and can provide functional storage as well!

If you happen to be hanging your shelves on an empty wall, I have some tips on accessorizing bathrooms on a budget you might find helpful.
To see the full bathroom reveal, click here.
And that’s how to make these super easy DIY Industrial Pipe Shelves. Will you be building some? And if so, where will you put yours? I’d love to see/hear about your plans in the comments below! These would also work great in a home office!
For more Bathroom Inspiration check out these posts:
Black & White Industrial Bathroom


Thanks for the tutorial! Love your shelves!
These are super expensive. But really cute
These are great and beautiful in your bathroom.
Your entire bathroom makeover inspired me to do my own. I was wondering why you listed the black hammered spray paint (I was thinking this was to spray lightly on the wood to give it that burnt look). I was also wondering how the drywall hooks held up since the 2X10 and the metal fixtures are pretty heavy. I’m afraid the drywall hooks – screws will loosen over time. The space to hang them does not have any studs.
I am guessing the paint is for the pipes. Maybe they start out as chrome or copper?
The pipe is sold as bare carbon steel. It’s not necessary to paint it, but the primer spray paint seals it from the environment so it doesn’t rust over time. As it’s not critical to prevent rust, you can leave it bare (though you will have to clean it as there is metallic dust that rubs off.) The black hammered spray paint just gives it the industrial look since pipe in work projects has to be coated.
This is awesome! The shelf looks really sturdy and equipped to hold even your heftier bathroom items. Nicely done! Thanks for sharing your idea!
Hi Ashley! How many inches apart are your shelves?
Hi! Just wondering where you purchased piping that size? I can only find really long pieces!!
I get mine at Home Depot. They are usually in the plumbing section in boxes on the shelves next to the really long ones. ; )
Great! Hope I can find these threaded pipes & fittings in UK …
I made this shelf and just live it, thanks for the wonderful ideas.
Just bought materials for there 6ft. Shelves. Cannot wait until they are all done. They will go on a high display wall. Always wondered how I could display things up there, very high vaulted ceiling in my place, this is it for sure. Thank you!!!
Yay!! How exciting! I’d love to see a picture once you are all done : )
Hi Stacy! (and Ashley :))
I’m also planning on doing this with longer shelves (five feet). For your six foot shelves, did you still just use two pipes, or did you use more since it is a longer shelf?
Ashley, if you have any thoughts or advice on that as well, I would LOVE to hear it! I’ve never done anything like this! Thank you so much for sharing your beautiful bathroom and this tutorial!!
-Laura
I would suggest having a support every 3 feet if you are using a 2″ thick piece of wood for the shelf. So if you’re gong 6′ I would suggest one on each end and in the center. for 5 ft, I think it would be ok to just have the two ends, but if you plan on it supporting a lot of weight I would definitely add in a center support. You can always add the center one in after you get the shelf in place, so you could test it out to see if it’s enough support for whatever you plan to put on the shelf ; ) Hope that helps!
I’m wondering if your wood pieces are actually 2×8? My 2×10 seems to deep for the 10″ pipe bracket. Thanks!
hmm… I’m not sure. a 2×10 board should be technically 1 1/2″ x 9 1/4″. It is supposed to fit pretty close to the end cap piece. If you want to send me a picture I might be able to assist further : ) Thanks!!
How far apart did you place the shelves?
I’m not sure. We don’t live in that house anymore. But I measured using the baskets and decor I wanted to use, and just made sure I wouldn’t have too much space in between. If I had to guess I’d say somewhere around the 12″ mark : )
Mine were about 16 in. apart
Muchas gracias , me encantó la idea.
I made these this weekend, with a bit of a variation on colors and stain. SO Easy, thank you for the info! Check it out on Instagram https://www.instagram.com/catharsisandcrafts/?hl=en
love this rustic look!
Just what my bathroom needs! Did you make the flush sign as well? That’s just too cute!
I realize this post might be old but I’m hoping you still see this. Did you just lay the wood on top of the pipes without anything? Is it stable? I want to try and build these this weekend and didn’t know if you anchored the wood somehow. Also, how long are your shelves?
Thanks.
I am in the process of getting mine hung. Love this idea been working on it a while. Asley, love the flush sign. Once my shelves are up I plan on using your idea. Going for the industrial rustic look in a small 3rd bath. Just completed my mirror and mason jar lights. Will send pic once done….so excited. Diana, hopefully you will check back for your answer. I too am concerned with the shelves not moving. Fix…using a drill bit for metal, drill a hole in the underneath of the pipe (middle between the cap and the wall) through the wood. Insert screw. This will keep it secure. Hope that helps.
To the Diana who asked if the shelf “just sits” on top, most of the ones I’ve seen do just sit on top. But you can secure the pipe (underneath) to the shelf with a C clamp. And if you paint it the same color as the pipe it doesn’t stick out like a sore thumb
Hi Ashley, love these and am putting them in my son’s bathroom this weekend… I also had a question about the spray paint… what did you use that for?
Thanks!
Hi- where did the get jar that says things?
Thanks
I’m wondering if your wood pieces are actually 2×8? My 2×10 seems to deep for the 10″ pipe bracket. Thanks!
I spend many an hour browsing through DIY blogs and the other day i saw a light fixture made out of a pipes,. I must say it looked super and these shelves would look great with it,
Hi Ashley! Love the way your shelves came out — hope you were able to recreate these in your new house :)
I am making a longer version of these for our living room. I bought the hardware today, and the threading does not go in completely on either end (i.e. there is still some of the thread showing once the pipe is screwed into the flange and the cap). Is this normal? I guess it will probably be covered by the shelves from the top view, but I’m worried about it showing from beneath, since these shelves will be higher on the wall above the tv. Any thoughts?
Oh, I went with the 3/4″ opening, 8″ long pipe in case that matters (my shelves are 7.25″).
Thanks!
Hello, so what size board would you suggest then, i’m getting ready to make these and thought the same…that the board was to wide? Thanks
The dimensions of the pipe don’t match with the width of the board. A 10 inch pipe nipple measures about 8 inches between the threads and the width of a 2×10 is 9 1/4 inches. The board would have to sit on top of the pipe cap.
We tried to do these in our bathroom yesterday but even with anchors the shelf was hanging lower at the front (combination of wood/pipes seemed to be too heavy for the anchors). We’re switching to 8″ pipes instead of 10″ to see if that helps, and trying a different set of anchors (even though the ones we got were rated for 50 lbs and we had 4 in each flange!) Any tips on securing to the wall? I really don’t want to give up on them!
hmm… I’ve never had that problem before. Is the flange actually pulling away from the wall? Or is it just not level?
Hey Ashley! I can’t wait to try these shelves! Would you happen to remember where you got that “things” container?
Hey, great tutorial! This may be a stupid question, but do you know what the weight limit is on pipes? I’m thinking of doing a full wall of standing bookshelves in this style, but I’m slightly worried that the pipes could break under the combined weight of the wood shelves and all the books. I’ve tried Googling this, but can’t really seem to find an answer. Any ideas?
Hi! I wanted to ask…for the shelving, how much did it cost total?
Hi Ashley!
These are beautiful! I was wondering what size shelves these are, and how much you think it cost you to build?
Hi! Little late getting to these but with the time that has passed, how are they doing in the sheetrock. Im assuming yours aren’t in studs.
Also what did you paint with the hammered paint? If you have time to reply, I’d really appreciate it! Thank you!!
We love how ours turned out in our nursery! Thank you for sharing!
Those are really cute. I think I know right where I want to put them in my house!
Did you use anything to attach the shelf to the pipes? Have you had any issues with them falling off? They look adorable and after searching the internet for shelves, I think I found exactly what I want! Thanks!
I never really thought about just how much organization is required to have a successful warehouse. It makes a lot of sense though. Using the maximum amount of space would be ideal for producing the greatest results.
Why is every DIY site now down by a broad — pretending she’s not dependent almost entirely on thousands of men to think up , manufacture , and deliver all the tools and materials (and basic methods).
Getting annoying.
“I’m independent — screw men. Yay
……um…..can you boys maybe invent and build and maintain everything I use again, thanks jerks”.
That’s how every one of these sites sounds to us.
You both clicked on this – watched at least part of the video and felt the need to make a negative comment because your sensitive male egos were bruised — hmmmmm, wonder why we are saying ‘screw men’….darn, so hard to figure out…
What did you cut your length to for the shelves?
I’m honestly not sure. We don’t live in that house anymore. I believe I measured it pretty close to the width of the toilet though and just made sure it would look good centered up.
Wow… that was way simpler than I expected. I love it!
Hi your page is wonderful We are also in same field supplier of racking and shelving in middle east
Thanks
Mehran Trading FZE.
Really liked your industrial pipe shelf. I will definitely try it. Keep posting innovative ideas.
I was wondering what size shelves these are, and how much you think it cost you to build?
This post is good and useful
https://www.download-boosters.com/
Hope it continues to provide useful information for everyone, thank you
This post is good and useful
https://www.download-boosters.com/
Hope it continues to provide useful information for everyone, thank you
Wow! I stumbled upon your blog post about DIY industrial pipe shelves, and I must say, I’m completely blown away! The level of detail and guidance you’ve provided is truly impressive. It’s evident that you’re not only passionate about sharing your knowledge but also dedicated to helping readers create their own stylish and functional shelves. As the owner of a racking and shelving company in Dubai, I greatly appreciate well-crafted projects like this. Your blog post showcases the perfect combination of creativity and practicality, which aligns perfectly with the values we hold dear at Addmore International. Speaking of Addmore International, we’re a dedicated team of professionals who specialize in providing top-notch shelving and racking solutions in Dubai. We understand the importance of efficient storage and organizing spaces effectively.
Experience Expert Guidance”: Our dedicated team is here to provide you with knowledgeable support throughout your shelving or racking journey. Count on us to guide you every step of the way, ensuring a seamless experience.
Feel free to contact us at https://addmoreintl.com/ for any information you need. We believe in delivering personalized solutions, tailored to your unique requirements. Once again, a huge thank you for sharing this informative and inspiring blog post. It’s through content like yours that we find inspiration and motivation to continue providing exceptional shelving solutions to our valued clients. Keep up the incredible work!
This blog is exceptionally good and informative. Each topic is explained clearly and thoroughly, providing valuable insights and practical information. The detailed approach makes complex subjects easy to understand. It’s a fantastic resource for anyone looking to learn more. Keep up the excellent work and continue writing!
Wow, your DIY industrial pipe shelves look amazing! I’ve been thinking about adding some industrial accents to my bathroom, and your project has inspired me to give these shelves a try. I love how sturdy they look with the metal pipes Forklifts for sale and the distressed wood. The step-by-step instructions are really clear, which is great because I’m not the most experienced with DIY projects. Thanks for sharing your tips on securing the shelves to the wall—I’ll definitely make sure to use proper anchors.