So this project is probably a few months late, but looks like we are still going to get plenty use out of it since this is obviously the winter that never ends! Plus, just because it’s warming up doesn’t mean you can’t hang some pretty decorations on your DIY coat rack! ; )

If you are new to DIY projects then this is a great way to introduce you to some power tools. If you are a veteran, then you will see how easy this project is! My favorite part about it is that the stain is from my DIY Stain that I shared with you a few weeks back. I love how the color turned out! So let’s gather up those tools and make a coat rack!
Supplies:
– 1×6 Cut to desired length
– Coat hooks
– DIY Wood Stain
– Ryobi Orbital Sander
– Ryobi Impact Driver
– Foam Brush or Lint Free Rag
– Clear Shellac
How to make a DIY Coat Rack
First. We bought a 48″ pre cut 1×6 and that just so happened to be the exact size we needed, but if you need to trim it down you will need to cut that with either a circular saw or a miter saw. Once you have it cut to your desired length, let’s sand and stain this baby!
Using your Ryobi Orbital Sander gently sand the wood. My 1×6 wasn’t particularly rough so I sanded it once with a medium grit and then finished it off with a fine grit sandpaper to give it a nice finish. I also made sure to sand the ends and edges so that our clothes wouldn’t snag on anything.

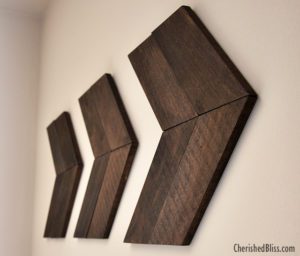
Second. Now it’s time to whip out your DIY Stain. This stain is definitely different to work with rather than your traditional store bought stain. It goes on thing and takes some time to see the color. The first coat will look like you did nothing, but you did trust me. Here is a little photo breakdown of the process. You don’t have to wait very long between coats, about 10-15 minutes.

You will want to keep applying coats until you get the color you are happy with while it is still wet. Then once it dries it will look very flat and chalky. Don’t have a panic attack like me. Once you apply your Shellac, it will look fabulous! TIP: I added a few extra coats to the edges to give it a little dimension, but this is optional
Third. Apply one coat of shellac, let dry. Lightly sand with your fine grit sandpaper. Be careful to not apply to much pressure when sanding. Apply a second coat of shellac. You can repeat this process until you are happy with the look.

Fourth. Once everything is dry, it is time to attach your hooks. To do this you will need to first measure it out and figure out the placement. Start with the very center of the board. This is where the first hook will go. Then do your two outside hooks. Remember, you don’t want these to be on the very edge, so figure out where exactly you want them to be and mark it. Then for the remaining two hooks measure the distance between your middle hook and your outside hook and place a hook in the center of those. The hardest part about this is making sure the hooks are evenly space and level, take your time and re check everything! Using your Ryobi Impact driver, attach the hooks with the provided screws.

Fifth. To hang, we just used wood screws to attach the coat rack directly to the studs. It just so happened that we could replace one of the hook screws with a wood screw to get it directly into a stud, and the other one fell between two hooks. Then we just added another screw opposite the one between the hooks for some symmetry. If you don’t want your screws visible, you will need to counter sink them and fill with wood putty.

It is so nice to finally have a place for all our coats and snow pants. Our coat closet was OVERFLOWING with shoes, hats, mittens and everything else the winter requires. This gives us a nice place for those every day things! : ) Have you made a DIY Coat Rack? I’d love to see, just leave a link in the comments!

If you are interested in some more great DIY Wood projects, be sure and check out Ryobi Nation where you can not only browse beautiful projects, but you can upload your own!

Love this post? You might like these too!
DIY Wood Stain

DIY Wooden Arrows
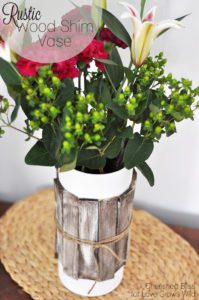
Rustic Wood Shim Vase
Or you can click here for all my DIY Decor Projects
Love it!! My daughter was just telling me yesterday that she needed a rack that had more hooks that were spaced further apart. Now, I know how I can do it. Thanks for the tutorial!!
Thanks Crystal! That was exactly what I didn’t like about the store bought ones. They are so close together. That just doesn’t cut it for winter wear! : )
This is really pretty!!! Looks great :)
So pretty and functional. Love it!
This looks great! I would love it if you joined and contribute your awesome posts at my link party at City of Creative Dreams on Fridays :D Hope to see you there at City of Creative Dreams Link Party
Really pretty coat rack and great thinking on the spacing between hooks.
Where did you find those hooks? They are exactly what we’re looking for!
I love this! I’ve started prepping to make one just like this, but I’m having trouble finding hooks. Where did you find the ones that you used? Thanks for sharing your project!
They are from lowes over by all the knobs and pulls. These are from about a year ago, but they should have something similar at least : )
Hi! Thanks for the tutorials.
I also checked the DIY wood stain one. Both were pretty helpful!
I do a have some questions for you. How did you get the final wood to be that color? Did you add more coats or did the wood just got darker in time? How long does each coat take to dry for you?
Thanks!
Fanny
A piece of wood must first be split or whittled to a size that is slightly larger than needed before being inserted through the hole in the dowel plate to form a dowel. The hole’s pointed edges sheared off the superfluous wood.
Click here https://windowcoveringusa.com Window Covering Services in USA
Osh University stands as the epitome of excellence, acclaimed as the best university for mbbs in world. Immerse yourself in a transformative learning environment where cutting-edge education meets a commitment to shaping the future leaders of medicine.
Shalamar Hospital is your destination for expert audiology services. Our audiologist are equipped with advanced knowledge and technology to address all your hearing concerns, providing the care you deserve.
Jewelgalore features a stunning selection of stud earrings . Explore our collection to find elegantly designed pieces that add a touch of sophistication and charm to your style.