My new little entryway area has been my favorite place to look at these days. Maybe it’s because for a while it was the only spot in my house that was clean. Or maybe it was because I am just head over heels in love with my new DIY Rustic Farmhouse Bench. Either one of those works for me; ) Last week I promised I a tutorial on how to build my new bench! So time to get out those tools and let’s build some furniture!

Please note: some of the following links are affiliate links to help support this blog and the free tutorials! Thanks for your continued support!
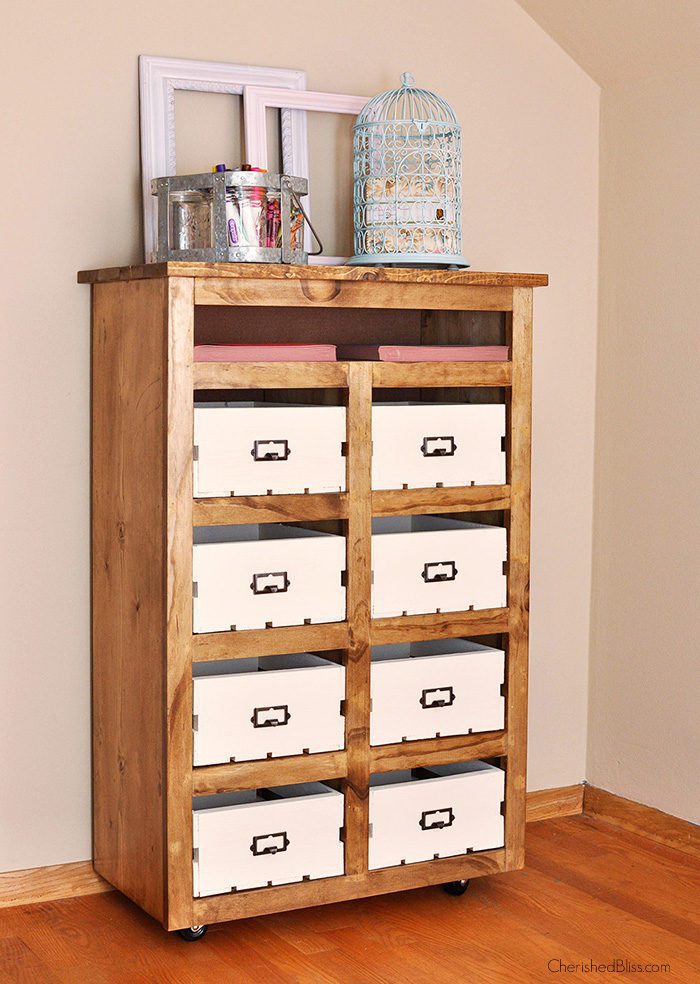
I built this bench specifically to house these adorable galvanized bins (from walmart.com) so if you want to use something else, you may need to adjust the measurements.
Supplies:
3 – 1×4’s @ 8′ (this leaves you with an extra 4′ piece)
3 – 1×6’s @ 8′
2 – 1×6 @ 6′ (You may be able to substitute this with scraps)
1 – 1×2 @ 8′
Kreg Jig & 1 1/2″ screws
Square
Orbital Sander
Impact Driver
Miter Saw
Wood Glue
Brad Nailer
DIY Wood Stain
Shellac
Cut List:
5 – 1×4’s @ 4′
9 – 1×6’s @ 20″
6 – 1×6’s @ 16 1/2″
4 – 1×2’s cut to size approx 21 3/4″
Notes:
– I used wood glue in all my joints, and I suggest doing this for a stronger build.
– Always make sure you square up your project as much as possible.
– Check for straight boards when purchasing, they can be warped.
– I often find bundles of scrap 1×6’s at Home Depot or Menards for less than $3 eliminating the need for the 2 1×6’s @ 6′. Might want to check for that to save on cost!
How to Build a Rustic Farmhouse Bench
1. Make all your cuts (listed above) except for the 1×2’s I suggest measuring those each individually to fit in place.
2. Make the legs. Take 3 1×6’s @ 20″ and attach using pocket holes and 1 1/2″ PH screws. I also added a pocket hold at the top of each 1×6 to attach the top of the bench where the red x’s are. Repeat for the other 2 legs.

3. Build the top. With your 5 1×4’s attach using pocket holes and 1 1/2″ PH screws. When placing your middle set of pocket holes you want them to be slightly off center because you will be placing one of the legs in the center of these and you can’t screw into a screw ; ) Not that I would ever do that or anything!

4. Sand all your pieces. I also went ahead and finished my legs, top, and my 16 1/2″ 1×6’s because I was building in my basement and it was just easier for me to stain before fully assembling the bench. I used my DIY Wood Stain, except I left the coffee grinds out of this batch. You can see how to make that here. The good thing about it is that the fumes aren’t bad so I can stain it inside : ).
5. Attach the legs to the top. Starting with your center leg, attach using your pocket holes and PH screws. Center your leg with the center of your top piece when attaching.

Then you can attach the 2 outer legs. My legs have a 21 3/4″ space between them.

This leaves for about a 1 1/8″ overhang of the top piece.

6. Shelf supports. Attach your 1×2 shelf supports using a pocket hole and PH screws. Your 1×2’s should be about 9 3/4″ from the bottom of your 1×4’s. This will leave a slightly bigger space in the top section than the bottom, but that’s because you have to account for the 1×6 the buckets actually sit on. : )
7. Nail Shelves Down. Next you will just simply nail down your 1×6 shelves for your adorable galvanized bins!

8. Finish. Like I mentioned, I decided to stain mine before I fully assembled it just because it was easier for me. But here is how I finished my bench. I applied 2 coats of the DIY Wood Stain I mentioned before (minus the coffee grinds). Just a little FYI it looks kinda weird until you seal it. It has a very flat looking finish when dry (see picture below). After both coats were dry I applied 2 coats of the Zinsser Clear Satin Shellac. I decided to go with this because it dries so quickly. You can certainly use a poly if your prefer.

Now you can just enjoy your new piece of furniture and admire your work! I hope you love this bench as much as I do!! Have a beautiful day and happy building!

Looking for more things to build? Check out these…

fantastic! I’ve been looking for something like this for our entryway. quick question-can you sit on it? was thinking it would be a great shoe/coat/mittens-putting on/taking off station. thanks!
Hi Amber! I sat on mine several times and wiggled around to make sure and it seems to be very sturdy! The shelves really keep it from wobbling! If you wanted it to be really extra sturdy you could easily make it with 2×4’s… you’d just need to adjust the measurements some. : )
I love this so much! Pinned and shared! I would love it if you stopped over and joined my party!! You have some amazing projects and I would be honored to have you linking up to share with my readers! Have a wonderful week and I hope to see you at the party! Starts in 2 mins!!
Jess
Thanks so much Jessica!! : ) xoxoxox
I love love love this! And I can’t believe those galvanized bins came from Walmart. Definitely thinking this would be awesome in our playroom one day for toy storage. Pinning!
Thanks Lauren! Yes I am seriously loving the galvanized bins! Word on the street is that they will have some galvanized trays coming out soon! I’m waiting patiently : )
Gorgeous! Pinned and hope to build soon.
Thanks so much Heather!! I would love to see it when you build it! : )
This is so perfect! I love how it turned out. Such pretty details with those bins.
Thanks Marie! You are too sweet!! : ) xoxox
Love this Ashley! And those galvanized bins… wow! Perfect combo!! Gorgeous!
Thanks so much Kendra! We are loving those bins! They are great for hiding all the little toys around our house ; )
GORGEOUS! Featuring you thins week!
xo
Thanks Desiree! Always an honor to be featured over on your blog!! : )
I love this tutorial! My husband works in construction so I’m hoping he can get me the wood for free, that would make me love this project even more! LOL.
I don’t know how you moved from Texas to the Midwest. I’m a Texas gal and couldn’t imagine the change.
Thanks Brittany! Free wood is always the best ; )
It was kind of hard at first, but luckily I prefer the cold to the heat so it wasn’t horrible. Although the winters here are just as bad as the summer’s in Texas ; )
I am in love with this bench & those galvanized buckets! I’ll be taking a trip to Walmart asap!
Thanks so much Sara! Those buckets are awesome for getting stuff out of sight!
This is great! Do you think that it would still be sturdy if I made it 80 inches long?
Looking good in BHG, December 2015. Where did you purchase the galvanized bins for your faux-mudroom?
Thanks
Aww thank you so much! I still haven’t seen a copy yet. I have to find one!! I actually purchased those bins from Walmart. I don’t see them too often in stores, but you can get them online : ) Thanks for stopping by!!!
My husband is going to build this for me for Christmas :) Walmart.com has two sizes of bins. Are yours Large or Small. (Large measures 13’x11′ on the bottom…I don’t know the measurements for the Small).
Thank you so much.
Hi Sarah! Yay, so exciting! I have the small ones. They measure 11×8″ on the bottom : ) I would love to see a picture when you are all done! Have a great week!
what are the dimensions of the bins that you used? Thanks!
Love this bench!. Couple questions for you… Would this be an appropriate project for a newbie?. It would be my first woodworking experience!. Also, would you have the measurements/ sizes of your bins?. Walmart is no longer stocking the bins from your link????. Also, is the bench study enough to sit on?. Thanks so much!
Hi Tracy! Yes, it would be a great beginner project! My bins measure about 11×8″ on the bottom… online it says they are only available in stores right now :( Hopefully you can find them! Yes, the bench is sturdy enough to sit on for like putting on shoes, but I would let my kids jump around on it or anything, just because it doesn’t have any cross support, but if you are just sitting it is definitely strong enough, I’ve stood on it multiple times with no issues at all! Hope that helps! Would love to see how yours turns out if you end up making one! : )
Your link for the bins takes me to “small galvanized bins”. Is this accurate? Or did you use the large ones?? Thanks!! :)
Hi! Just found this and am gathering supplies. However, I can’t find anywhere what the finished dimensions are. I apologize if I missed it, but could you tell me?
Hi Jackie, It measures about 17.5″ x 4′ : ) I don’t think I technically included that but I added up the dimensions of the lumber. Lumber can vary slightly, but that should be pretty close for you! : )
I’m making this today and it’s going well so far. The only hiccup I’ve encountered is the screws are too long. You need to use 1 1/4 inch screws not 1 1/2. I checked on one of the legs and the 1 1/2 screw went through the other board. Other than that it’s been going great. Thanks so much for the tutorial. I’ve had this bookmarked for over a year so I’m glad to finally be doing it.
We’re a bunch of volunteers and opening a new scheme in our community.
Your site provided us with useful information to work on. You’ve performed an impressive process and our entire
group will be grateful to you.
Very well done! I am impressed with your DIY skills.
I wish all the best.
Thank you for this Great and informative site! snow plowing syracuse
Appreciating the persistence you put into your ideas and detailed information you provide. tree trimming
Wow! This could be one of the most useful content we have ever come across on the subject. Actually excellent info! pruning
Great stuff! I appreciate the work done here! painting long island
Appreciating the persistence you put into your ideas and detailed information you provide. https://www.cesspoolsonlongisland.com/services/cesspool-septic-maintenance-long-island-ny
Join the ranks of excellence at Osh University, consistently ranked among the international medical universities. Experience a cutting-edge education that propels you toward a successful medical career on a global stage.
Shalamar Hospital’s Laser Skin Complex offers advanced dermatological treatments. Visit us for cutting-edge skin care services, and achieve your desired skin goals with expert guidance.
Adorn yourself with the regal allure of Pakistani bangles available at Jewelgalore. Our exquisite collection celebrates the traditional artistry and craftsmanship of Pakistan, allowing you to express your unique style with grace and charm.