We have been in our house for 2.5 years and our upstairs bathroom was one of the first things I wanted to remodel, and here we are finally finished. I think I’ve mentioned before that this house was a kind of flip for us, one that we could live in and enjoy during the process. This is both amazing and sad for a blogger. It has provided me with wonderful content, a full kitchen remodel, a new baby, and memories beyond my imagination. But on the other side of things I have poured my blood, sweat and tears into this house slowly turning it into a home, and to just walk away from it one day will be difficult. Well I’m digressing, today isn’t about a trip down memory lane, but hopefully to teach you how to Frame a Bathroom Mirror. See the FULL REVEAL HERE!

DIY Bathroom Mirror
I think the thing I got the most comments about was our bathroom mirror. It’s a HUGE mirror, 60″ to be exact and to buy a replacement that size was simply out of our budget. Sometimes I am reminded by my loving husband that this was an investment house and while I have been bringing my own style into this home, we still can’t over improve or spend unnecessary funds when we know we won’t be in this house forever.

Gosh, I just can’t seem to stay on point today. Must be the coffee I’m drinking as I type this up!
Ok, but really. This is a fairly simple project that consists of drying time more than anything else.
Frame a Bathroom Mirror Supplies:
This list of supplies contains affiliate links. There are no additional costs to you by clicking on the links however, it helps support this blog. ;)
- 1×4’s (Number depending on the size of your mirror)
- Miter Saw or Miter Saw Box & Hand Saw
- Staple Gun & Staples
- Wood Glue
How to Frame a Bathroom Mirror
Take Measurements & Cut the Wood
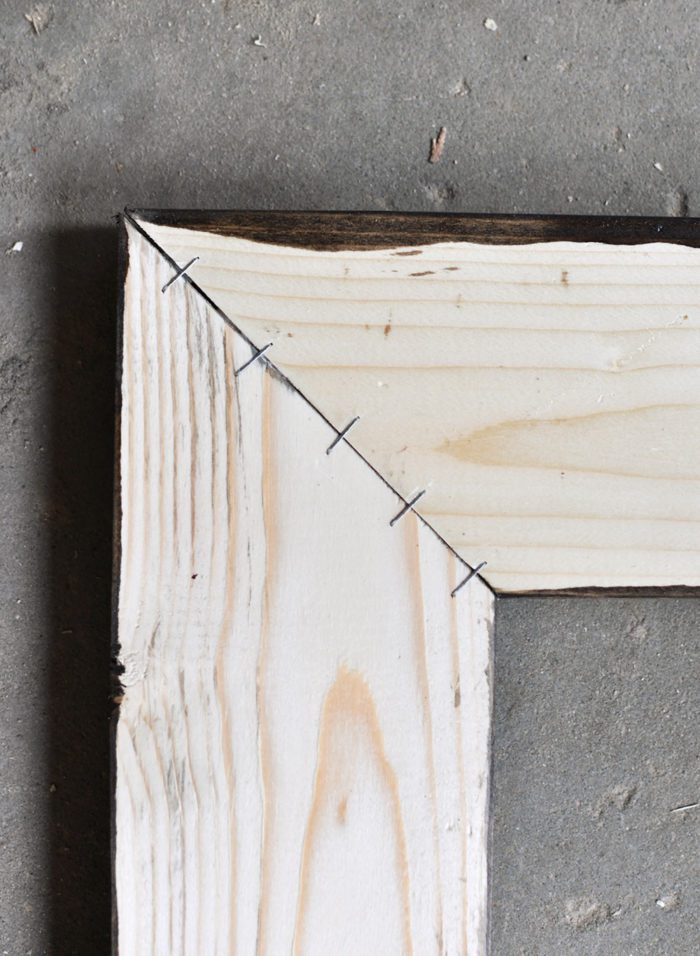
First, you have to determine how big to build your frame. This frame is built with mitered corners, meaning cut at a 45-degree angle to create a 90-degree angle when paired with another board. I wanted mine to fit exactly over our current mirror since it was already the width of the vanity. Our mirror was 60″ wide, so this was my measurement for the long side of my horizontal boards. The mirror height was 36″ so this was the long side of my vertical boards. You’ll see it in the picture below. So when making your 45-degree cuts, you need to make sure your longest side is the correct measurement, not the shorter side.

One you have all your pieces cut, it’s time to attach them. There are a few different ways to do this, but I wanted to share with you the quickest and least messy way! You’re welcome! ; )
Glue and Staple the Boards for the Bathroom Mirror Frame
Flip all the boards over so the back is facing up. Add wood glue to one of the mitered edges and line up your joint. While holding it in place, staple your board together directly over the seam. Let the glue dry for a bit before moving it.
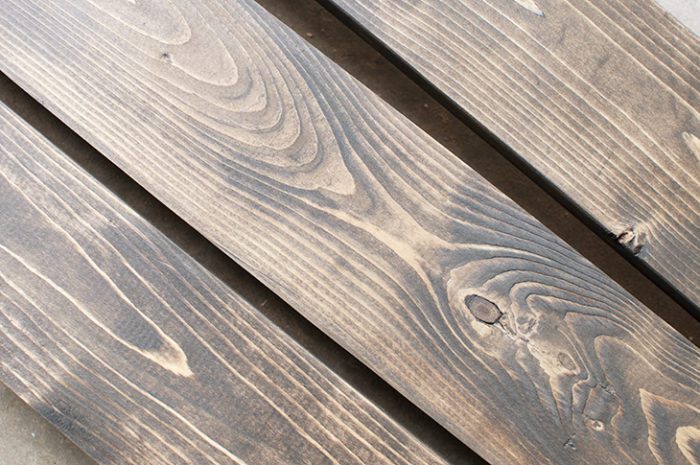
Finish Your Wood
I’ve actually got a tutorial for this coming very soon, but you can essentially finish it anyway imaginable :) Here’s how mine looked for reference.
Add Decorative Braces
Now it’s time to add those “L” shaped braces. First I spray-painted mine with some Black Hammered Paint, but again, whatever fits your style. Then just attach the braces on the front of the frame and it’s ready to go!

Hang the Mirror
To hang the mirror I actually used command strips. I’m always changing my mind and this method isn’t permanent so it worked out great for us, but the sturdiest way to do this would be gluing it directly to the mirror, after you make sure your mirror is secure of course! TIP: If your mirror is like mine and had those ugly plastic clips, replace those for some washers and it allows you to get the frame pretty much flush with the mirror!

I hope you enjoyed this tutorial on How to Frame a Bathroom Mirror!
See the FULL REVEAL HERE!
Looking for more bathroom inspiration? Check out our Black and White Industrial Bathroom:


I would love to see a picture of what you mean when you say to replace the plastic clips with washers. Those darn plastic clips are what is holding me back from framing my mirror.
I agree. I would like to see a picture of the washers used instead of the clips also.
Hiya. Absolutely love this. Just wandered at the bottom where the frame meets the counter should you put a bead of silicone in there. Any water getting up behind the frame
Aw thanks so much! Yes! I believe I did add a bead of clear silicone caulk to prevent that. We also caulked between the countertop and the wall before I framed out the mirror ; )
Me too please! :)
Your mirror looks amazing!
I’m so sorry for the late response guys! We just made a cross country move. I actually don’t have pictures of the washer, but here is a link to someone else who also used washers: http://www.somewhatsimple.com/how-to-frame-your-bathroom-mirror-over-plastic-clips/ Hope that helps! Thanks!
i would love to see how you made those matching shelves.
I’d like to know the color of the blue finish on cabinet please. Lynn
Me too! It’s gorgeous.
Hi Lynn, the cabinet is actually a gray color, sometimes the computer screens make it look a little funny. But I’m not sure what the actual color is. We ordered the vanity from Wayfair, and that was how it came. Wish I was a little more help!
The is a video on youtube show to use the washers
I agree. I would like to see a picture of the washers used instead of the clips also.
Beautiful renovation. I would love to know what stain you used for the framed mirror. Thanks!
I agree… we need to see photos of replacing the clips with washers. And you talk about spray painting hardware… There were no pictures of what you were talking about.
I just did this project and I just chiseled out a space in the wood. Easy. If you don’t have a chisel, a hammer and flat head screw driver will do.
Also, use I used liquid nails because regular glue might not do the trick.
Did you use liquid nails to glue the wood to the mirror?
The ugly plastic clips….how do you get rid of those??? I don’t understand what washers are
Washers are metal rings that have a whole smaller than the head of the screw. Here’s a link to a tutorial that shows how exactly to make the switch: https://www.somewhatsimple.com/how-to-frame-your-bathroom-mirror-over-plastic-clips/
Yes, me too! I don’t understand how the frame will be flush with the mirror and the clips not visable.
Most builders glue those mirrors to the wall before adding the plastic tabs. I’ve taken down plenty of them & all were glued. I framed my mirror & the only thing I did differently was I painted the back of the frame in a flat black because you can see a small portion of the raw/unfinished side in the reflection after mounting. Love the tip for stapling it together before gluing it on the mirror.
Yes! Please show us 😁 I’m in the process right now and stuck
Wow, this post could not have come at a better time. I had just removed my rectangular mirror with the plastc clips, and was online searching for a new mirror, when I decided to take a break & do some blog reading. I love how your framed mirror looks and would love to do this to mine instead of purchasing a new one. My mirror was only attached to the wall with the clips, so I also need to see how you changed out the clips for washers.
Thanks so much Liz! I don’t have pictures of the washers, and actually just moved across the state, but here is a link to another blogger who used washers instead of plastic clips : ) http://www.somewhatsimple.com/how-to-frame-your-bathroom-mirror-over-plastic-clips/
2 questions! You said you stapled after gluing the frame together and to make sure glue dry before removing. Removing the staples? If I read that right – do you have to remove staples? Think it wouldn’t hurt anything to leave them in.?
Can you put the L bracket on backside so it doesn’t show? I loved yours but would rather have it not showing.
Hi Becky, That was probably a typo on my part, I meant let the glue dry before moving the frame, just because it’s so long and it kinda twists when you move it, so it’s better to just let the glue dry first to avoid any problems, you definitely want to leave the staples in there!
As far as the L bracket is concerned, that was really just for the look of it, it’s not entirely necessary to use those, although it does add a little stability, so if you are doing a large mirror like I did then you could certainly add them to the back, but just remember those will be up against the mirror. But if your frame will actually be on the wall rather than the mirror, that would work out great for you! Hope that helps!
Hi! Do you have a picture of the “L” shaped brackets you used? Did you get them from Home Depot?
Love love love this! Thank you so much! I too would like pictures of the “washers” you used to replace the plastic clips.
Hi Kelly, I actually don’t have a picture since we just moved out of that house, however I did find another blogger’s tutorial who did use washers, you can find it here: http://www.somewhatsimple.com/how-to-frame-your-bathroom-mirror-over-plastic-clips/ Thanks for stopping by!
I love that mirror! Usually when I want something, I just go and buy it. I can’t do something myself. but this time you inspired me! I will do that mirror for my bathroom. I will place it next to my window so it can show its beauty more. Thanks for the detailed guide!
Thank you! So glad you found inspiration : ) You can totally do it! I would love to see how your’s turns out if you want to share a picture you can always email me!
where is your vanity cabinet from? beautiful!
It is from Wayfair. There is a direct link to it at the bottom of this post: https://cherishedbliss.com/industrial-farmhouse-bathroom-reveal/ : ) Thanks for stopping by!
I would also like to see what it looks like when you replace the plastic clips with washers. My mirrors need help badly and your tutorial is the look I’m going for.
I actually don’t have a picture since we just moved out of that house : ( however I did find another blogger’s tutorial who did use washers, you can find it here: http://www.somewhatsimple.com/how-to-frame-your-bathroom-mirror-over-plastic-clips/ Thanks for stopping by!
Thank you so much! It all makes sense to me now. :-)
Thanks, Answers my washer question. Now ready for the project
My Ashley, you really out did yourself here. I adore what you did, and the framing work is WOW!
I am so glad I came across your blog! My hubby and I do the “live in it-flip” with all our houses too! I am always painting and making it homey just to pack up and move on to the next. It is hard sometimes! And I totally agree with the over improving part. It’s hard not to add all those perfect little touches to a house. Your mirror looks amazing! This is a project I will be tackling soon too. Thanks for sharing! ????
Hi I was wondering what type of command strip you used that were strong enough to keep the frame up?
Hi! What color/ kind of stain did you use for this project? It is beautiful!
I would also like to know this!
Yes! What color stain did you use for the wood frame?
I want to know too!
Hey love the idea but how and what are the washers to hang mirror? Thanks for the info. :)
I also would like to know about the command strips. I want to do the same thing to our mirrors, but I am worried they wont be strong enough. Like you, I prefer not to do anything with liquid nails as its very permanent.
Hi! I LOVE this frame and can’t wait to try and build one of my own. Did you attach the command strips to the mirror then? So the frame must be pretty darn flush with it if the washers don’t get in the way right? Also, have you had good luck with the command strips being strong enough? Thanks so much.
Hi Sarah, I attached the command strips to the frame and then to the mirror. I didn’t actually pull the mirror down and press on the strips like the directions say, because it was just too big to do that, especially with the faucet in the way. I did use way more than the suggested amount to make sure it would hold. I haven’t had any issues thus far, so it seems to be working pretty good. Also when I did attach it to the mirror I held it in place and added support to keep it there for about 24 hours (just some stacked books or something) so that it had time to fully adhere : ) Hope that helps some! Let me know if you have any other questions!
I would love to know where the pump/brush set are from sitting on the bathroom counter?? This bathroom is stunning!! We are going to attempt. Thanks for the inspiration!
I have my stained/cut wood drying outside but now as I’m trying to glue and staple the corners I’m seeing my wood has started to bend slightly in spots. I’m worried this will make it difficult to attach to the mirror. Any tips for straightening/flattening the wood back out?? Thanks!!
Hmm… I’ve never had wood do that after I started working with it, unless I left it out in the rain. Was it straight to begin with? Sometimes wood can be warped when you buy it from the store, so you have to dig through sometimes to make sure it’s straight and doesn’t bow in any direction. The only thing I can suggest is once the stain is completely dry you can mist it with water and then put something on top of it to keep it in a flat position. Otherwise I’m afraid you might have to get new boards. If you have a picture I might be able to have a better idea of what you’re talking about. You can email me at ashley.cherishedbliss at gmail . com
What glue did you use to glue the frame to the mirror? Wood glue or something else? Thank you!!
I actually used the command strips to hold it in place. I used more than what is required, but if you would prefer to use a glue, Elmer’s has a pro bond glue that is meant to bone a porous surface with a non porous surface that would work great for this application! Let me know if you have any other questions!! Thanks so much!
Hi! I love this look! Where did you buy the decorative brackets?
The whole bathroom looks amazing! I would love to know how you made the shelves above the toilet or where you purchased them. Thanks!
Hi,
I LOVE this mirror idea. We have a huge mirror – I was trying to decide if I should put a middle piece in to make it look like 2 big mirrors.
Which command strips did you use? were they the new ones that are kind of velcro-like for pictures?
I’d love to know how you made the shelves too!
Hello! I love everything about this bathroom, and have a few questions for you :) What is the wall color? In one photo it looks white but in another not so much. I am currently redoing a half bath/laundry room (I know, it’s as awful as it sounds) and would like to do it in this style. Also, and I may have missed it in the article, what stain did you use? Thank so much in advance!
I agree!!!! I love your bathroom and would like to know what color you have on your walls. We already have the blue/grey cabinets with the light grey counter top. And I love the matching shelves.
Where did you purchase the brackets?
Brilliant x
Lovely look! How would you make the frame fit over the holding l-shaped chrome strip that the mirror sits in?
Would the frame have to be routed out to accept the wood frame sitting flush?
Hi there! Love your Bathroom. What kind of stain did you use on the wood and what kind of wood?
Would love to know what colour stain you used. Simply beautiful!
Hi Ashley ,
I love your bathroom remodel. Looks amazing. I am going to try and frame my mirror. In your tip you mentioned To replace the plastic clips with washers. What type of washers do I use?
Thank you
what type of flooring do you have in this bathroom
Gorgeous! What color is the stain? Did you do some weathering to the wood? I’m doing this exact thing to my mirror and I have the same vanity. I would love to hear back!
love this! what are the things holding up the shelves?
Hi Julie, that is just metal piping from the plumbing section of a hardware store. I have a tutorial for those shelves here: https://cherishedbliss.com/build-diy-industrial-pipe-shelves/ : )
Great job! It is a wonderfully inexpensive way to upgrade a builder-grade mirror without having to replace it.
Apologies if someone already mentioned this (as I did not have the time or inclination to read all comments), but one thing that needs to be done if the frame sits on top of the mirror glass at all is to finish the back side of the frame (at least an inch or two from the inside edge). Otherwise, you will see that edge reflected in your mirror, and it looks bad! It looks like you did this in the finished product pictures, Ashley, but that wasn’t as evident in your photos of the back side in progress). The same thing applies to the frame fastening method: make sure to keep any glue away from the inside edges. We have also actually used small furring strips around the mirror (if you have space around it) to attach the frame to. This helps to make up for the difference in thickness between wall and glass if the frame overlaps only partially. ????
Love your bathroom! What color did you use on the wall and what color stain. Thank you!
I first found this tutorial through another site (and links back to this one) which lists the supplies more in detail (stain color..etc) http://akadesign.ca/diy-farmhouse-bathroom-mirror/
Here is what you will need!
Supplies
Wooden Frame Mirror – get the tutorial here (or build your own version)
Minwax Jacobean Wood Stain
Lint Free Cloths
Corner Brace (4)
Black Hammered Spray Paint
Gray Paint (I used Sherwin Williams Urban Bronze)
Paint Brush
Helmsman’s Spray Varnish
I love this!!
Did you follow the same technique to stain the mirror as you did on your desk and shelves tutorial? The mirror looks like straight stain without the gray paint. Also, where did you get the L braces?
I’d love to know where you got your vanity. I love it!
Where did you purchase your bathroom vanity from that is pictured?
Hi, thank you for the information. How do you attach the frame to the mirror and what did you use the hand saw for?
Thanks for your help!
I might have missed this, but what color stain did you use to finish the wood?
Love it!!! Thanks so much for all the information. I need to do this to my mirror. Thanks again.
Hi! Wondering what brand and color stain you used!? Thank you! I’m not crafty enough to build on my own so someone is doing that part for me but hoping to stain a similiar color!
Hi Wendy! Here is the process I used https://cherishedbliss.com/farmhouse-bathroom-mirror-tutorial/. It’s a mix of stain and paint, but pretty easy to do : ) Good luck!!
Hi! I absolutely love this, but I have 2 questions. What stain did you use and where did you buy the corner brackets? Thanks!
Thank you!! The corner brackets are from any hardware store, I think even Walmart sells them ; ) And here’s the tutiral on how I painted and stained the mirror https://cherishedbliss.com/farmhouse-bathroom-mirror-tutorial/
Hi Ashley! Love this idea, we were actually considering doing this to our mirror as well. We made the same kind of industrial shelves in our bathroom so I love how you tied in the frame to the shelves with the stain and brackets! Thanks for sharing on Merry Monday. Pinning!
Hi there
My husband and I are trying to frame out our mirror in our bathroom and it looks exactly like yours. I’m curious as to what type of glue to use to glue the frame onto the mirror.
Also what exactly do you mean by switch out those plastic clips for washers? I have the plastic clip that hugs the mirror……I almost want to say that’s what is holding our mirror in place. But I know exactly what you’re taking about getting it flush with the mirror. Could it work without switching those out?
Thanks so much for your help.
Hi Tina,
I didn’t actually glue mine, I used command strips. But if you are looking to glue yours, I would suggest Elmer’s ProBond. It is made to make a porous surface (the wood) bond with a non porous surface (the mirror). You would need to tape it in place to hold it there as it dries. Maybe even apply pressure for some time to make sure it adheres well. And then here is a tutorial that shows how to replace the plastic clips with the washers: https://www.somewhatsimple.com/how-to-frame-your-bathroom-mirror-over-plastic-clips/
You could leave the plastic clips, but you would need to measure exactly how far apart the are and carve out a hole for them to sit into the wood. You could do this with a router or a wood chisel. The router would certainly be easier though. Hope this helps! Let me know if you have any other questions!
Thanks!
I absolutely love this! I do have a question about the particular command strip you used. I have been look at their products and cannot determine what would work best. I scrolled down to see if anyone asked the same question and I saw that you mentioned you had to use more than expected. How many did you use?
Hi Elizabeth. I used the command strips that were weighted for the highest weight I could find. I think I used 4 strips on each board, so 16 total.
Hey! I just stumbled upon your post! Do you have the information about the pendants? I am looking for some just like this for our bathroom!!
Thanks!
Hi Katherine. I bought them from Amazon.. here’s the affiliate link: http://amzn.to/22Ao6nM
Hi, I see that others have asked about your bathroom wall color but have not seen a response… Would you please let me know what color are on the walls? Great job on the bathroom!
Hi Tamra, I apologize for the delayed response. The color is Sherwin Williams “Simple White” : )
I came across this blog on Pinterest. Although I love the wood frame for the mirror and plan on tackling mine in the next week, I’m more interested in the toothbrush and soap dispenser in the picture. Could you please tell me where they were purchased from? They would look perfect in it new bathroom.
I love your bathroom design. If I’m using command strips or a Velcro kit to adhere the frame to the mirror, do I still need the L- brackets?
Thank you so much!! Technically you could do it all as single pieces of wood, but you might not be able to get it to line up perfectly straight and it could end up being a little wonky. I personally would suggest assembling it first (with both the staples and metal brackets), then hanging it on the wall.
So 48 hours after removing the painters tape our command strips failed. If I use glue will it be seen in the reflection?
Fantastic!!! These handcrafted wooden mirror frames are very trendy now a days. Nice share
Hi! I’m sorry if you already answered this, I tried to look through the questions but didn’t see if anyone else asked how thick the 1×4’s are? Can’t wait to start this project!
Thanks!
Ok, please disregard my question above. Clearly wasn’t thinking straight and realized my error! HA!
We are in the process of doing this in both of our bathroom remodels. I love the faucet you those too! Do you remember who it’s by and what the name of it is?
Can you please tell me what stain you used and how many coats? Thank you so much!!! I love it and can’t wait to do our dated bathroom mirror.
I was wondering the same thing about the stain color. :)
Can you tell me what color paint you used in this bathroom?
Where did you get wood that was that wide? I love the color of it.
Hi! Can i ask what kind of countertop that is?! And where is was purchased? Is the grey on the vanity called urban bronze?
Thanks!
Hi Jenny! I actually bought that vanity from Wayfair a few years ago as a whole package. It came with the vanity, hardware, and countertop all together. The countertop was a quartz marble I believe. You can find some similar ones here: https://rstyle.me/n/cw2sxwb66w7 (affiliate link)
Omg I love this bathroom! Can I ask what color stain did you use for the wood? Also what are the pieces you made your shelves with? Thanks!
Thanks Lisa! I used a combination of Special Walnut and then kind of giving it a gray wash. You can find the tutorial here for the wood treatments: https://cherishedbliss.com/farmhouse-bathroom-mirror-tutorial/ And the shelves themselves are I believe 2×10’s I can’t remember the depth exactly, but I just cut them to the length I needed and that was it! : )
How did you stain your wood? It looks like you did a mix of stain and fire? Correct me if I’m wrong. I’m doing mine now and have that color of stain, but wondering if you used fire as well?
Love the mirror but those light fixtures ???????? what are they called or where did you find them? They are beautiful!!!
Hi
looking gorgeous. I just love your work skill. Your bathroom design and color combination also choosing lights of bathroom these are all looks great. Where did you get wood that was that wide? Can i fix up on my bathroom with own way? If you had more insight i will greatly appreciate it. Thanks for the sharing your article.
This time I will use woodprix instructions to make it.
The bathroom mirror is very essential for a bathroom but another accessory is must need every bathroom. Every bathroom mirror with need bathroom faucet and shower panel and etc. I like your bathroom mirror. Must I will try to use this mirror for my bathroom. Thank you for share a beautiful post.
Hi I love the bathroom vanity where did you purchase it. Thank you, Laura
How did you make the shelves above the toilet? Great touch!
Hello! I absolutely LOVE this and we also have a large plain mirror in the house we just purchased. I am a little concerned about the wood getting water marks from the sink being so close – mine is like that too – have you noticed any damage or splatters? Thank you!!
The frame you put on your bathroom mirrors looks fantastic. My wife and I are wanting to put in some custom bathroom mirrors so that we have a more rustic look in our bathroom. We love the farmhouse look and want to style our bathroom in that style.
one of the best article about bathroom mirror ever I saw. thanks for sharing.
I haven’t read all of these posts so maybe someone addressed this issue. Overall, great mirror! Thank you! BUT, the miter box in a pain in the A?! It’s like a child’s toy. Instead, I took wood to a framer and she cut my wood and glued/pinned together. I used Liqued Nails for mirrors to attached to mirror. Frame kept sliding down for hours. It’s finally cured but about a 1/4 inch too low. So, if you have the space and you are gluing your mirror, make your frame an inch or more taller than the mirror to account for glue-slide. Unless, of course, something like the counter can hold it up.
Why does So many people ask the same questions.. If they read your stuff they would know the answers.
I would love to know the color stain your used for your mirror. Thanks!!
I have those ugly plastic brackets that hold the mirror. you said to change them for washers. I don’t understand how. Can you please explain.
Thanks,
Marcela
Thank you so much for this post . They are given information about supplies for frame a Bathroom Mirror.1)Take Measurements. Cut the Wood.2)Glue and Staple the Boards.3)Finish Your Wood.4)Add Decorative Braces.5)Hang the Mirror.Thanks for sharing this information and i tell to users to visit on this website.
OMG I just said “thank you! I love you!” out loud! I was struggling with what to do with those plastic clips (cut out back of frame? Glue mirror on wall?) For a week now! And your washer idea is brilliant! Thank you for saving me much stress and thought over this!
Cool. Thanks for sharing an informative article. Keep on sharing.
Where did you find the L shaped bracket? I have looked on Lowes.com but I am not finding anything even close. I am not even sure what terms to search for.
Hi Whitney, I went searching on Home Depot’s website and finally found them. Here’s an affiliate link: https://rstyle.me/+hLJMbgTfCzJyMVVF-mHSwg you should be able to look up the aisle number based on your local Home Depot. Hope that helps. Let me know if you have any other questions!
Wow! What a gorgeous transformation, Ashley! It looks lovely! Thank you bunched for linking up with us and sharing your ideas! Have a fabulous week! xoxo
Hello,
Could you please tell to me how to ‘finish’ your bathroom mirror to get that rustic, dark-brown color, but with some of the wood still peaking through?
It’s beautiful.
Thank you,
Did your mirror have clips you had to work around? Mine does and I’m wondering how to make that work…
Thanks for sharing decorative idea of mirror frame.
Keep sharing awesome content.
How can do this if there is not enough room outside the mirror? Is there a way to do this but on top of the actual mirror?