This is a sponsored post written by me on behalf of Frigidaire and Lowe’s. All opinions are 100% mine. Get the kitchen you’ve always dreamed of by building this DIY Kitchen Island. It’s easy to create and provides great storage! Get the free plans at cherishedbliss.com
When we decided to have our Frigidaire Professional Appliances installed, we had a few things we wanted to change in our kitchen. I already shared with you how I altered our kitchen cabinet next to the stove and opened things up. I also took out some of our cabinets that were attached to the wall and built a walk around DIY kitchen island, therefore making it much easier to move around in the kitchen.
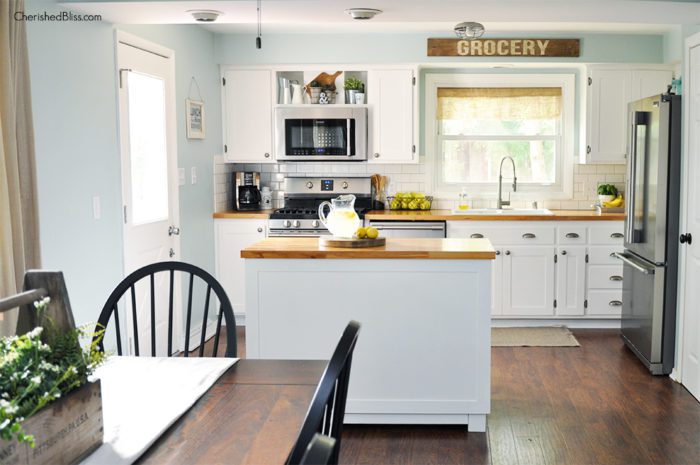
In the winter we use the back door in the kitchen to enter our house, but there is never a place to take off our shoes since the door would open straight into the cabinets. Now we can fully open the door and make room for everyone. The kitchen is also the room where everyone seems to congregate, so it’s nice to have a place were people can gather around and eat snacks or serve meals!
Building an Island might sound a little scary, but it’s not as hard as you might think! I’m going to walk you through the whole process. You just have to take it one step at a time!
Supplies: (this post contains affiliate links)
- Circular Saw
- Kreg Rip Cut
- Miter Saw
- Kreg Jig
- Pocket Hole Screws
- Clamps
- Drill and/or Impact Driver
- Sander
- Finish Nailer
- Wood Filler
- Painting Supplies
Lumber Shopping List:
- (2) 4’x8’sheet 3/4″ Plywood (ripped down)
- (1) 1x4x6
- (5) 1x2x6
- (1) 4’x8′ sheet 1/4″ Plywood (ripped down)
- (1) 4×4 (make sure it’s untreated)
- (2) 2x3x8
- (1) 2’x4′ sheet of 1/2″ plywood (ripped down)
- Cut List: (I recommend cutting as you go to ensure a square project)
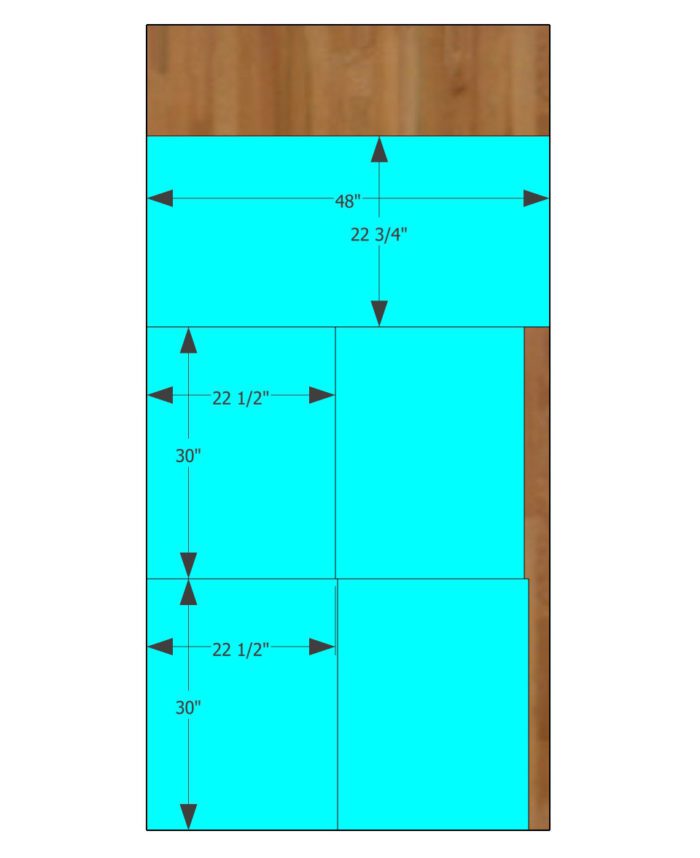
– Cabinet Base (3/4″ plywood)
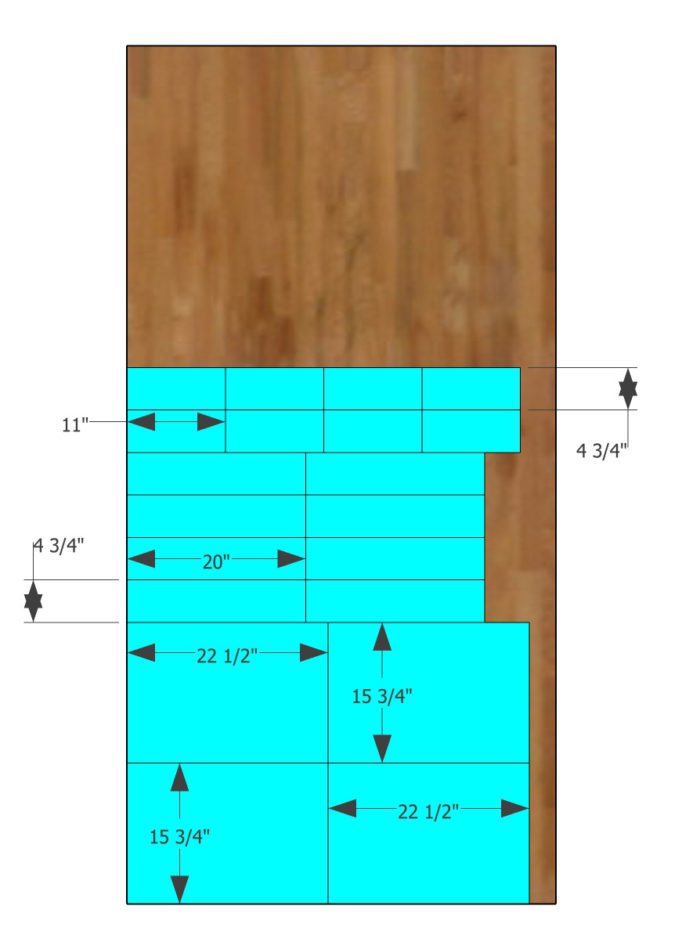
– Shelves and Drawer Boxes (3/4″ Plywood):
- (2) 1×4’s @ 15 3/4″
- (1) 1×4 @ 13 1/2″
- (4) 1×2’s @ 22 1/2″
- (2) 1×2’s @ 48 1/2″
- (4) 1×2’s @ 27 3/4″
- (3) 1×2’s @ 13 1/2″
- (1) 1/4″ sheet of plywood @ 46 1/2″ x 30″
- (4) 1/4″ strips @ 2 1/2″ x 22 3/4″
- (6) 1/4″ strips @ 2 1/2″ x 25 3/4″
- (2) 1/4″ strips @ 2 1/2″ x 48 1/2″
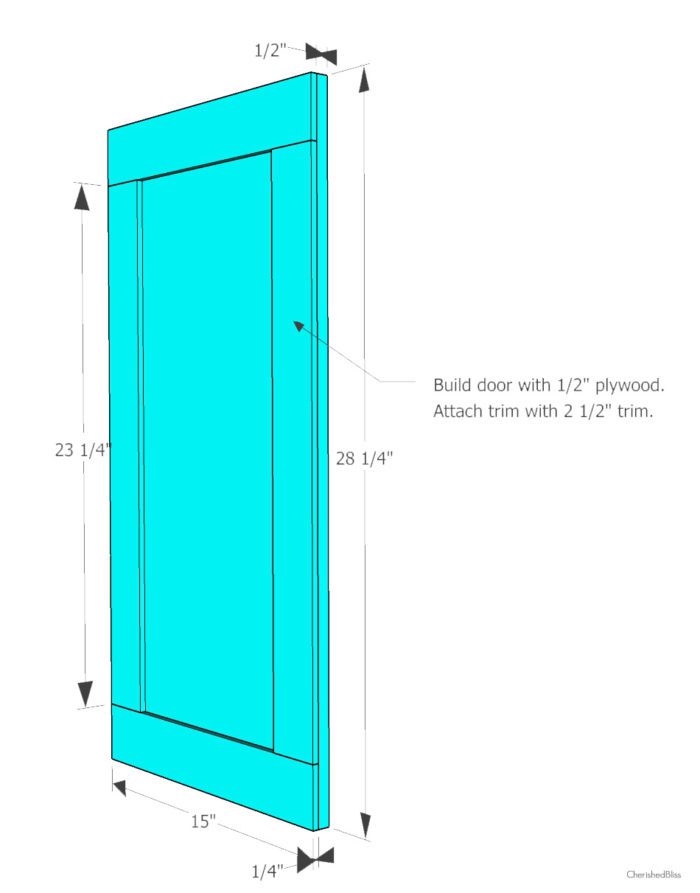
- (2) 1/2″ plywood @ 15″ x 28 1/4″ (doors)
- (4) 1/4″ strips @ 2 1/2″ x 23 1/4″
- (4) 1/4″ strips @ 2 1/2″ x 15″
- (2) 2×3’s @ 40″
- (4) 4×4’s @ 3 1/2″
- (2) 2×3’s @ 14 1/4″
- (4) 1/2″ plywood @ cut to size for drawer faces with minimum 1/4″ extra around perimeter of opening.
Notes:
The majority of this island is put together with pocket holes to which I will refer to as “PH” in the plans below. I used my Kreg Jig to create these pocket holes along with the appropriate size Kreg pocket hole screws.
Before we get started I want to mention that I think it’s best to make cuts as you go. Sometimes you might get off a 1/16″, and it will throw off the rest of your cuts. That’s just a tip of mine. If you cut with awesome precision then you might be able to make all your cuts first, but I’m not that good!
How to build a DIY Kitchen Island
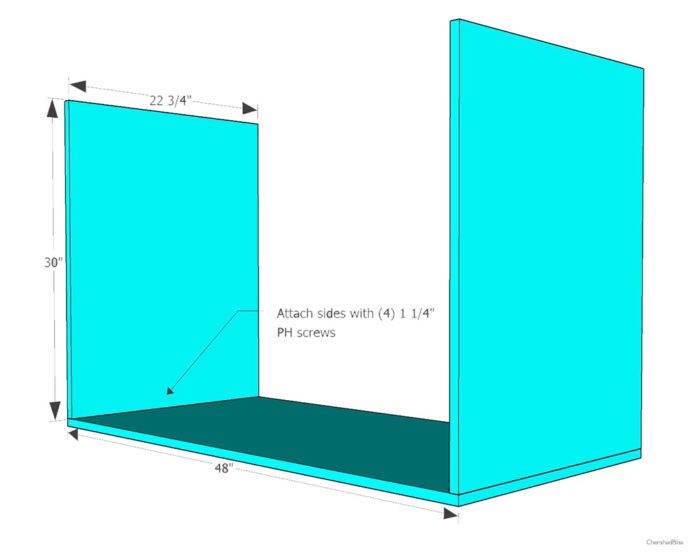
First make the cuts for the box of the island.
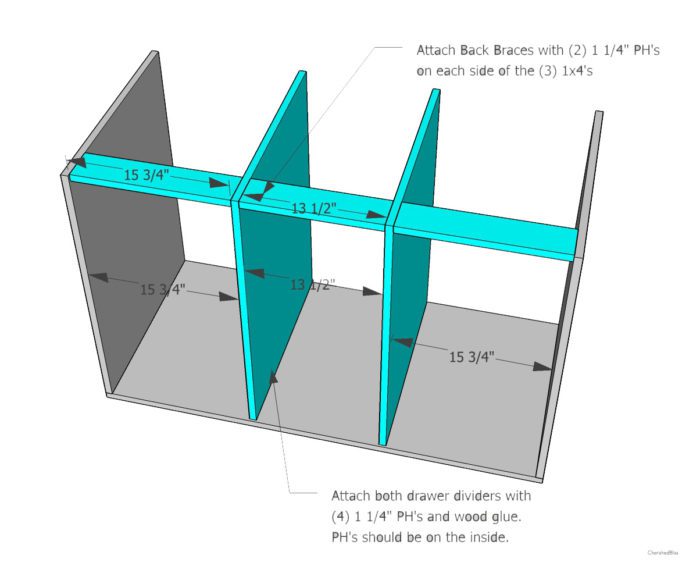
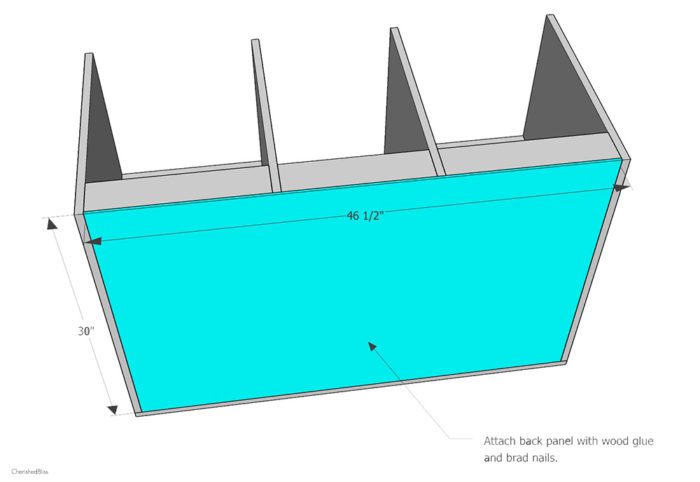
Then I moved on to the dividers which will hold the drawers. For this step I made sure my pocket holes were facing towards each other on the inside. That way I don’t see them since the drawers fill that space. Also the dividers are 1/4″ shorter from from to back that the sides of the island. This leaves a recessed space where I placed the back panel. See image below. It doesn’t matter what side the recess is on, but once it’s in place, that needs to remain the back side.
Once I had my dividers in place I attached the braces in the back to insure that the dividers didn’t bow or break off.
Adding Shelves
Next up I added the shelf brackets with my nail gun and wood glue. I didn’t permanently attach the shelves just in case I ever wanted to remove them.
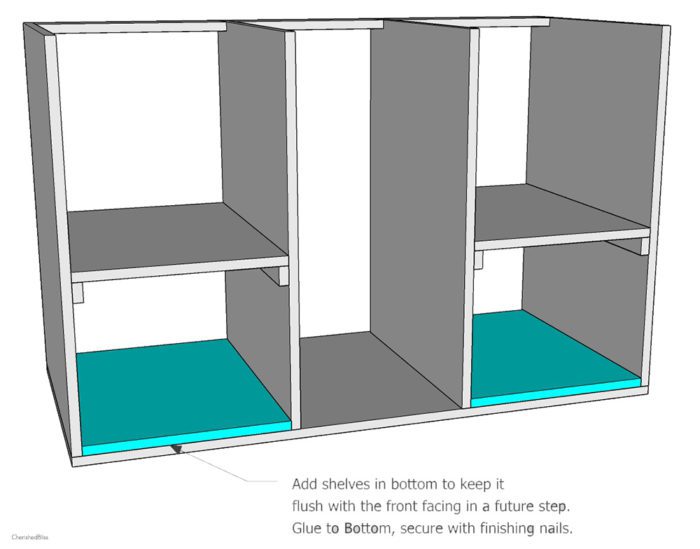
Because I wanted to have the bottom of the cabinet flush with the face framing, I added another shelf in the bottom of each cabinet space. Just a little note, before I completed this step it would have been easier to install the leg frame here, but I actually changed up some of my ideas mid way so it didn’t work out for me, but it could for you! That way the screws could be hidden by the extra shelf rather than countersinking and using wood filler.
Back Panel
I added my back panel in. Then I decided to recess this to avoid all the extra unfinished edges on the sides of the DIY Kitchen island. Next I nailed into the braces on the back, around the sides and bottom, and then on the vertical drawer dividers and the actual shelf brackets.
Decorative Moldings
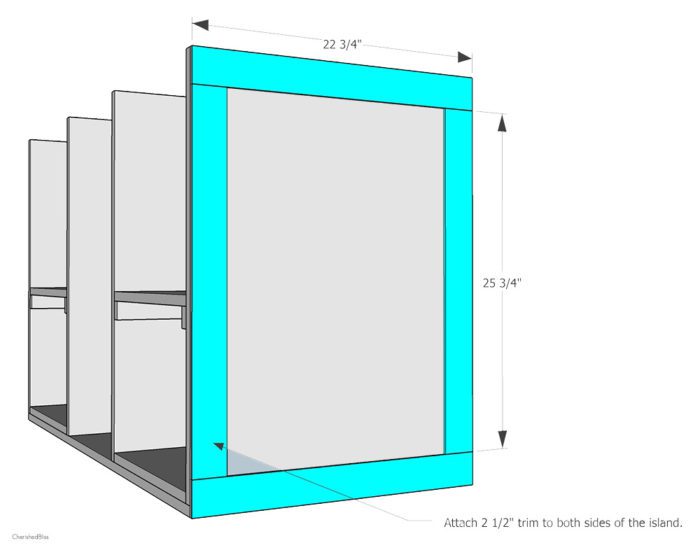
I attached the side trim first using wood glue and brad nails. This is definitely important to cut to size because I wanted it to be flush with all sides. I repeated the same process on the opposite side.
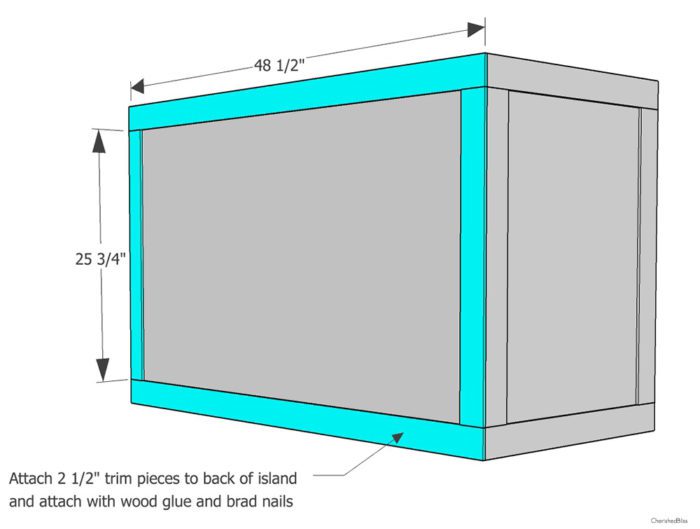
Then I added the trim to the back. I made sure to fill all spaces and gaps with wood filler and sand flush.
Face Framing
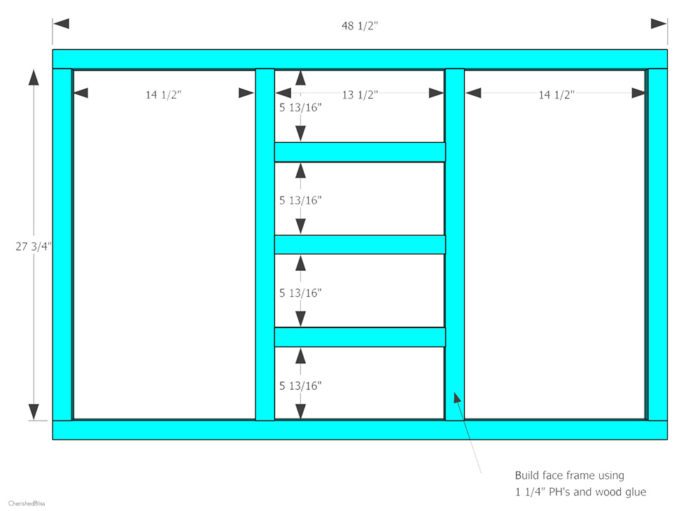
I built my face frame separately to make sure it was sturdy when attaching it to the cabinet. Next, I attached all pieces with PH’s and wood glue. Since these are 1×2’s I had a little bit of a hard time not splitting the wood. With pocket holes it needs to have two on the ends so that it doesn’t just twist, but that was the cause of splitting the wood. So what I did was put the pocket holes on opposite sides so one on the top part of the 1×2, and on the other side it went on the bottom part so that it wasn’t able to pivot. I also used wood glue to help it set. When building this facing I was constantly checking the measurements to keep it all flush. It’s always better to measure 3 times and cut once!
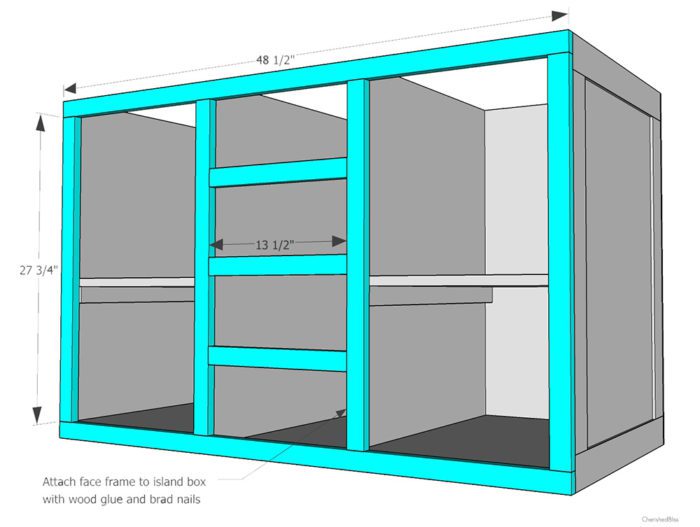
Once I had my face frame built, I attached it to the front of the cabinet base with wood glue and brad nails.
Base Support
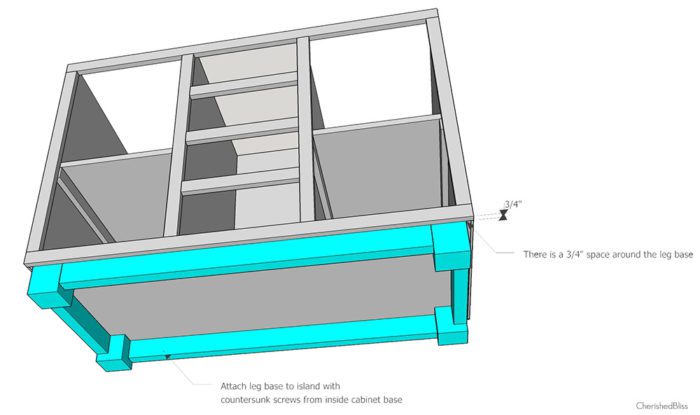
Next I build the leg frame. I built this separately so again, I made sure I had all my measurements correct before making the cuts. I built the frame with pocket holes on the back side of the 2×3’s. When attaching I countersunk screws from the bottom shelf of the cabinet base straight in to the 4×4’s. But it is an option to complete this step before installing those extra shelves in the bottom.
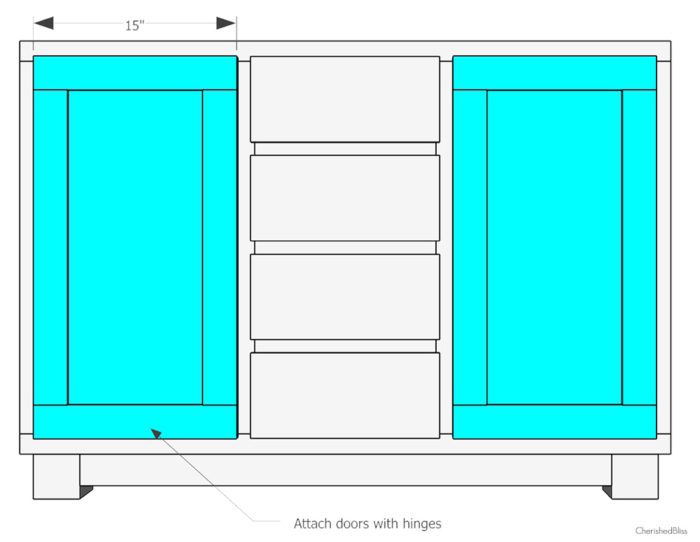
Doors
I used the doors from our previous cabinet, but they are easy to build if necessary. I actually had to build the one on my new cabinet by the stove. It’s just made with 1/2″ plywood and then using the 1/4″ trim pieces to obtain the shaker style.
Attach your doors with hinges.
Installing Drawers
Next I built the drawer boxes. I basically followed this tutorial from Ana White, except I did not leave a space for the drawer face. I wanted my drawer face to be in front of the facing of the cabinet to match the rest of my kitchen. The I attached my drawer faces to the drawer boxes, once they were installed in the DIY Kitchen Island to make sure nothing was crooked. Drawers are probably the hardest part because the measurements do need to be pretty exact. I especially recommend cutting as you go here. No matter how much I squared the island along the way, nothing about the drawers turned out perfect. It’s an art that gets better with practice. By the time I installed my 4th drawer I had it down! Practice makes perfect!
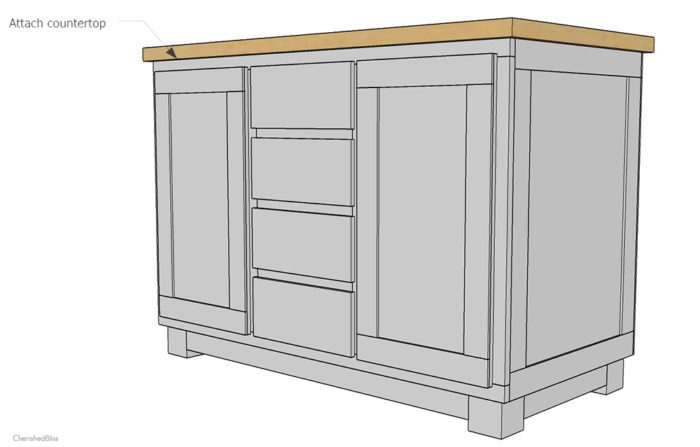
Countertops
Now all that’s left is to install the countertop. We used the butcher block we had on our previous cabinets.
We love everything about this DIY Kitchen island! It’s great storage and we love having a place to stand around.
DIY Kitchen Island
Be sure and check out my other kitchen renovation posts, and leave me any questions in the comments!
How to Alter Kitchen Cabinets
DIY Shaker Style Cabinets
How to Paint Kitchen Cabinets
Industrial Farmhouse Kitchen Reveal








It turned out AWESOME, Ashley! Woo Hoo.
Hi did you build this?? Some cuts on the diagram seem to be extra or some missing. Any help would be appreciated!
Your kitchen looks amazing. The island is the perfect add
Hi
Holy wow…it looks amazing…thank you so much for the detailed plans…those are really helpful.
You are such a rock star to build that yourself! It looks fabulous!
I love the kitchen island. I would love to build this for my craft room. Do you have the plans in a PDF file? I could not find the plans. Thanks for sharing. Blessings.
This is GORGEOUS! I am so impressed. I want to make immediately.
I would like for my son to build this for me in Woods class at school. Is there a PDF version of the plans? Thanks Darla Acton
@The Average Dan, thank you for your photos!! :)
Thanks for posting these plans. We used them as the starting point for a kitchen island we built for my wife. We took the two bottom drawers and made it one big drawer and we also took the right cabinet and changed it to a tip-out garbage bin. We also added a 14″ drop leaf to use as a sitting area. We mixed in some reclaimed wood where we could. Check our the pics here: https://drive.google.com/folderview?id=0BxgOEWsRpescM2VtS0p6N2FxZEE&usp=sharing
Thanks again! Your plans helped make this project a reality.
http://dicksworkshop.blogspot.com/
Hey Dan! Thanks so much for sharing the pictures with me! It makes me so happy to see what others create with the plans! Love the changes you made, genius way to hide the trash can, and that drop leaf creates so much more space! I LOVE it! Happy Building!
Dan..tnx for the pics..it helped me understand a little more what was going on..Ashley did a pretty good job with the plans but never having built anything before the pics & close ups would have been more informative for me
@The Average Dan, thank you for your photos!! :)
How much did you spend on the materials? Thank you!
Hi Kely, I’m not entirely sure. I bought the materials with this along with a bunch of other items. If I had to guess I would say around $150 ish depending on what you already have on hand.
Wow! This came out great! I always wanted a kitchen island, and since we’re moving, we’ll probably have enough space for one! Thanks for another great blog post!
What did you do so the drawers would slide out ?
What was the size of the butcher block top you put on? Curious how much overhang there is on all sides and what size top to order. Thanks! Looks great!
I love the design and build of your island! Adding doors and drawers is a great idea for storage. I built a more simple island, but added drop leafs on either end so it can be used to eat at, which is useful for people with smaller kitchens: http://bacheloronabudget.com/diy-drop-leaf-kitchen-island-cart/
Looking forward to trying out some other projects on your site!
I’m looking at building a island for our house. Just out of curiosity, how much did this cost you? I would love this if I was in my budget.
Hi Kelsey, I’m not completely sure. I had quite a bit on hand. Probably $150ish for the lumber, plus all the hardware/screws, drawer slides and paint. Maybe around $200-$250 total depending on the hardware you choose and what you might already have on hand. That’s my best guess. Sorry I don’t have a more definitive answer! :( But if you have any more questions please let me know!
Hi Ashley, well done. What I found incomplete is the draws and doors. Theirs no mention of the type of hinges for example, they are overlay hinges but how much overlay?
The draws, are their draw guides? I wouldn’t want a small child to pull a draw out and have it land on them ya know. Like I said, great job, but missing some component information an average DIYer would need.
Hey, you used to write magnificent, but the last several posts have
been kinda boring… I miss your tremendous writings. Past several posts
are just a little out of track! come on!
Hi is there a printable link??
Hi I printed this out. The cut diagram for the plywood doesn’t seem to match the list. And I’m not sure where the 11”x4 3/4” pieces come in??
Would like to get this project started so any insight would help! Thank you!!
How heavy of a countertop can this island support?
I’m not sure of the exact weight limit, however I don’t see why it wouldn’t be able to support any standard countertop.
Hi, Is there a pdf of this kitchen island plan that I could download/
Thanks
Darrell G
When we decided to have our Frigidaire Professional Appliances installed, we had a few things we wanted to change in our kitchen. I already shared with you how I altered our kitchen cabinet next to the stove and opened things up. I also took out some of our cabinets that were attached to the wall and built a walk around DIY kitchen island, therefore making it much easier to move around in the kitchen.
Hello
Thanks for posting these plans. We used them as the starting point for a kitchen island we built for my wife. We took the two bottom drawers and made it one big drawer and we also took the right cabinet and changed it to a tip-out garbage bin.
Hello
Thanks so much for sharing the pictures with me! It makes me so happy to see what others create with the plans! Love the changes you made, genius way to hide the trash can,
Hello
I love the kitchen island. I would love to build this for my craft room. Do you have the plans in a PDF file? I could not find the plans. Thanks for sharing. Blessings.
Hello
I love the design and build of your island! Adding doors and drawers is a great idea for storage. I built a more simple island, but added drop leafs on either end so it can be used to eat at, which is useful for people with smaller kitchens:
I already shared with you how I altered our kitchen cabinet next to the stove and opened things up. I also took out some of our cabinets that were attached to the wall and built a walk around DIY kitchen island, therefore making it much easier to move around in the kitchen.kite developer
I already shared with you how I altered our kitchen cabinet next to the stove and opened things up. I also took out some of our cabinets that were attached to the wall and built a walk around DIY kitchen island, therefore making it much easier to move around in the kitchen.qr code
When we decided to have our Frigidaire Professional Appliances installed, we had a few things we wanted to change in our kitchen. I already shared with you how I altered our kitchen cabinet next to the stove and opened things up. I also took out some of our cabinets that were attached to the wall and built a walk around DIY kitchen island, therefore making it much easier to move around in the kitchen.
Hello
The accounting of Master Thesis Literature Review understand the need to craft an exceptional personal statement. A good Paper Writing Services Legitimate can make your Legitimate Essay Writing Services while a bad one can break the same.
Beautiful great post. I fair faltered upon your web journal and needed to say that I have truly delighted in perusing your web journal posts. Aluminium Security Doors Melbourne
Hi,
I loved as much as you’ll receive carried out right here. The sketch is tasteful, your authored material stylish. nonetheless, you command get got an shakiness over that you wish be delivering the following. unwell unquestionably come more formerly again since exactly the same nearly a lot often inside case you shield this increase.Discover The Best
I’m thinking “what wouldn’t I use it on?” . I would try to make hooks for my pot holders and measuring cups. I have a bare spot on my kitchen wall detective always wanted to hang them but it’s impossible because it’s covered brick.guided tours in Israel
I think I need to hire someone like you to come deck out my house. I’m hopeless at this sort of thing. I know what I like, it just doesn’t get done! Tragic, I know. At least I can dream about someday become more adept at these things.guided tours in Israel
I think I need to hire someone like you to come deck out my house. I’m hopeless at this sort of thing. I know what I like, it just doesn’t get done! Tragic, I know. At least I can dream about someday become more adept at these things.Online Shopping Mall
Thank you for this Great and informative site! snow plowing syracuse
You have a distinguished talent in explaining things. Thanks for sharing this here. painting wall
Great stuff! I appreciate the work done here! https://www.cesspoolsonlongisland.com/
Thank you for sharing the plans!
What’s the size of your butcher block countertop?
I see some common butcher block countertops come in 4′ width, but that would be a hair too narrow for your island, right?
Thanks again!
Hello
I’ve added a few quirky ornaments to my tree like an avocado, donuts and coffee. I also have a laptop ornament that says “blogger” and a Taylor Swift guitar ornament that plays “Long Live” when you turn it on! This year I gave Conrad a beer ornament to add to the tree. witneycouriers
Hi,I’ve added a few quirky ornaments to my tree like an avocado, donuts and coffee. I also have a laptop ornament that says “blogger” and a Taylor Swift guitar ornament that plays “Long Live” when you turn it on! This year I gave Conrad a beer ornament to add to the tree. witneycouriers
Super nice write up and good theme i see here very good … Buy Roxicodone online
Super idea … https://tradingossmachines.com/product/monero-crypto-mining-rig/
Wow, what a great tradition with the ornaments! And your husband wearing the same shirt to shop for Christmas trees – he’s a keeper! I like that closure on the bottom flap of the box; I think it makes it look more professional! And saves on scor tape! Welcome to Jason’s Holidays
It is to one’s greatest advantage to know every one of your choices prior to making a bet. The straight bet is to a greater degree a long stretch sort of bet. You won’t pile up the enormous mixture immediately however after some time, it will add up.Cloud Consulting Services
Really helpful post and I want to try it in my kitchen as I’m planning to do some renovations. Did you secure the island with the floor or the weight of the island will just hold it in a permanent position? Thanks.
Hello! Your content looks quite promising and I simply couldn’t leave your blog without suggesting you should check our company’s website, AppSquadz, an ibeacon app development company that can assist you with more.
These are amazing. I did a test batch before I start jarring and putting them in the pantry. I do have a question though- how long do you think the jar batches are good for.I’d like to make a bunch (lol I have kids and these didn’t last long- very yummy- so obviously having more on hand would be better for me that and I feel you brownies are always nice to have on hand)cape verde holiday
Fantastic post! Please keep sharing. I know of a roofing company if you are looking for Game Please get in touch! Thanks, have a good day. แบบการ์ดแต่งงาน
amazing post thank you for sharing check my article here
http://erickwcxg417.theburnward.com/10-no-fuss-ways-to-figuring-out-your-marketing-companies-in-tampa
I already shared with you how I altered our kitchen cabinet next to the stove and opened things up. I also took out some of our cabinets that were attached to the wall and built a walk around DIY kitchen island, therefore making it much easier to move around in the kitchen Buy Goldshell KD5 miner Thank you for sharing the plans!
A very good giver which is useful in many ways.
Read More : Glazed Porcelain Tiles
Super amazing post thanks for sharing…
Read More : https://meiracare.com/medication-prescription-refill-online
This article was nice to read. I’d advise producing more articles of this nature. Now let me describe our services in more detail. For further information, please visit our website.
Appconsultio is a reputable and well-known mobile application development company in Pune. We offer a range of services to aid and assist clients in whatever manner we are able. It also includes user-friendly digital techniques, which are essential for every firm.
By helping its clients grow their companies at affordable costs, Appconsultio positions itself as the best mobile app development company in Pune. Every software has essential elements that will enable us to achieve our goals.
Our main objective is to offer exceptional, personalized services while successfully addressing customer challenges.
https://www.appconsultio.com/
This article was very informative.
informational blog thanks for sharing.
Download NTS Test Result by CNIC Number of your jobs/admission test.
Great blog buy boats online
Impressive data you have provided
Nagraj Company is sure to add color to your bathroom, kitchen and bedroom in giving a spectacular look to the walls and floors of the home or office, because of the quality of their products as well as the variety of sizes of tiles that are available. Design patterns have no answers. Now choose from a variety of Nagraj options to make your home more attractive. Let nagraj help you decide on your suggestions or favorite art shapes.
Thanks for sharing this post. It is very informative and helpful
When I applied for internet banking, I supplied my phone number. However, nothing has changed in my account. My e-banking account was temporarily frozen, and I needed to change my password.Overseas Indian Bank My mobile edutec.in number is being updated, and online banking is enabled on my account. When I applied for internet banking, I supplied my phone number. However, nothing has changed in my account. My e-banking account was temporarily frozen, and I needed to change my password. Overseas Indian Bank My mobile number is being updated, and online banking is enabled on my account.
Thanks a lot https://ehsaas8171.com/
https://bisp8171.com/
Thanks a lot i am really happy
SMM Panel One offers the best SMM services that are simply accessible to everyone. Through our genuine SMM panel services, we have assisted many businesses in gaining greater insights. If you choose us for your business, then we can help you develop your online presence across multiple social media platforms such as Facebook, Instagram, LinkedIn, YouTube, etc. because we believe in 100% customer satisfaction.
This is a pretty wonderful website, and I advise you to submit content to draw in people. Really useful knowledge may be found on your website.Want to tell you about a popular jacket?
Houston Astros Jackets By wearing which you will not only look good but also stay away from the cold.
At SMM Panel One, we pride ourselves on providing top-notch SMM services that are easily accessible to everyone. Our genuine SMM panel services (STC) have successfully aided numerous businesses in gaining valuable insights. By selecting us for your business needs, we can assist you in enhancing your online presence across various social media platforms including Facebook, Instagram, LinkedIn, YouTube, and more like. Our ultimate goal is to ensure complete customer satisfaction, as we believe in delivering nothing less than the best.
https://8171portal.com/
Registered Yourself In Ehsaas Program and Ehsaas Rashan Program,BISP Program Through 8171,8123 Web portal
Providing the best SMM services on the market
Its a Panel to serve your all business need and increase your reach to greater heights. User can manage all Their Social Media Account with the help of our panel. You can manage your Posts, Interact with Follower and Link your Social network Account etc. SMM Panel also provides statistics so that you can monitor your development and access how well your Post/Account/Business is doing.
https://rightsmmpanel.com/
Thank you very much dear teacher for this nice sharing.
Nice information
Hey! I stumbled upon your article on how to build a DIY kitchen island, and I couldn’t help but drop you a comment. First off, I want to say how much I enjoyed reading your step-by-step guide. It’s evident that you have a passion for DIY projects, and your enthusiasm shines through in your writing. As someone who loves to tackle home improvement tasks, I appreciate the detailed instructions and the clear photos you provided. It’s like having a friend guiding me through the process!
I have to admit, I’ve been wanting to add a kitchen island to my own home for quite some time now, but the idea of building one seemed intimidating. However, after reading your article, I feel inspired and empowered to take on the challenge. Your tips on measuring and planning have given me the confidence I needed to dive into this project. I particularly appreciate the way you emphasized the importance of considering the overall aesthetic and functionality of the island. It’s not just about adding extra counter space; it’s about creating a beautiful and practical centerpiece for the kitchen.
I can’t wait to gather the necessary materials and get started on my very own DIY kitchen island. I’ll be sure to refer back to your article throughout the process. Thank you for sharing your knowledge and expertise with us, Cherished Bliss! Your blog is definitely going to be my go-to resource for future DIY projects. Keep up the fantastic work, and I look forward to reading more of your informative and inspiring articles. Cheers!
Horilla is a reputable and well-known Free & Open Source HR Software company in United Kingdom. We offer a range of services to aid and assist clients in whatever manner we are able. It also includes user-friendly Horilla HRMS, which are essential for every firm.
By helping its clients grow their companies at affordable costs, Horilla positions itself as the Best Free & Open Source HR Software Company in United Kingdom Every software has essential elements that will enable us to achieve our goals.
Our main objective is to offer exceptional, personalized services while successfully addressing customer challenges.
elements that will enable us to achieve our goals.
Our main objective is to offer exceptional, personalized services while successfully addressing customer challenges.
Thanks For Sharing
Thank you very much dear teacher for this nice sharing.
nagabola We really appreciate it and don’t forget to visit our website
Ehsaas Program CNIC Check Online Registration New Method
Good article
https://bisp8171.com/8171-ehsaas-program-25000-bisp-new-update/
We really appreciate it and don’t forget to visit our website
Awesome Blog thanks for Sharing So Much informative Blogs. Carry on – If You want to know About bespoke exhibition stand builders and exhibition booth builder or Any modular exhibition standsYou can visit Xpostands
I found this article to be thoughtfully researched and well-presented. The writing style is engaging and keeps the reader interested throughout. I have blog If you have Need Concert Ticket Just Visit – Ticketexchangeinfo
Its a great news. You can learn more on https://legit.pk/8171-ehsaas-program/
Its a great news. You can learn more on, I would like to refer to ehsaas programme
BISP Web-Portal 8171 check online your status after adding CNIC and Mobile Phone number. You need to write a 13 digits CNIC into the box and then press Enter and get all the details appeared about your family data.
Very nice post cvv shop . Seriously thanks for posting this great information for us.
very amazing design and good viy kitchen idea you shared, go for nid bd card
best online day counter tool calculates how much time there is between two dates contador de dias
Hi,
The real estate industry’s future is intertwined with demographic shifts, including aging populations, urbanization, and changing lifestyles. Adapting to these trends will be essential for staying competitive and meeting the evolving demands of consumers in the years to come.buy real estate in ND and MN
One of the key drivers of the real estate market is location. The old adage “location, location, location” holds true as properties situated in desirable areas often command higher prices and generate more significant returns on investment. Proximity to schools, shopping centers, public transportation, and other amenities can significantly impact a property’s value. In contrast, properties in less accessible or less attractive locations may struggle to attract buyers or tenants.real estate team
grat information provided
From this page, you can check the STS Sindh Police Written Test Result 2023. STS Sindh Police Written Test Result 2023 STS Answer keys Examination taken on September 17, 2023, for selecting a Security Constable in Sindh Police for a Special Protection Unit SPU, CPEC Sindh check online.
Thak You So Much One of the key drivers of the real estate market is location. The old adage “location, location, location” holds true as properties situated in desirable areas often command higher prices and generate more significant returns on investment
https://edupakstudy.com/bisp-online-kacheri/ best online day counter tool calculates how much time there is between two dates contador de dias
NEED A DO FOLLOW BACKLINK PLEASE INSERT MY WEBSITE LINK TO YOUR ONE PAGE PLEASE THIS IS MY SITE: https://edupakstudy.com/
Benazir Taleemi Wazaif Online Registration has been started. In this Program, your children will get 1500 to 4500 every Three months if Your Children are not registered in this Program. You can Register your children in this program. Here We Will tell You how you can register for this program.
Benazir Income Support Program has launched Ended Education Scholarships, which encourages and distributes education scholarships to children worldwide in Pakistan.
Benazir Taleemi Wazaif
Ꮤow! In the end, I was able to obtain useful information about my research and understanding from a blog.
Amazing information. I really enjoyed reading your article. As someone who has been involved in this HEC Free Laptop Program for many years, I would like to refer to ehsaas programme
I wish to give you a link that adds values to your readers related to your topic. Thanks a lot
Amazing blog I read about cement price in Pakistan and got accurate information about it. This site gives me latest information, for more follow https://pakprices.pk/cement-rate-today/
Incredible insights! Your article was a pleasure to read. Having been actively engaged in the HEC Free Laptop Program for several years, I’d like to mention the 8171 Ehsaas program in connection with it. I’d love to provide you with a valuable link that complements your topic and benefits your readers. Thank you very much
Really amazing Blog thanks for Sharing So Much informative content. Carry on – If You want to know About bespoke exhibition stand builders and exhibition booth builder or Any modular exhibition standsYou can visit bispprogram.com
Thanks for the information. you showed an in depth knowledge on the topic where to buy steroids
Nice Sharing ! Ehsaas Program
In the dynamic realm of exhibitions, Munich’s stand builders emerge as true artisans, seamlessly blending creativity and functionality. Their meticulous craftsmanship transforms mere spaces into immersive brand narratives, creating memorable experiences for attendees.exhibition stand design company in munich are adept at capturing the city’s innovative spirit, infusing each design with a unique blend of modern aesthetics and cultural richness. With an unwavering commitment to excellence, these builders elevate brands, ensuring their presence resonates long after the event concludes. In Munich, the exhibition stand builders stand as architects of visual allure, crafting environments that leave an indelible mark on the diverse tapestry of the city’s events.
The industry of real estate thrives on the expertise of diverse professionals, from real estate agents and brokers to architects, developers, and urban planners. It’s a collaborative ecosystem where creativity, innovation, and market knowledge converge to shape skylines and create living spaces that cater to evolving needs. The process of envisioning, designing, and bringing real estate projects to fruition embodies a fusion of artistry and practicality.Jual beli tanah cepat indonesia
Hi,
The industry of real estate thrives on the expertise of diverse professionals, from real estate agents and brokers to architects, developers, and urban planners. It’s a collaborative ecosystem where creativity, innovation, and market knowledge converge to shape skylines and create living spaces that cater to evolving needs. The process of envisioning, designing, and bringing real estate projects to fruition embodies a fusion of artistry and practicality.Jual beli tanah cepat indonesia
The global real estate market, an interconnected tapestry spanning continents and cultures, embodies both the universal pursuit of shelter and the localized nuances that define unique markets. From the bustling streets of New York City to the serene landscapes of rural Europe, each locale tells a distinct story of demand, supply, and the intricate dance between tradition and modernity.
geschenkte immobilie verkaufen
Its a complete info related to tooth number 14.
Beyond its economic significance, real estate plays a pivotal role in shaping communities. The development of property pal, the accessibility of amenities, and the interplay between urbanization and preservation define the fabric of societies. Real estate agents act as guides, navigating clients through the labyrinth of choices, aspirations, and financial considerations.
I have Download Intelligence Bureau Roll Number Slip by CNIC. Thank You
Great work. if you are struggling in Pakistan get enroll in ehsaas programme to get financial assistance.
good findings. picasso apk provides free movies and cricket matches to get you entertain.
Amazing Latest Prices
Eligibility Criteria of Ehsaas Program
Those who want to get their health in the Ehsaas program have to follow the criteria, if you do not meet the criteria then you will not be eligible for this program.
Be a Pakistani citizen
Be over the age of 18
Be living in a rural area
Be a widow
Be a woman over the age of 60
In this program, those persons are eligible whose monthly income is less than 40 thousand
Persons whose property does not exceed two acres are eligible.
Under this program, eligible households will receive a monthly stipend of Rs. 2,000 to Rs. 4,000, depending on their financial needs. The program targets households with a monthly income of less than Rs. 20,000 and aims to support around 7 million families across the country.
Industrial real estate, often overshadowed by its more glamorous counterparts, plays a pivotal role in the logistical ballet that underpins global trade and production. Warehouses, distribution centers, and manufacturing facilities form the invisible scaffolding supporting the seamless flow of goods across borders and continents. The modern supply chain, intricately interwoven with technological advancements such as automation and artificial intelligence, has redefined the spatial requirements and operational efficiency of industrial real estate, catalyzing a paradigm shift in the way goods are produced, stored, and transported.Realtor
Hello
Thanks for posting these plans. We used them as the starting point for a kitchen island we built for my wife. We took the two bottom drawers and made it one big drawer and we also took the right cabinet and changed it to a tip-out garbage bin.drooling
In the realm of residential real estate, the concept of “home” takes center stage. It’s where families grow, memories are made, and dreams find a sanctuary. The housing market reflects not only demographic shifts and lifestyle preferences but also cultural norms and economic stability. Trends in residential real estate fluctuate with changing tastes, technologies, and societal needs. From the rise of sustainable architecture to the demand for smart homes, the residential sector constantly adapts to meet the evolving expectations of homeowners.
What Does It Cost To Paint Stairs
Thrilled with the exceptional service provided by Best solar company! Their professionalism and expertise truly shine through. From start to finish, the experience was seamless and efficient. Highly recommend them to anyone looking to make the switch to solar energy. Thank you for a job well done!
A seasoned wordsmith with a passion for crafting engaging narratives and delivering information with flair. Known for my ability to transform complex ideas into accessible content, I thrive on creating compelling stories that captivate and inform. With a keen eye for detail and a commitment to excellence, I bring a unique blend of creativity and precision to every piece I write. Let’s weave words together and bring your ideas to life!
Viral Video in Pakistan
Fantastic piece! The details you’ve provided in this article are not only enlightening but also skillfully presented. It’s clear that you’ve dedicated considerable thought and effort to craft this post.
8171 Ehsaas program brings good news
please provide some details about negahban program
Fantastic blog! I derive much pleasure from your content and find it to be quite informative.
Indian Web Series Actress Bio
This information is incredibly insightful and aligns perfectly with our quest for sustainable energy solutions. As the best solar company in Pakistan, we pride ourselves on delivering top-tier solar products and services that meet the evolving needs of our clients. Your shared knowledge contributes significantly to our mission of promoting renewable energy across the nation.
https://portal8171.com/5566-2/“>p>The Punjab Ehsaas Rashan Program can be self-registered through online registration. If you want to complete your application online, you will be told a very easy process here, which you can follow and register.
You can register yourself by sending the card to 5566 You will then be sent an OTP code also known as your code, which you need to scan the National Identity Card with your mobile. After that, you can take your ID card to the nearest utility store and get a discount on the Rashan.
Needless to say, this incredible hit is a must-hear.
I’ve tried a few different SMM Panel Two before but SMM Panel 2 stands out as #1 in my book. Their services for expanding their social media presence are unparalleled. Our brand has gained tremendous traction since partnering with them. SMM Panel 2 delivers 100% on customer satisfaction.
The Ehsaas Program and the Benazir Income Support Program (BISP) are two prominent social safety net initiatives in Pakistan, aimed at alleviating poverty and providing financial assistance to vulnerable segments of society. The 8171 ehsaas program 25000 bisp
, launched in 2019 by the Government of Pakistan under the leadership of Prime Minister Imran Khan, is one of the largest social protection programs in the country’s history. On the other hand, the BISP, initiated in 2008, has been a longstanding welfare program catering to the needs of low-income households.
The Smm Panel is a flexible platform that serves a worldwide clientele. They provide a variety of social media services that can improve your online visibility on a number of different platforms. They are the SMM Panel Two in the business thanks to their dedication to cost and quality.
In Pakistan, the “Ehsaas” program stands as a beacon of hope and support for the underprivileged. Launched by the government under the leadership of Prime Minister Imran Khan, Ehsaas aims to alleviate poverty, create opportunities, and foster social equality across the nation.
The core philosophy of Ehsaas revolves around inclusivity and compassion. It recognizes the diverse needs of individuals and communities, striving to provide assistance where it is most needed. Through a range of initiatives, Ehsaas tackles various aspects of poverty, including access to education, healthcare, livelihood opportunities, and social protection.
8171 Check OnlineEhsaas program stands as a beacon of hope and support for the underprivileged. Launched by the government under the leadership of Prime Minister Imran Khan, Ehsaas aims to alleviate poverty, create opportunities, and foster social equality across the nation.
The core philosophy of Ehsaas revolves around inclusivity and compassion. It recognizes the diverse needs of individuals and communities, striving to provide assistance where it is most needed. Ehsaas tackles various aspects of poverty through various initiatives, including access to education, healthcare, livelihood opportunities, and social protection.
House is incomplete without a kitchen but many find hard to make a house in this ecnomic hard times.
National Jobs Portal – Search Government Jobs & Apply Online on National Jobs Portal Pakistan’s first online single platform for Government Jobs http://www.njpjobs.pk
Best post of the day ….
If you are interested in literature then you must visit this site it’s all about masterpieces.. imagination health and information;
https://literaturebs.online/
Interior design and construction require good amount of money but https://loansformula.com/ can help you with this
We get a lot of kitchen information from your article. If we want to decorate our kitchen, we take help from your article. Thanks for your guidance
For more kitchen remodeling tips visit Bestratedhome
Hiring an individual to complete your online courses on your behalf has become a common practice in today’s digital age. This method involves compensating someone to assume the responsibility of attending lectures, completing assignments, Do my online teas exam for me, and taking exams on your behalf. By outsourcing your online classes, you can save time and effort while ensuring that your academic requirements are met. This approach allows individuals to focus on other commitments or responsibilities, while still achieving their educational goals.
DLF Andheri West Mumbai is an upcoming residential project that will reinvent urban life in Maharashtra’s lively cityscape. The DLF Group, a real estate development powerhouse since 1946, developed this project. DLF Andheri West Mumbai’s 2 and 3 BHK apartments combine modern architecture with sustainable living to strike a balance between luxury and sustainability. This property is strategically placed in Andheri, West Mumbai, near major commercial and recreational hubs and great transportation linkages. Modern amenities, rigorous security, and Vastu Shastra principles promote a comprehensive and rewarding living. As the project prepares for launch, prospective buyers can expect openness and accountability through RERA registration, reinforcing its standing as a top residential destination in Mumbai’s ever-changing real estate scene.
VTP Cielo is a new top residential development. This brand’s modern complex is the new perfect option for astute investors and discriminating full customers as it skillfully combines elegance, comfort, booking, and convenience.
Nice content thanks for sharing
Shalamar Hospital’s orthopedic department is dedicated to enhancing your musculoskeletal health, combining expertise with compassionate care in a modern medical environment.
It goes without saying that this amazing hit is a must-listen.
Showbiz in Pakistan and Viral video
It’s obvious that this fantastic hit is a must-hear.
Bollywood Showbiz News and Viral video
Love the breakdown of tools and materials. Will definitely be referencing this post when I gather my supplies
Is there a way to modify this plan for a smaller kitchen? I’d love to build an island but don’t have a lot of space
Sounds like you made some smart changes to maximize space and functionality in your kitchen! Building a walk-around island is a great way to improve traffic flow.
Thanks For sharing this information i read this article so Amazing and interested.
you are so nice you have cleared my problem
Thanks for sharing such insightful article.
I’m so grateful for the wonderful knowledge you’ve shared on your blogs. It will be incredibly useful for me when promoting my website on social media. Thank you for sharing!
Bharti Jha Web Series list