This has been a work in progress. I had already painted this crib once for Addison and learned some things along the way, and this time, I decided I would share some of the tips that helped me to get this project done. I am so excited to share this post with you today because it means I am one step closer to finishing Adam’s nursery. It is probably the best looking room in the house since we have moved in, and the least used. Hmm… lol!
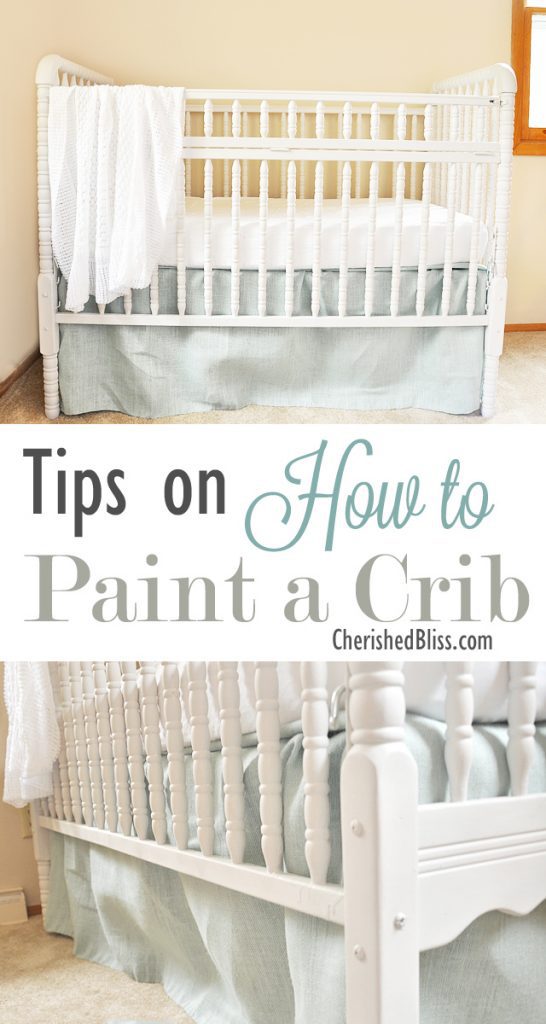 Painting a crib, especially with these spindles, is no easy task. Unfortunately I don’t have before pictures because this was a work in progress while I was packing at 9 months pregnant and moving 2 weeks postpartum. The good news is, I’m here to help! I am no expert by any means and everything I am sharing with you today simply worked for me. If you are unsure of anything I definitely would recommend consulting a professional before proceeding.
Tips on How to Paint a Crib
Prep
– First thing… please please make sure if you are using an older crib that it is lead free paint, lead can be harmful to the baby! Once that is determined you can move forward.
– If your crib is already painted, you might want to sand down any paint drips that have occurred from previous paint jobs. There were a few on mine… I was going for the vintage look so I wasn’t that concerned with them being perfect. This is just a personal taste.
– Once you are done sanding anything necessary wipe the entire crib down, you want to remove any dust, dirt, grime, paint particles, etc. Then let it dry completely.
Painting
– Invest in a good paintbrush! You will be thankful later.
– For the actual paint I suggest using Maison Blanche Furniture Paint. I used their Silver Mink Color, it looks white from a distance, but it has a slight gray/silver look to it. It was perfect for me because I wanted white, but you know me and my vintage look… I didn’t want it bright. I also am really going for a clean vintage look for this nursery. Old but in great shape… not even sure if that makes since, but that’s what I went for with Adam’s Dresser too! This paint doesn’t require any sanding if your crib is stained and it really cuts down on the prep time, and this was necessary for me considering the spindles I was working with.
– This paint is pretty thick and goes on nicely, depending on your crib style you might only need one coat, I did two.
– This paint dries really quickly so that helped speed up the process, if you are using a more traditional paint be sure to let it fully cure between coats to insure the safety of the baby and the paint’s VOC’s. Another good thing about Maison Blanche’s Paint, the VOC’s are extremely low! A big plus for me.
-Once you think you are done (if your crib has spindles) you are probably not. So just take a second look over the entire crib and touch up any places that didn’t get covered by the paint.
– Let the paint fully cure based on the manufactures suggested time frame. I waited 48 hours.
Sealing
– Now you can move onto the sealing process. I did lots and lots of research on this part and came to the conclusion that once fully cured, poly-acrylic should not be harmful to the baby. This is one of those things that I would prefer you consult a professional on if you are concerned. I am NOT an expert. I felt comfortable with the decision after much much research, and I want you to feel comfortable to. This is your cute little baby’s bed we are talking about!
– I used a Spray poly-acrylic and allowed it to dry for 3 weeks before placing it in the baby’s room.
– I decided to go with a spray simply because of the spindles I was working with.
– I sprayed 3 coats following the manufacturer’s guidelines, allowing appropriate dry time between coats. Then I did two more where I felt a baby might chew on it at any point. I also try to make it a point to not allow my kids to chew on the crib, but they are sneaky little creatures! : )
– Once you are done, let FULLY cure! This is very important to reduce the level of VOC’s.
Now you get to bring it inside! and decorate! ! : )
Want to know what else I have done for this nursery? Check out the posts below.
DIY Wooden Arrows
How to Paint a Dresser







Thanks for the great tips!!! Love the crib!!
I need these tips to paint my dresser and as it look so boring to see it in yellow paint and that’s why I have decided to paint it and make it new and beautiful. I liked the colour you have used for this dresser. Now I will use this colour to paint my dresser also. Ashley…thanks for providing such brilliant ideas.
It’s just so pretty Ashley… I’d sleep in there if I fit! Thanks for all the great tips!
The crib turned out beautifully, Ashley! Your tips are really helpful. My last child will soon be turning 2 so I know my crib days will soon be over. Just seeing this crib makes me smile! I’m stopping by from The Weekly Creative. Have a wonderful night!
Hey Ashley! I want to do this to my crib for my new baby. How is it holding up almost a year later? My first born chewed the top of the crib so I am concerned of course that the paint would be an issue for my second. Love to know if you are still happy with the results. Thanks so much!
Hi Ginger. My son is 10 months and he hasn’t seemed to chew on the crib yet like my oldest did. I am definitely still happy with the results though. It is holding up great, and no chipping paint. : ) I have seen a few tutorials for sewn teething covers for cribs. I thought about doing one of those if he starts to pick at the paint.
Hey there! I’m just about to start painting my crib. Did you paint yours while it was assembled or was it taken apart for that process?
Hi Lindsay, I actually painted it while it was taken apart. We had just moved so it was already in pieces and it makes it a little easier on your back ; )
Where did you get this crib from, I love it ?
Hi Jessica! I got it from a garage sale. I’m not sure who the manufacturer is… but I believe it is a Jenny Lind Style crib. That was what I was going to get before I found this one. Hope that helps!
I also have a Jenny Lind crib I’m going to paint soon! Where did you get the piece attached in the front to make the side higher? If that makes any sense at all! Thanks!
It’s actually just made that way. It’s not a drop side crib or stationary… that little section just has hinges… I forget what this style of crib is called, but I don’t think they make them like this anymore. I know it’s still safe though because I had to order parts for it and they won’t sell to you if your crib doesn’t meet the standards or are out of date. Good luck with your crib! : )
Ditto to Jessica,
Where did you get this crib? I’ve been on a search lately and can’t seem to find the right one. Even if it’s old or you thrifted it, do you know who made it?
Thanks!
Hi Audrey,
I did get it at a garage sale, and unfortunately I don’t know what brand it is. I know the lady I bought it from said it was from before the 70’s. I had to call a company for a replacement part and made sure everything was safe, but I do believe it is a Jenny Lind Style. Hope that helps!
do you have any specific advise for brushing the spindles? I have this same crib but the spindles make me nervous. Should I paint horizontally or with lengthwise brush strokes?
Hi Katie, there is just no simple way to do spindles. I went horizontal on the front half and then turned it around to do the back half. You just have to watch for paint drips… but it took me FOREVER it felt like!
Ashley,
Would you ever consider spray painting baby/children’s furniture? I have an old cradle I’m wanting to refinish but there is no way I would have the patience to brush paint all of the little spindles and details.
I love this!! I also I have used Jenny Lind style crib I would like to update. How many cans did you end up using of the Maison Blanche paint? I see on their website it comes in quart size. Also for the sealer, was there a specific reason why you did not use the Maison Blanche wax or varnish? Do you remember the brand of spray you did use?
Thank you so much for all the great info. I am excited to start this process!!
Hi Randi. I didn’t even come close to using one can. It goes pretty far! I didn’t go with the wax because you are technically supposed to reapply it to keep up the finish and that’s not something I wanted to do on the crib, and I just felt it would come off easily if scratched and whatnot. Wax isn’t really a durable finish in my opinion… at least not for kid’s furniture. I’m not familiar with their varnish though, that might be a good option! I don’t remember. I just bought a spray one probably from lowes or home depot. I do know I used a satin finish. Just make sure you let it fully cure before letting your baby sleep in it, which I believe is around 21 days. Hope that helps! : ) Let me know if you have any other questions!
Hi, what kind of brush did you use because I hate when it leaves brush marks if ya know what I mean?! :-)
Hello, well done crib! Wondering how you went about sanding the spindles? In the middle of sanding a crib like this and wondering if I should take the extra time to attempt to get into all the nooks and crannies. Have been using a thinish strip of long sandpaper and sanding with a shoe shine method along each rail but it is still leaving alot of shiny paint in the divets and afraid paint won’t hold well there.