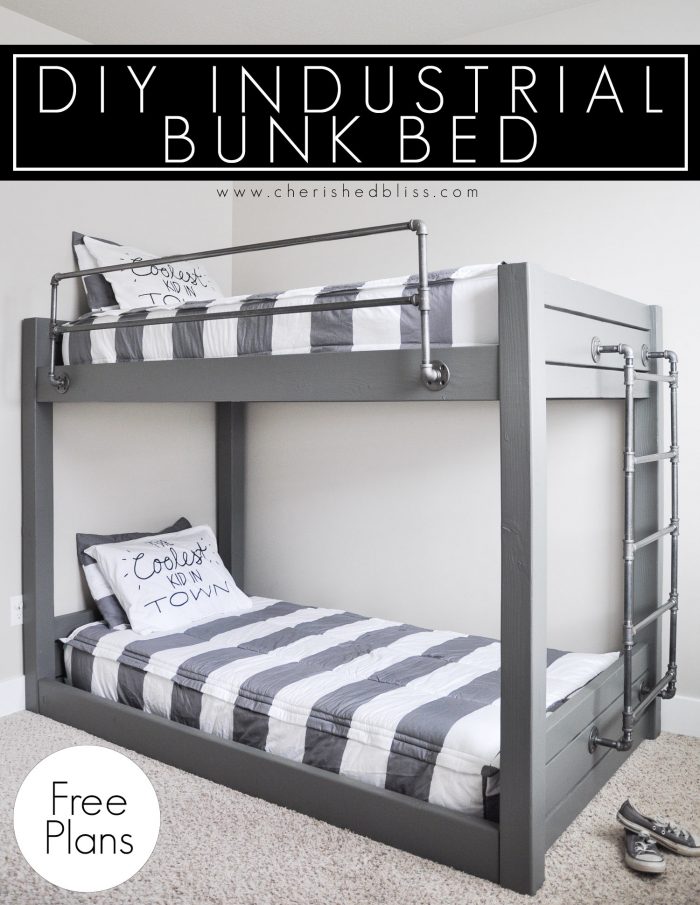
Double your sleeping space with these easy-to-build DIY Industrial Bunk Bed Free Plans using basic lumber and metal pipe from the hardware store.
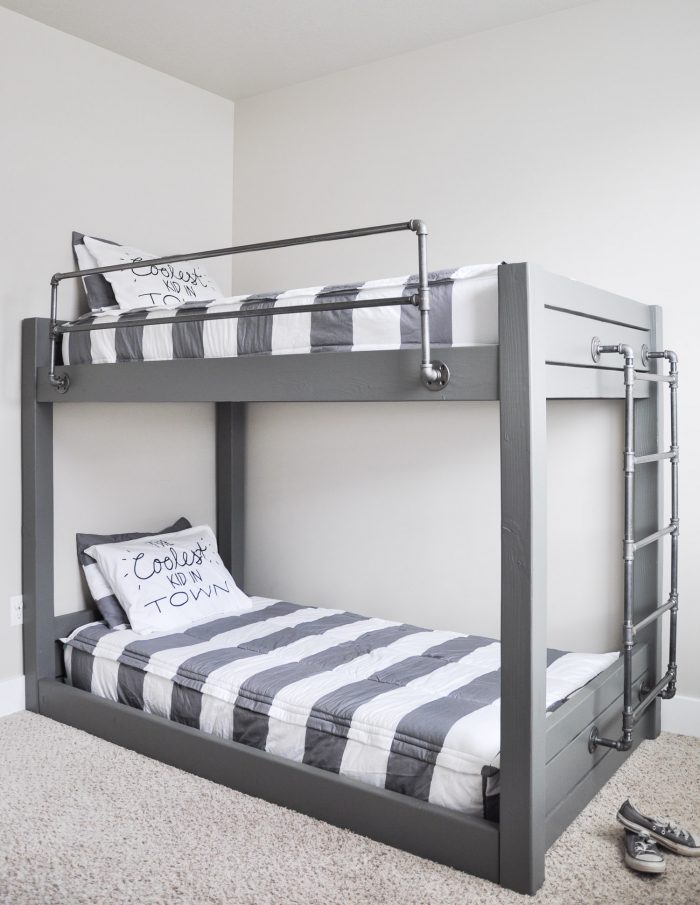
We’ve been in our house for 3 months now. My husband and I were just talking about how it feels like we just moved in, yet have been there forever. It’s weird how that works. Today marks a huge milestone for me. I finally got my boys’ beds up off the floor and built this DIY Industrial Bunk Bed for them. There is just something about having mattresses on the floor that make a room feel dirty. I remember begging my mom as a kid to let me put my mattress on the floor and her always telling me no. I never understood that now I know!
Now the beds are literally the only thing I’ve done in their room so the next step will be to decorate it and improve the storage issues. It’s actually a very small room for two boys, but the bunk beds have really improved the situation. We’re currently in the process of finishing our basement, so once that’s done my two oldest will move down there. The 3-year-old will be staying upstairs close to me so I can pretend like he’s not growing up and still mommy’s little baby (cause he always will be). : )
Bunkbeds for Kids
My oldest requested a “Halo” bedroom, but I’m personally not a fan of an alien shooting game and unfortunately for him his mother is a blogger and she kinda refuses to put Halo on her blog. Maybe I’m wrong for that, but I mean really… as if he needs encouragement to play video games. I did however come up with a sneaky mom plan to create an Industrial Bedroom inspired by one of the Halo levels. I mean I actually have no clue what that level looks like, I just remember seeing him play a level with his cousins once and they were running around on all this metal stuff so metal stuff = industrial pipe. You see my logic here right? Good, we are on the same page ; )
Not to mention that I’m totally ok with being able to throw my style into my kid’s rooms whenever possible because I have a serious mental block when it comes to doing things that “aren’t me”. My daughter is a huge fan of color… as you can tell, I am not. Unless you consider black, white, gray, and wood tone color then I’m kinda at a loss when she wants to incorporate all these rainbow colors. Probably why I’m procrastinating on her room.
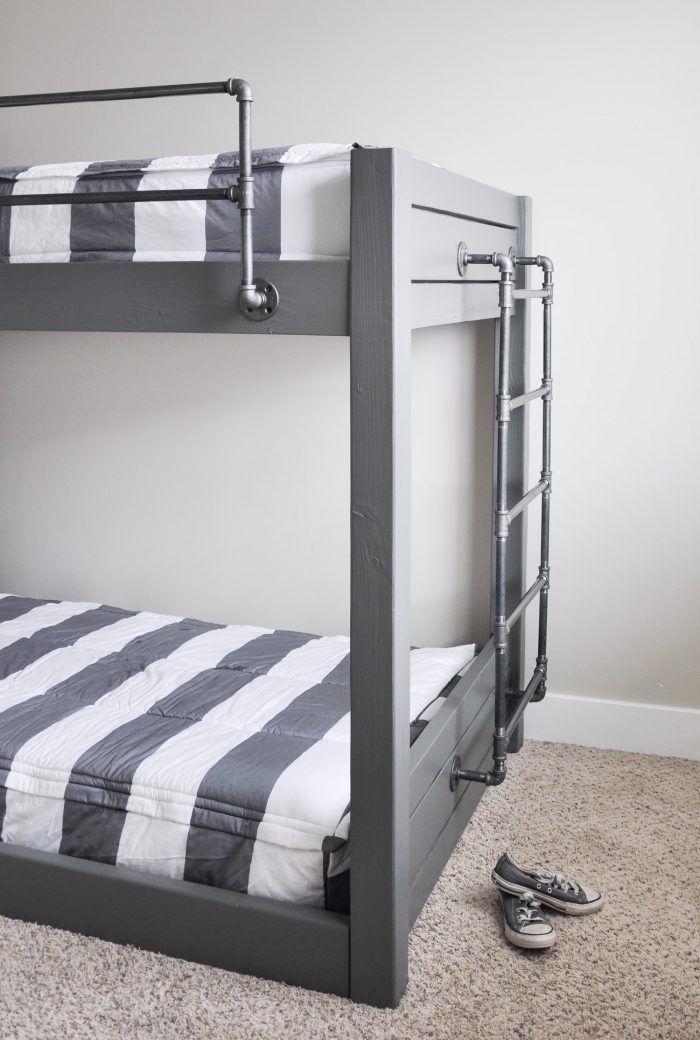
My youngest is 3, so I liked the idea of keeping the bed on the floor so it’s just easier for him, plus I didn’t want bunk beds that were bordering the ceiling. This Industrial Bunk Bed is in between a low profile version and a full-on bunk bed standing at just 60″. If you wanted to go shorter you definitely could because there is a decent amount of space between the bottom mattress and the top side rail.
Kids Bed Ideas
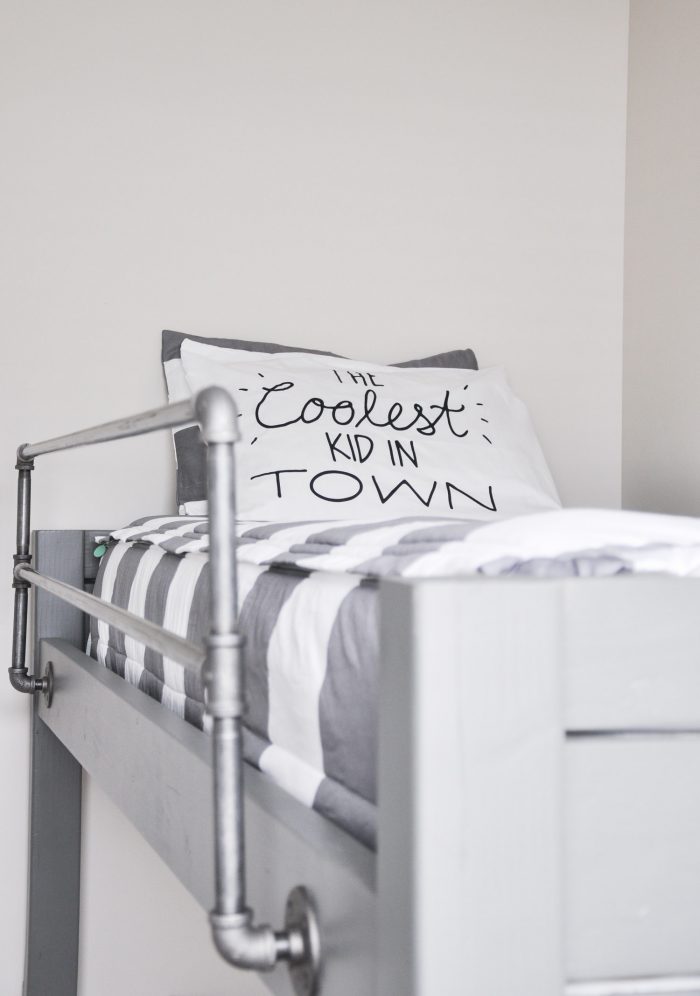
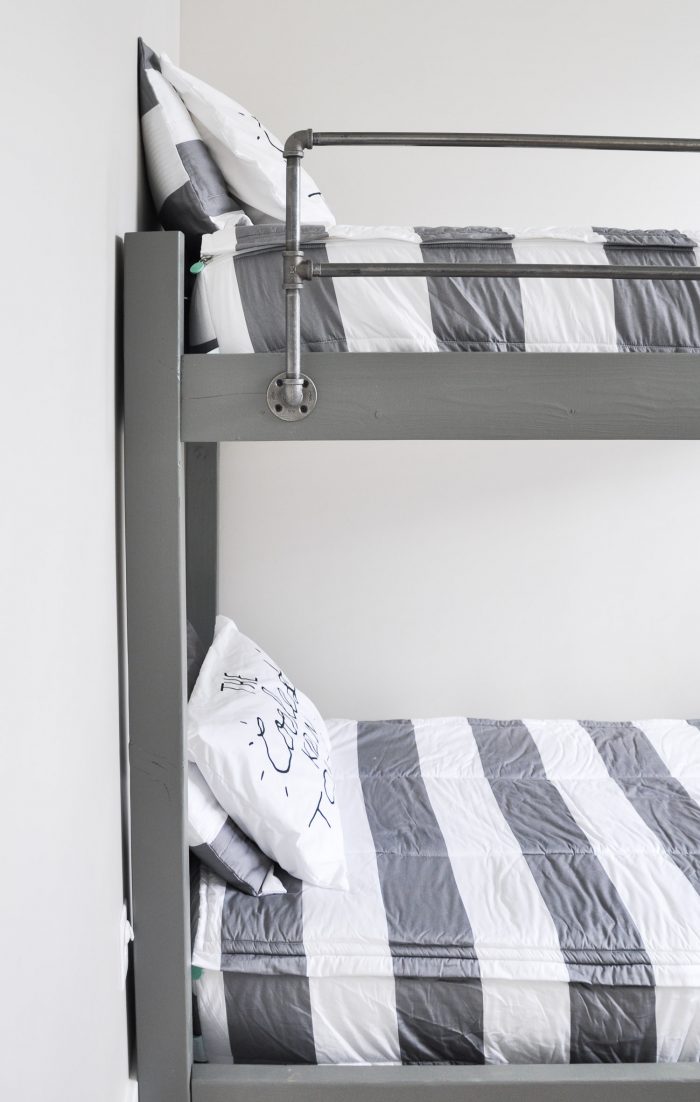
I also feel like I should throw a warning out there. I wouldn’t suggest this bunk bed if you are putting a younger kid on the top. My son is 9 so I feel like he’s totally safe up there, but there is a gap between the bed and the pipe railing. So if my 3-year-old was up there I’d be a little concerned about him rolling in between. But ultimately you are the parent, follow your gut, and only do what you feel is safe!
I also built this bed to have a gap around the mattress because I wanted the bedding to fit beside the mattress without any issues. Definitely measure the width of your mattress and adjust the width as you see fit. All that would need to be done to accomplish that is to reduce the length of the 2×4’s and 2x’6s on the headboard and footboard. However, if you are concerned about the railing you could use that extra space to attach a wooden railing from the inside of the side rails.
Bunk Bed Ladder Made Out of Pipe
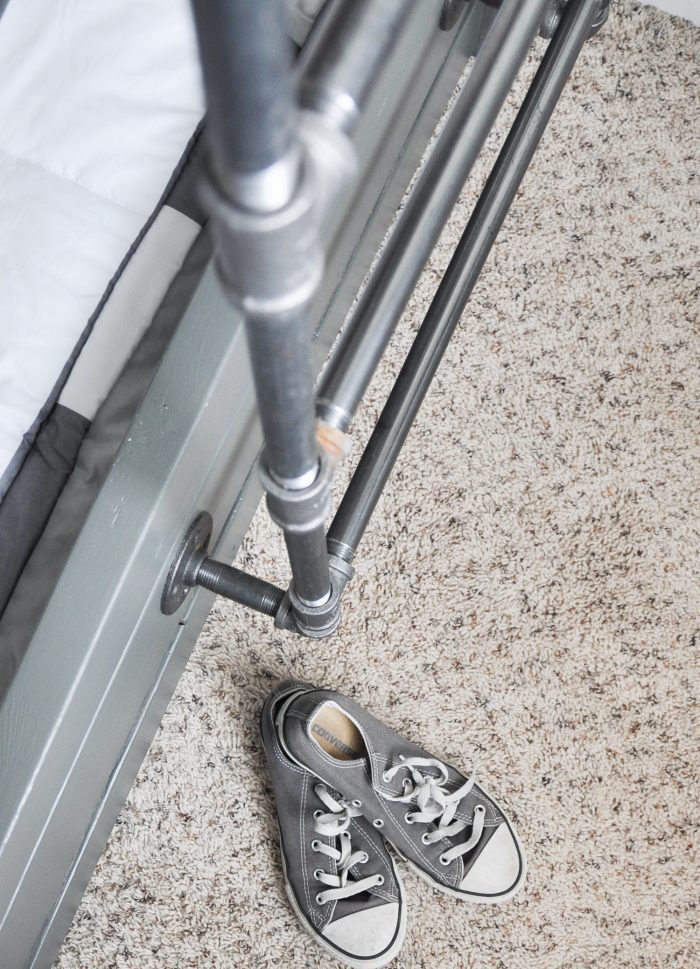
I also decided to build the ladder out of the industrial pipe. I think when the kids move downstairs I’m going to build them a ladder on the wall just for climbing fun because I want to use that ladder. Would it be totally awkward if I put one in my room? Probably so… what would the guests think haha!!
Ok, I think I’ve talked your ear off enough for today so just a few more things:
Paint Color – Behr’s Mined Coal (I’m totally in love with this color too!!)
Bedding – Beddy’s (Total game changer for bunk beds guys! I’ll be sharing more on this soon)
Pillowcases were a Target Clearance find.
Tools required for building this DIY Industrial Bunk Bed: (affiliate links)
**Please read entire post before building this bunk bed
- Ryobi Miter Saw
- Ryobi Impact Driver
- Kreg Jig or the Kreg Foreman (if you want to get serious with your woodworking)
- Ryobi Sander
Building Plans for DIY Industrial Bunk Beds
*Disclaimer: This bunk bed is lacking some features such as guardrails around all 4 sides, this is because ours is placed against the walls, but I am not comfortable providing building plans for your kids without sharing the fact that this is not built to code.
*I am comfortable with how it is built and feel my 9-year-old will be safe, however, I did mention above I would not put a younger child on top given the space between the bed and the guardrail. One way to correct this issue would be to add a 2nd 2×6 above the railing that holds the guardrail, which I myself might add. By following these building plans you are releasing myself (Ashley Thurman), and Cherished Bliss, LLC from any liability. These plans are meant to be used as a guide, please adjust as necessary. Here is a link to the CPSC requirements for bunk beds for your reference: https://www.cpsc.gov/PageFiles/120632/regsumbunkbed.pdf Please build responsibly!
Hope you enjoy the plans for this Industrial Bunk Bed!
Lumber Supply List:
- (4) 4×4, 96″, Board
- (6) 2×6, 96″, Board
- (3) 2×4, 120″, Board
- (2) 2×2, 96″, Board
- (3) 1×4, 120″, Board
Cut List:
(4) Leg Posts, 4″ x 4″ x 60″
(8) 2×4 Headboard Pieces, 2″ x 4″ x 37″
(4) 2×6 Headboard Pieces, 2″ x 4″ x 37″
(4) Side Boards, 2″ x 6″ x 75″
(2) Slat Supports, 1″ x 4″ x 41″
(9) Slats, 1″ x 4″ x 41″
How to Build a Bunk Bed
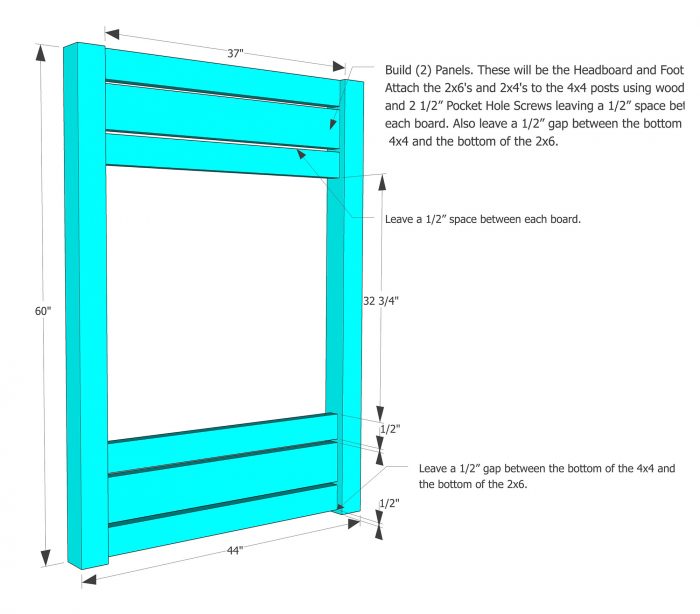
Build (2) Panels. These will be the Headboard and Footboard. Attach the 2×6’s and 2×4’s to the 4×4 posts using wood glue and 2 1/2” Pocket Hole Screws leaving a 1/2” space between each board. Also leave a 1/2” gap between the bottom of the 4×4 and the bottom of the 2×6.
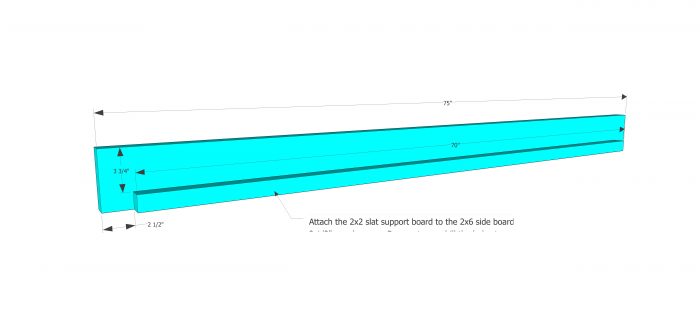
Attach the 2×2 slat support board to the 2×6 side boards using wood glue and 2 1/2″ wood screws. Be sure to pre drill the holes to avoid wood splitting.
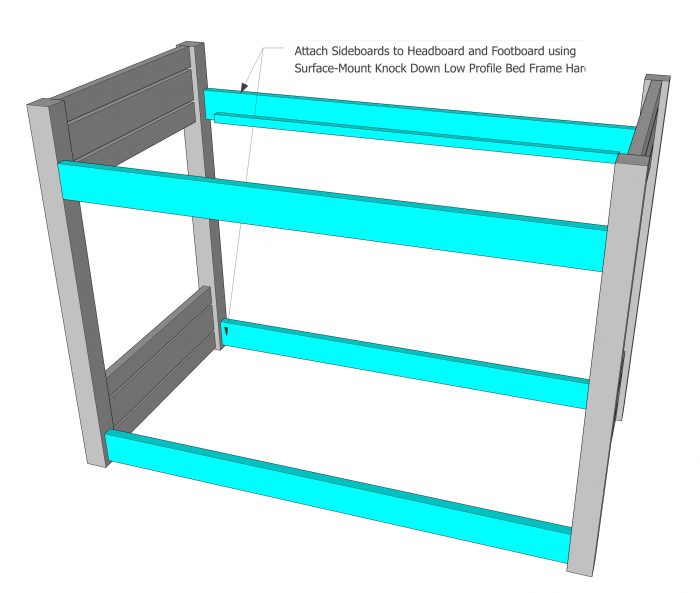
Attach Side Board to Headboard and Footboard using Surface-Mount Knock Down Low Profile Bed Frame Hardware.
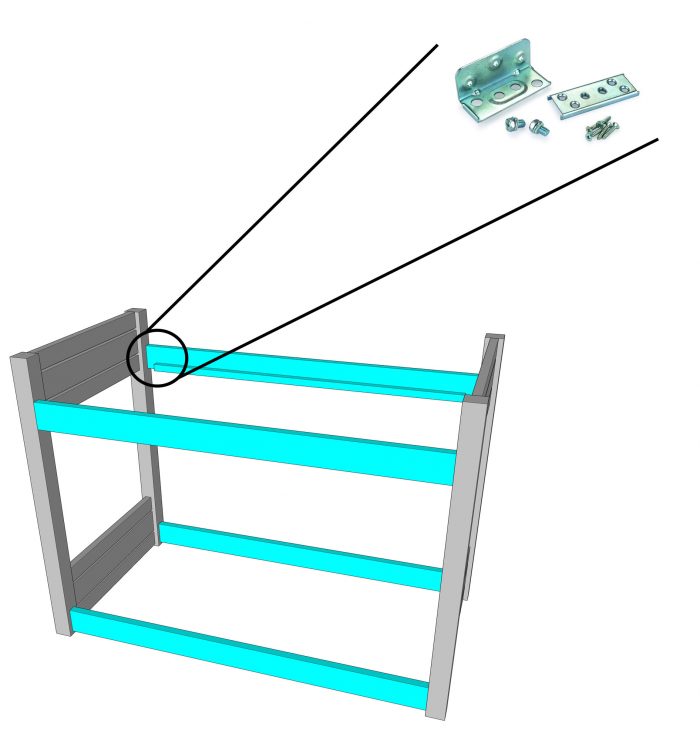
Using the Surface-Mount Knock Down Low Profile Bed Frame Hardware allows you to disassemble the bed frame easily for moving. Hardware is highly recommended due to the constant use of the bed and weight distribution. If you choose not to use bed hardware, the use of bolts would be necessary.
Attach slats to the 2×2 slat supports using 1 3/4” wood screws. Be sure to pretrial the holes to avoid wood splitting.

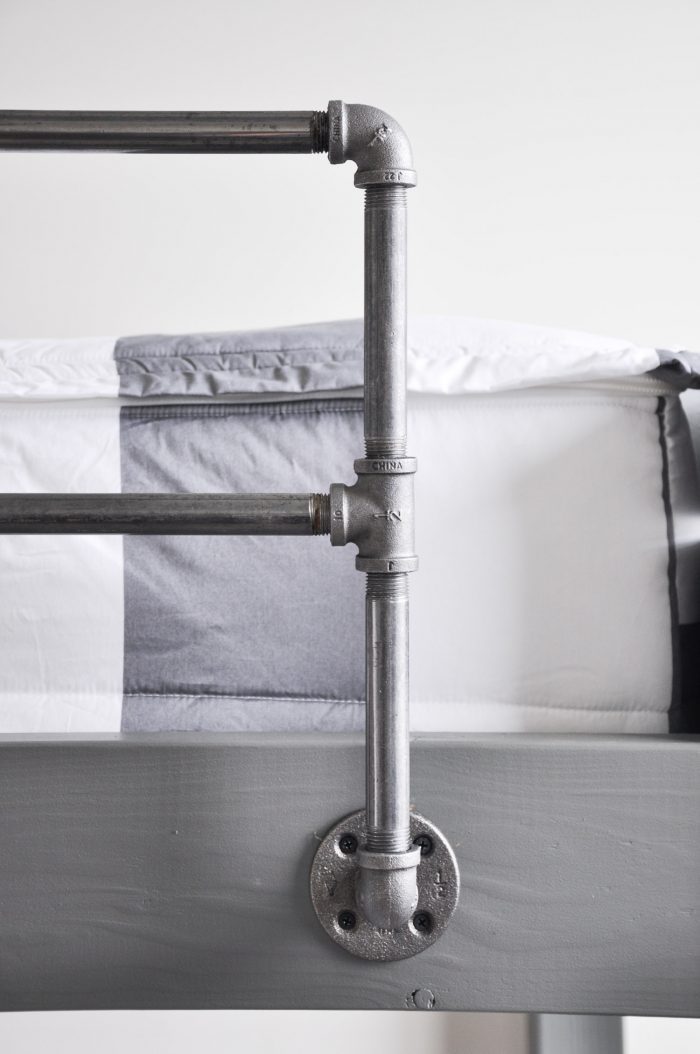
Build the side Guard Rail out of Metal Pipe. The size of this will depend on the height of your mattress. I used (2) 60″ pipes, (4) 6″ pipes, (4) elbows, (2) T’s, and (2) 1″ threaded connectors that attach the (2) flanges.
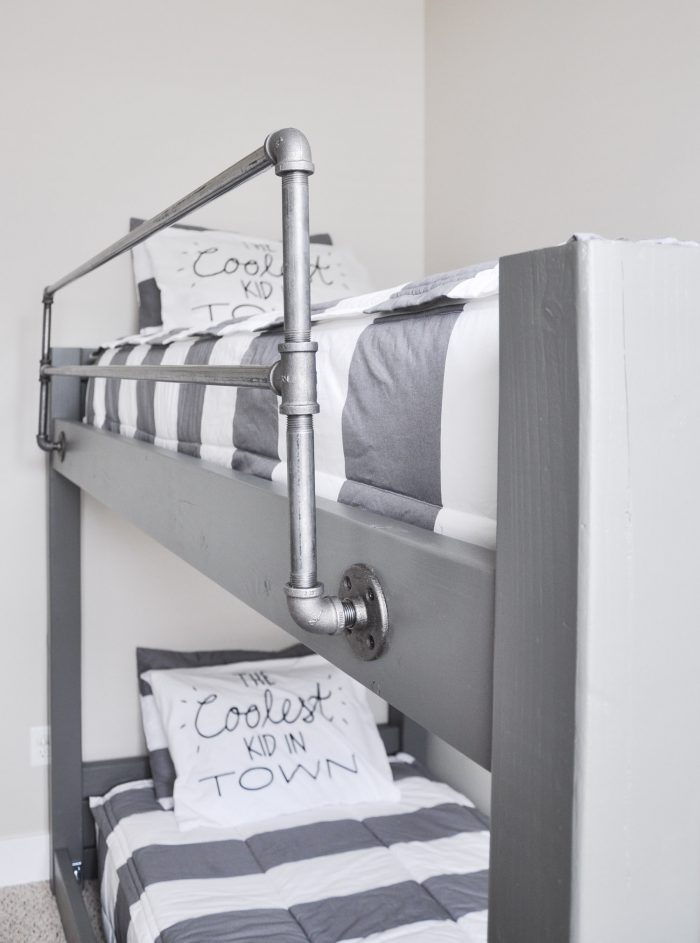
Built ladder using (5) 18″ pipes, (8) 10″ pipes, (4) elbows, (10) T’s, (4) 1 1/2″ connector pipes, (4) 3″ pipes that connect to (4) flanges.

Now all that’s left is to enjoy!!


Hi! i love the look of your bunk beds! great job! I’m just curious if you know approximately how much the materials cost you to build them? I’m trying to see what are my options (by me, I mean my husband) – and which are reasonably priced (without sacrificing on style and quality). Thanks!
I have the same question.
Hi Nicole and Meg,
I’m not entirely sure of the exact cost. A lot of items I had on hand. I will say that the industrial pipe is not the cheapest route to go. It can get pretty pricey. You could do the ladder in wood if you were looking to save money on the project though. The wood and hardware to build the bed is probably around $150 depending on how much lumber is in your area. Then you would need a gallon of paint as well as the piping for the decorative touches. I would say you would be spending at least $200-$250 for the whole project as my best estimate. Hope that helps! Let me know if you have any other questions! Thanks!
I built this and the wood cost about $125.00 and the pipes and fittings I bought online for about $121.00. With the added cost for Paint/Stain, screws and brackets, it added an additional $50.00. The mattress and bedding will add anywhere from $300.00-$600.00 (if you go with the Beddy’s brand).
what website did you buy your pipes and fittings from?
https://www.essentialhardware.com/
1/2” pipe
Items in this Order
ITEM QTY TOTAL
World Wide Sourcing 2A-1/2G Galvanized Elbow 1/2″ Galvanized
SKU:207445 Model#:2A-1/2G
8 $11.68
World Wide Sourcing 11A-1/2G Galvanized Tee 1/2″ Galvanized
SKU:207516 Model#:11A-1/2G
12 $19.68
World Wide Sourcing 27-1/2G Galvanized Malleable Floor Flange 1/2″
SKU:207587 Model#:27-1/2G
6 $16.26
World Wide Sourcing GN 1/2X60-S Galvanized Pipe Nipple 1/2″ x 60″
SKU:196785 Model#:GN 1/2X60-S
2 $20.34
World Wide Sourcing 1/2X10G Standard Pipe Nipple 1/2″ x 10″ Galvanized
SKU:208473 Model#:1/2X10G
8 $20.40
World Wide Sourcing 1/2X2G Standard Pipe Nipple 1/2″ x 2″ Galvanized
SKU:208465 Model#:1/2X2G
4 $5.32
World Wide Sourcing 1/2X6G Standard Pipe Nipple 1/2″ x 6″ Galvanized
SKU:208471 Model#:1/2X6G
4 $6.96
World Wide Sourcing 1/2X12G Standard Pipe Nipple 1/2″ x 12″ Galvanized
SKU:208474 Model#:1/2X12G
5 $14.55
World Wide Sourcing 1/2X11/2G Pipe Nipple 1/2″ x 1-1/2″ Galvanized
SKU:208464 Model#:1/2X11/2G
4 $5.04
World Wide Sourcing 1/2X3G Standard Pipe Nipple 1/2″ x 3″ Galvanized
SKU:208467 Model#:1/2X3G
4 $5.48
Subtotal $125.71
Shipping $0.00
ORDER TOTAL $125.71
essentialhardware.com
Items in this Order
ITEM QTY TOTAL
World Wide Sourcing 2A-1/2G Galvanized Elbow 1/2″ Galvanized
SKU:207445 Model#:2A-1/2G
8 $11.68
World Wide Sourcing 11A-1/2G Galvanized Tee 1/2″ Galvanized
SKU:207516 Model#:11A-1/2G
12 $19.68
World Wide Sourcing 27-1/2G Galvanized Malleable Floor Flange 1/2″
SKU:207587 Model#:27-1/2G
6 $16.26
World Wide Sourcing GN 1/2X60-S Galvanized Pipe Nipple 1/2″ x 60″
SKU:196785 Model#:GN 1/2X60-S
2 $20.34
World Wide Sourcing 1/2X10G Standard Pipe Nipple 1/2″ x 10″ Galvanized
SKU:208473 Model#:1/2X10G
8 $20.40
World Wide Sourcing 1/2X2G Standard Pipe Nipple 1/2″ x 2″ Galvanized
SKU:208465 Model#:1/2X2G
4 $5.32
World Wide Sourcing 1/2X6G Standard Pipe Nipple 1/2″ x 6″ Galvanized
SKU:208471 Model#:1/2X6G
4 $6.96
World Wide Sourcing 1/2X12G Standard Pipe Nipple 1/2″ x 12″ Galvanized
SKU:208474 Model#:1/2X12G
5 $14.55
World Wide Sourcing 1/2X11/2G Pipe Nipple 1/2″ x 1-1/2″ Galvanized
SKU:208464 Model#:1/2X11/2G
4 $5.04
World Wide Sourcing 1/2X3G Standard Pipe Nipple 1/2″ x 3″ Galvanized
SKU:208467 Model#:1/2X3G
4 $5.48
Subtotal $125.71
Shipping $0.00
bought all of the materials today at home depot. The wood cost $113.00, the pipe and fittings cost $225 alone.
Yes, the pipe does get pretty expensive! If only I didn’t like it so much ; )
Hello, Are some of the measurements above incorrect?? I may be completely looking at this wrong Or skipping something! Because Lord knows I have mom brain 24/7 and it seems to be a habit with me completely skipping out missing something????
Here is shop where you can find different house beds on floor and on legs https://www.etsy.com/shop/SweetHOMEfromwood?ref=seller-platform-mcnav
These are fabulous!! My youngest isn’t quite up for bunk beds yet but I think these would be great for when he is ready to transition to a big bed! Thanks so much for sharing your plans with us at Merry Monday this week!
How did you connect the pipes to make a rectangle? Aren’t they all threaded the same direction?
I was wondering the same thing at first. The only way I can figure is to tighten as much as possible and then put next fitting on and loosen pipe into the next fitting until both are approximately the same. As a pipe fitter I am trained to leave them tightened. For this application though it would be ok to loosen them into the next fitting.
Yup! That’s exactly what I did : ) One day I want to learn to weld so I can avoid this method ; )
It’s tricky and can loosen if they pipes are rotated while being climbed on. I used JB Weld on each of the threads to lock them in place.
Hi Rick, so what I did was tighten it as tight as I could on the top joint, then had to pull up to get the bottom side into the T joint, then essentially loosened it in the first joint as it tightened in the 2nd joint. I hope that makes sense. Let me know if not and I’ll see if I can draw up a diagram : )
We tried to make a ladder to our sons loft the same way and ran into issues with the threading and had to abandon the idea. Could you give more direction. On how you were able to am keeping it work so the steps are evenly spaced and level?
Hi Melissa, I’m so sorry you’re having trouble. I really just had to play with it until I got it right. The only way to get the pipes to fit in there since they are all threaded the same direction is whenever you come down to your last pipe to create the full perimeter of the shape is to screw it in really tight, then pull the bars to fit the other side into where it needs to be screwed in, then essentially loosen one joint while tightening another.
I had the same troubles making a pipe ladder. Lowes has a simple solution they call SteelTek construction pipe. It’s cheaper than black iron pipe and it’s designed for these sorts of applications. The pipe isn’t threaded; instead, joints are connected with sleeves that are held in place with a screw. It goes together really easily. I’m using the ladder as a corner support for a loft bed (the other three corners are attached to the wall studs). I will check the screws periodically to make sure they’re holding.
Great idea with the pipe ladder. I was curious if anyone had trouble. I’m making the bunk beds for my nephews. One is 13 and I was a little worried about the weight and climbed/pulling being and issue. I’m going to try and JB weld on the threads and around the joints. Might even skip that step and have someone spot weld it together. Hopefully that will solve the problem.
I stand on the ladder every morning to make my grandson’s bed and it’s solid as a rock. I used JB weld.
So you have a lumber supply list for this? And what was the approximate cost to build? I’ve beenlooking for a cool boy bed to build for my son.
Hi Jessica, I apologize I must have left that out, but I just added it in to the post : ) Thanks for letting me know!
I think the cut list has an error. You didn’t post the length for the (2) 2″x 2″ slat support boards, which I am assuming is 75″ according to your diagram. You have (2) 1″ x 4″ x 41″ where is should read (2) 2″ x 2″ x 75″.
Actually, I am in error also, it should read 2″ x 2″ x 70″ to allow for the 2.5″ spacing at each end.
I just made the same mistake according to the error in the cut list. Maybe I can do two slat supports on each side at 32″ each, with what I have already cut?
Would love to know final cost so I can decide if it is worth the time and effort to build. Happen to have a cost breakdown? It’s the only thing missing. Otherwise, great tutorial!
Hi Meg,
I’m not positive of the whole cost since I did have some things on, but I went back and priced everything best I could, and it will probably be around $200-$250 depending on the cost of lumber in your area. The piping can get expensive, just an FYI and if you are looking to save money I would make the ladder out of wood. The metal ladder was definitely the most expensive part.
Thanks!
I guess I am not finding the total cost of your project that you said you updated in the blog post… Just curious if it is worth it right now. I absolutely love this bed but debating on if it’s worth the time to build if the cost is the same as another bunk I have my eye on.
Hi Brianna,
I’m not entirely sure of the exact cost. A lot of items I had on hand. I will say that the industrial pipe is not the cheapest route to go. It can get pretty pricey. You could do the ladder in wood if you were looking to save money on the project though. The wood and hardware to build the bed is probably around $150 depending on how much lumber is in your area. Then you would need a gallon of paint as well as the piping for the decorative touches. I would say you would be spending at least $200-$250 for the whole project as my best estimate. Hope that helps! Let me know if you have any other questions! Thanks!
If you were going to make this full size over full size would you do anything differently besides make them wider?
Thanks!
Hmm… I might do a little research on how full over full bunks are built. The only thing I can think of is you might need an additional middle support for the width. But honestly I think you would be ok to just adjust the width.
What was the diameter of the pipe you used for the rail? Where did you purchase the pipe?
1/2″ diameter. https://www.essentialhardware.com
Hi. Im in the process of building this bed and i had a question in regards to the foot and headboards. How did you secure the 2×4 and 2×6 boards with the 1/2 inch gap in between.
Hi! Where did you find/buy the bed hardware for assembling and disassembly?? Would love to know! Thank you!
https://www.amazon.com/Galvanized-Steel-Rail-Fasteners-ToolSupply/dp/B001DSZGCU/ref=pd_cart_rp_1_1?_encoding=UTF8&pd_rd_i=B001DSZGCU&pd_rd_r=672SBQZ7EMEHHYANW50P&pd_rd_w=INVAn&pd_rd_wg=orf7A&pf_rd_i=cart-page-widgets&pf_rd_m=ATVPDKIKX0DER&pf_rd_p=3016374682&pf_rd_r=672SBQZ7EMEHHYANW50P&pf_rd_s=cart-page-widgets&pf_rd_t=40701&psc=1&refRID=672SBQZ7EMEHHYANW50P
It’s been awhile since this original post, but the bed hardware you noted in the above link is the same as this: https://www.rockler.com/5-surface-mounted-bed-rail-brackets?sid=V9146?utm_source=google&utm_medium=cpc&utm_term=&utm_content=pla&utm_campaign=PL&gclid=Cj0KCQjw2v7mBRC1ARIsAAiw34-NZ5GPg3QDM1duEH_9tT6jj-8uiECg4WY5nDj3y8LROq0z6MUmutkaAhANEALw_wcB but it notes “not recommended for bunk beds.” Should I be concerned?
This is what I used and it’s been 2 years without a problem. I can see the concern about the person on the bottom pushing up the top bunk and the risk of separation. The brackets are pretty snug and worked perfectly. My grandson’s bed only has a top bunk and we use the space underneath for play.
So my husband and I just went to Lowes to get the supplies for this bed…should have done a bit of research before because the total for the supplies came out to be $500…so we decided that we might do the galvanized pipe later but what a disappointment. We went through all that hassle for a bed I know I wont be happy with now…lol…I might make him return all of the supplies and just purchase one. Unless you know of a cheaper place than lowes to buy piping and the fittings?
Hi Heather, I’m so sorry for your inconvenience! Using pipe is definitely not the cheapest route when building projects… but there is a cheaper way to get it all. I believe Home Depot is cheaper, that’s where I buy all my pipe. Also, they carry long pieces, like 10′ and 20′. Those are much cheaper than the small pieces… and you can have them cut it down for you and thread the ends. It does take them a while though so you might see if you could come back to pick it up. I’m not positive that all Home Depot’s will do that many cuts free of charge, but mine always has : ) Hope that helps some! Let me know if you have any other questions! Thanks!!
I purchased my pipe and fittings online at essentialhardware.com It cost approximately $125.00 including shipping.
Ashley, this is fantastic! Great color as well! Thanks for sharing. Feel free to share this or any diy post at my Before & After Wednesday party which just went live. Here is the link if you want to check it out. http://www.thededicatedhouse.com/before-after-wednesday-week-82/ Hope to see you at the shindig! Have a great rest of the week. Toodles, Kathryn @TheDedicatedHouse
Hi, do these plans call for standard twin size mattresses?
Do you by chance have measurements for Full /Full ?
What type of wood is recommended? (I.E.- Treated/ Untreated; Cedar/ Oak, etc….).
Definitely Untreated. Treated wood contains chemicals and shouldn’t be used when coming in contact with people on a regular basis. You’d typically used it for fencing etc. I just used regular pine from the hardware store. If you want to use a higher quality wood you could certainly do that, just make sure you are using the right screws for the wood species. : )
I’ve been a gas fitter/plumber for 20 years and can assure with 100% certainty that it’s physically impossible to build the rail or ladder as shown in these pictures. You can easily build half of either one but you cannot rotate the opposing side (at the T) to engage one thread let alone a few to hold it together. You would have to add a “Threaded Union” on the horizontal sections which would allow you to “bolt” the two sides together. This would add another $100 +\- to the project and they are ugly parts.
Ed,
Forget your training. You’re not trying to keep it from leaking with 100 psi pressure test. You wouldn’t thread the second tee onto the pipe, you would run the pipe into the first tee as far as possible then back the pipe out of the first tee onto the second and you can absolutely back it out enough on one side to thread into the other side while still being sturdy and safe. I struggled with it for a while as well. Then it just hit me after staring at the pics for way too long.
It’s not about plumbing, maybe it’s physics?
You cannot make a rectangle with four 90’s and rotate them to get 1 thread on.
If you have the first 3 90’s assembled how do you thread the last one, it’s impossible.
A child could figure this out.
Also, the threads are tapered. Even if this were possible you could not thread as far as possible and then back off to thread the other side.
Ed, a child may be able to figure it out. But it seems you can’t. Forget your training. You would build a “U” with 2 90s and 3 pieces of pipe. Then you would put 2 90s on the last piece of pipe. Next, put the 2 objects you just built really close together with the open ended 90s facing the open end of the pipes. Final step, loosen the 2 pieces of pipe with open ends into the open end of the 90s. And I think the suggestion of the JB Weld would work great if you’re concerned about it staying put.
To snug it up, I used JBWeld on all of the threads. Worked perfectly!
Im trying to tell if you used black oxide pipes or galvanized, which did you use? Also if you used the black, did you have to wash it first? Is there a benefit of useing one over the other?
So I am making this currently but am adapting it for full sized mattresses. For the wood and paint it’s about $200. Brackets about $30 and I haven’t gotten the pipe yet. However, Home Depot/Lowe’s sell galvanized pipe in 20’ lengths and they don’t charge for cutting/threading. What you do is find out what total length you need and then the different quantities and lengths and buy them in big lengths (a 20’ stick of 3/4 galvanized is about $12). That will bring your cost way down. Never pay for individual nipples that are your correct lengths that’s way too expensive.
Has anyone coverted this to queen?
I know it’s been a while but I am curious as to how you pocket hole screwed each of the panels that make the headboard and footboard.
Did you pocket hole the top and bottom of the 2×6 and just the top OR bottom of the 2x4s? There isn’t enough space to do the top and bottom of each so I am just trying to decide the most secure method.
And thank you so much for the plan!
There is enough room to put 2 pocket holes on the 2×4, but it works best if you use a jig. Kreg’s Heavy Duty Pocket Jig has two holes side by side for perfect placement. You need to do 2 holes per board for optimum strength. You can use the same jig for the 2×6, but i would move the holes further apart. Just line up the jig on the edge of the board and use only one hole and then repeat the process from the other side so each hole is evenly aligned. It’s very sturdy and looks clean, especially if you fill the holes with plugs designed to fit the holes.
https://m.youtube.com/watch?v=fs_E_T0-aGY
I love the look of this bed! I have to boys who share a room. They are turning 5 and 8 in the next couple months. What would you say the weight limit is for the top bunk? My 8 year old is tall and a very solid boy (maybe 85 pounds). Wondering how long till he out grow it. Thanks!!
I made this bed for my grandson last year, he’s going on 7 and 60 lbs., we expect him to be in this bed for many years. I climb on his bunk to make his bed several mornings a week (I babysit) and suffice it’s to say, I weigh a bit more than an 8 year old boy ????. This bed feels really solid, especially considering it’s built with solid wood. We also braced the top bunk to wall to minimize movement. One thing I should mention, I did not add the bottom bunk and I left the front piece of wood of the bottom for a loft area for playing and storage. Even with this modification it feels really solid. The only other suggestion is make sure the mattress slats are close together (you could even add more) to add more strength and support.
Typo: off not of
Great design! Just finished building this for my boys (4 & 2). Didn’t have the extra money for pipe ladder, so just added two 2X4 for a wood ladder on one side and a 2×4 cross brace on top. Thanks for posting this design. It is simple but really looks great.
It’s highly recommended to use a professional mattress cleaner to remove the allergenic contaminants living, thriving and breeding in your mattresses and soft furnishing’s found in your home. You may also want to vacuum your twin mattress but I suggest you do it outdoors. Nearly all vacuums spew microscopic dust back into the environment negating all your cleaning efforts.
Why does the Lumber Supply List call for 96″ long 4X4 posts when the plans are for 60″? Wouldn’t it be more economical to get 72″ posts? I think you’d have less waste. Thank you.
I think the designer went with the standard length size of the posts. You certainly can buy 72” length if you prefer.
You need to edit your cutlist and shopping list. I’m a contractor by trade, and build homes for a living, so my wife decided to take it upon herself to surprise me and our two boys with some bunk beds based on your plan, and to lighten my workload. She did the shopping herself, then got frustrated and called for my help anyways. When I looked it over, I saw her frustration. You don’t mention the 2×2’s on the cutlist, and you can’t get nine 41″ slats from three 10’ boards. Simple enough to figure out if you’re use to this, but for a nice beginner DIY plan (which it is) try to avoid typos or errors that can discourage/confuse the novices just getting their feet wet. We live in the rural Midwest about 45 minutes from any big box hardware store or lumber yard, she wasn’t too thrilled to know we needed one more board. Keep up the awesome work, but please remember, attention to detail is important in craftsmanship, as well as passing that knowledge on. Thanks.
I am having trouble finding theHighpoint Surface-mount Knock Down Low Profile Bed Frame Hardware in an actual store. Online the cheapest I can find is 12.99. It looks like you need 8 of them. Is there an alternative to this part?
Same here ????
Incorrect. Their should be 4 in each pack for 12.99. I had to purchase 2. One completes the top bunk and the 2nd pack is for bottom bunk. Read description carefully.go to woodcraft.com. its where I got my 2 sets.
All you need is one set. It comes with 4 complete sets. Galvanized Steel Bed Rail Fasteners by ToolSupply https://www.amazon.com/dp/B001DSZGCU/ref=cm_sw_r_cp_api_i_bUB2DbCSH8HWG
Ashley, love this design. My daughter wants a bunk bed so I’m thinking about doing this (though in white with black piping). One question… any thoughts on the best way to extend the bottom into a Full with a twin above? Simple may be to run the twin post to the ground and then do a partial headboard on the bottom for the full… but seems a bit inelegant. wonder if you considered a full-bottom or had thoughts about the best way to make it work.
Hi, this looks amazing. Appreciate all the links and information throughout the string of comments. I’d like to build this for my son who is interested in a loft bed. Does anyone have a cut list for a full size bed?
Thanks!
I built this bunk bed and it turned out awesome, little challenging with the galvanized pipes but it worked out. The price was more than I originally expected but I built a solid full size bunk bed.
I for the life of me cant figure out how you secured the “headboard wood” to the 4×4’s with 2.5 in wood screws? Dont see any holes in the pictures!
Pocket holes. You need a Kreg jig. https://www.kregtool.com/shop/pocket-hole-joinery/pocket-hole-jigs/kreg-pocket-hole-jig-320/KPHJ320.html
You can get them at Home Depot, Lowe’s or Amazon.
thank you so much!! Just ordered one!
Don’t forget to use pocket hole screws. They look like regular screws with built on washers. Pocket holes are game changers!!
You are awesome.. thanks!!
is there a pdf or printer friendly version of this build?
I love the simplicity of this design. I adapted this to have wooden rails & ladder, and be shorter for my young kiddos. Turned out great. Thanks!
HI, someone still have the PDF ? The link don’t work anymore. Thanks !
A room feels unclean when there are mattresses on the floor, for some reason. See: https://factoringseattle.com
Wow! Glad to visit this site for this information. Thanks. concrete contractor