This is a sponsored post written by me on behalf of Elmer’s. All opinions are my own.
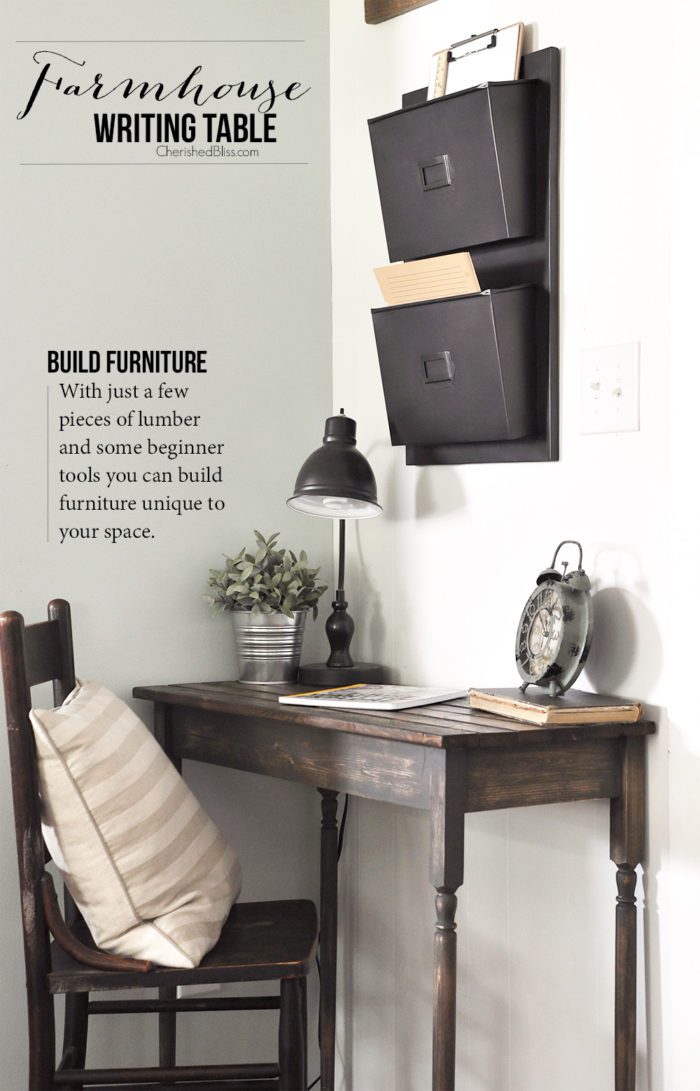
I have really been trying to finish up my kitchen/dining area before the holidays come swooping in out of nowhere! So far I have finally finished the kitchen and fixed my awkward corner. I’m still working on getting some stuff up on the walls, but today I’m here to share with you this other little space in the dining room. I honestly toyed with adding some kind of cabinet storage here since my kitchen isn’t exactly huge, but it just didn’t feel right to me. I finally decided I needed a little place to work. I’m always at the kitchen table with my laptop and having to move it out of the way for meals and I just liked the idea of having a little command center right here at the hub of our home!
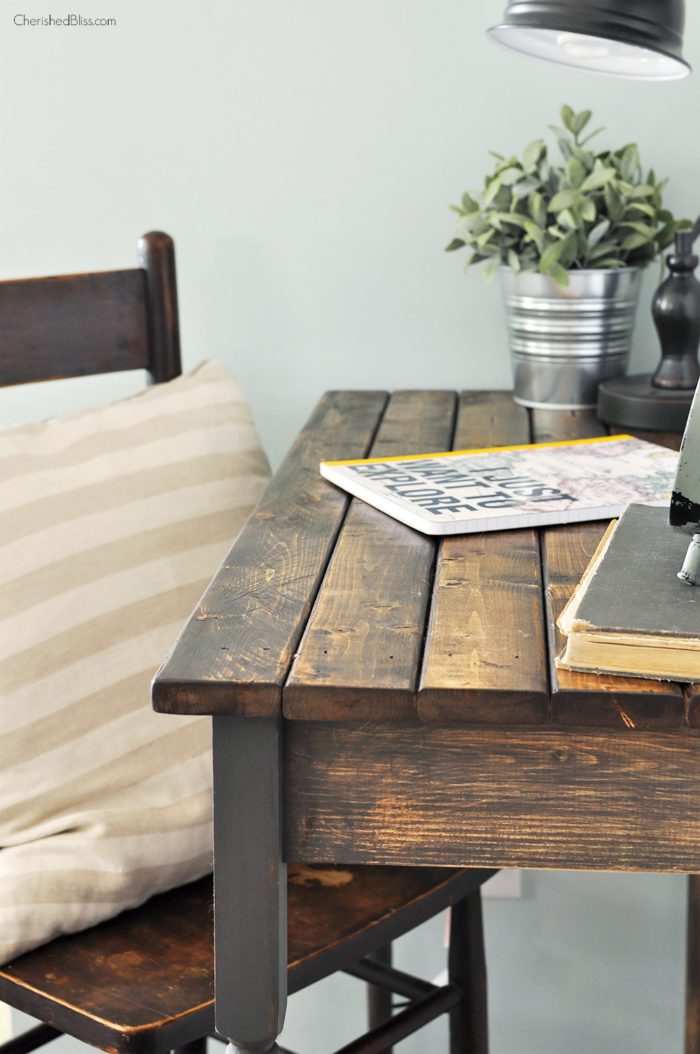
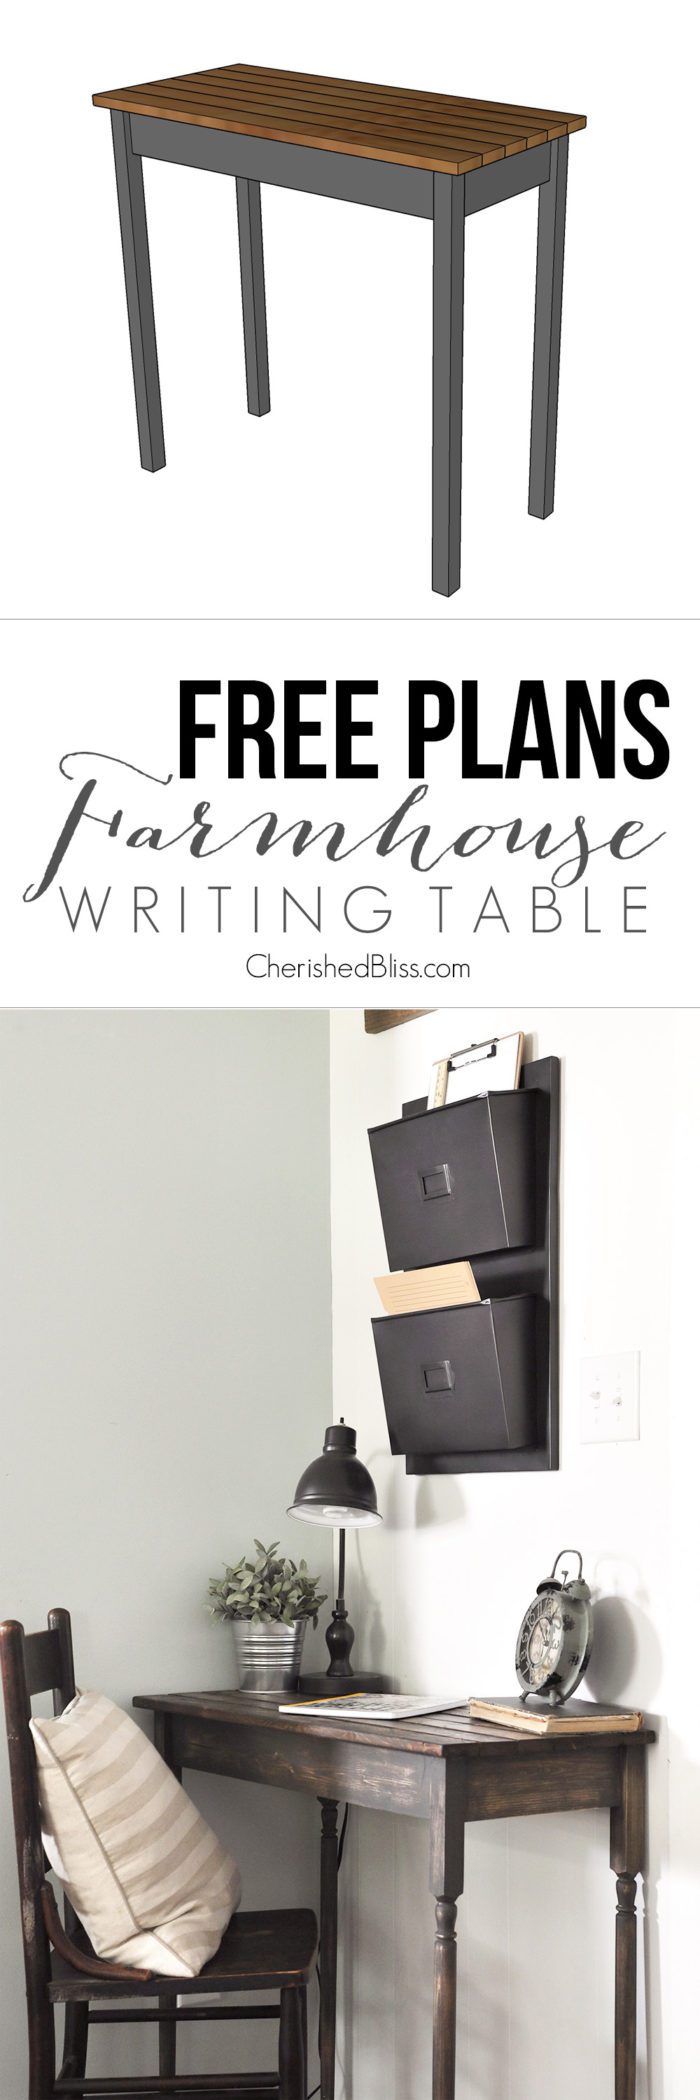
Because of where this space is a bulky piece of furniture just wouldn’t work right next to the doorway. It needed to be something small and airy that wouldn’t feel like you were closing in on the doorway. After much thought and idea searching I decided on building this simple DIY Farmhouse Writing Table. It’s very small, but perfect to sit at with my laptop and a cup of coffee.
This is an easy build so no worries if you are new to woodworking, you can do it! : )
Supplies:
– (4) Stair Spindles
– (3) 1×3 @ 8′
– (1) 1×4 @ 8′
– Miter Saw
– Drill
– Finish Nail Gun
– Elmer’s Wood Glue Max
– Kreg Jig
– 1 1/4″ Pocket Hole Screws
Cut List:
– (2) 1×4’s @ 11″
– (2) 1×4’s @ 27 1/2″
– (4) Spindles @ 29 1/2″
– (6) 1×3’s @ 32″
DIY Farmhouse Writing Table Free Plans
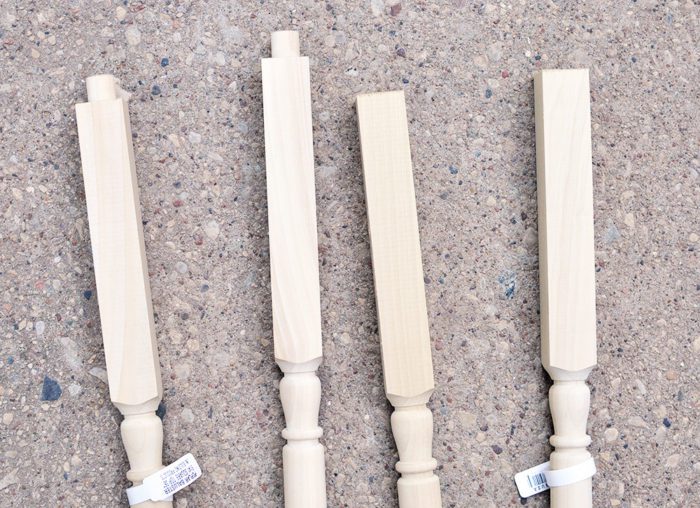
First you need to trim down your stair spindles. I trimmed the majority off the bottom sot hat it looked like feet rather than a large rectangle at the bottom, then I took off an excess from the top to obtain the 29 1/2″ length.
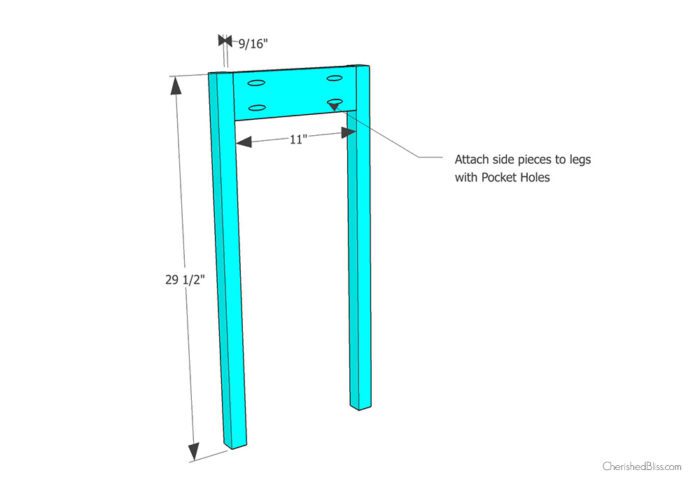
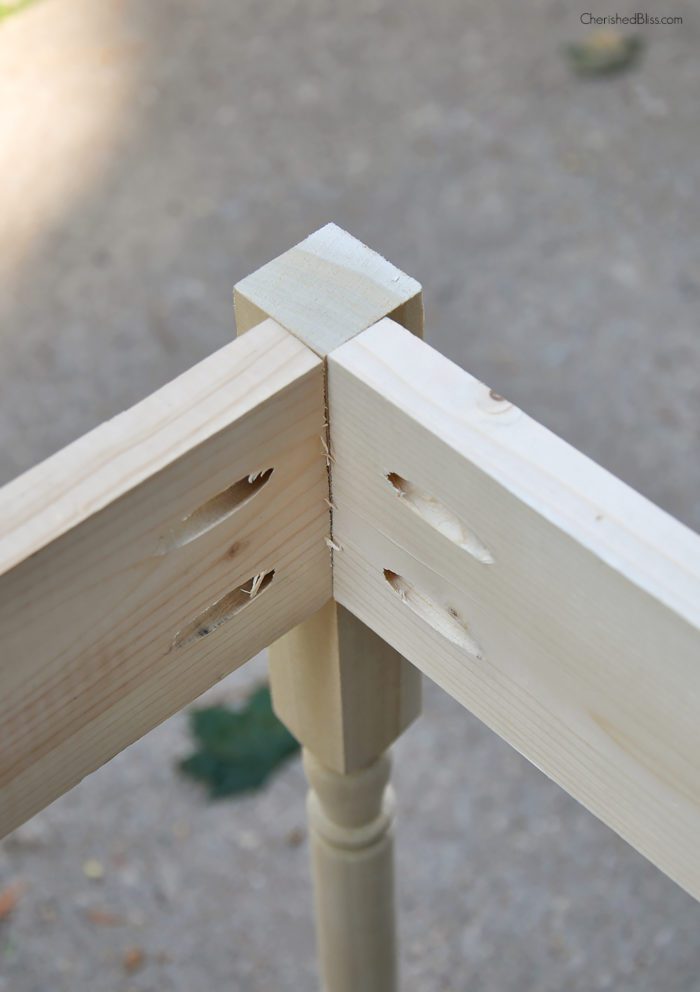
Step 1: Once you have your spindles cut and ready to go we can start building. Add your pocket holes to each end of your 1×4’s. Attach 1 spindle to each end of your 11″ board. Make sure to recess the board back so that it is flush with the back side of the spindle. This gives you the recessed look in the front. This is the inside view of the sides. Build two of these sides.
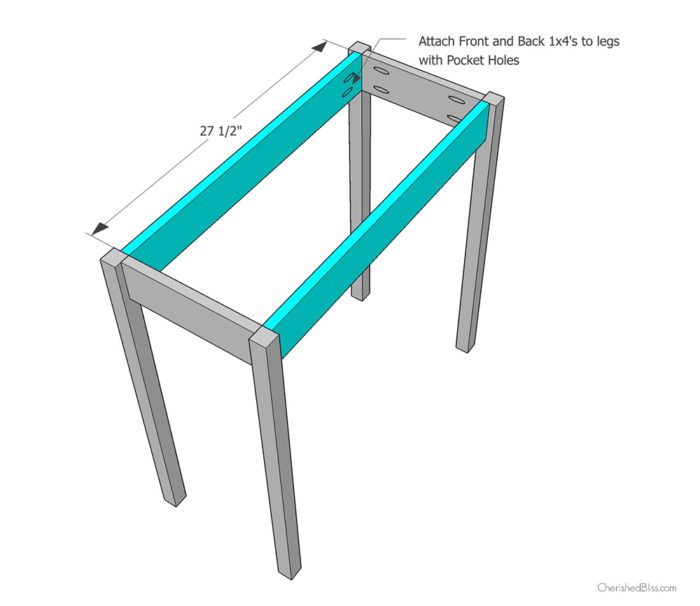
Step 2: Add the 27 1/2″ 1×4’s between the legs in both the front and back using pocket holes. Make sure to keep these recessed to the back side of the spindle as well.
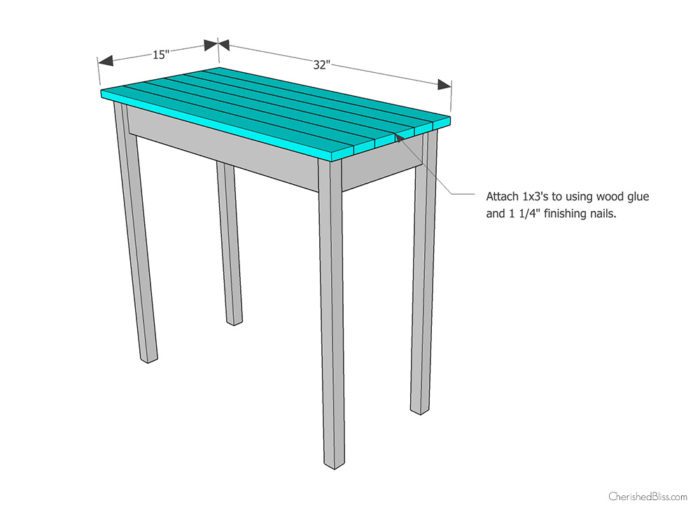
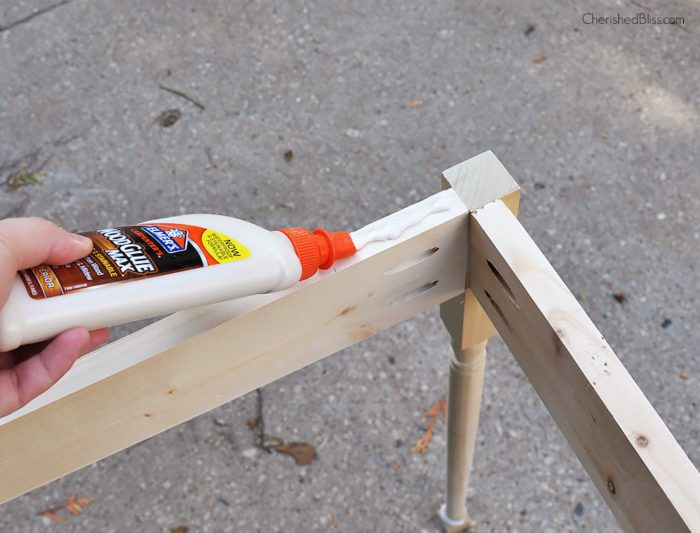
Step 3: With your Elmer’s wood glue and finish nailer, attach the 1×3’s on the top of your base. Make sure to center it over the legs so your overhang is even around all edges.
Now all that’s left is to sand and finish the table. I will be sharing a tutorial of how I finished mine in a few days!
Are you looking for more woodworking projects? Check out some of my other tutorials and free plans by clicking the image below.



I am in love. Such a cute little nook for writing thank you notes or a to-do list. Love it Ashley!
Love the table. Thanks to your great instructions I actually think I could build this myself! It looks great.
You guys rock the power tools! Love this and pinning for future inspiration. Thanks!
This is so great! Love that you made this…I swear at first sight I thought it was vintage. Gorgeous job..pinned!
You are seriously amazing! Every time I see one of your projects, I’m in awe. :)
Anna
I have built this table and it came out beautifully. I searched for your website to find plan and so glad i found it again! I will be building it again, yet this time a bit bigger. Thanks again for the great plan!!!
This was pretty much love at first sight and I love that you custom built it yourself!
I love this! Thanks for sharing the instructions on how to make our own. i want to do it! I love the lamp and letter holder that’s hanging. Do you mind sharing where those items came from? Thanks so much! Love your blog!
Such a nice farmhouse desk! Featured today on Ana-White.com. Keep up the great plans!
“Ana White and Team”
Your table looks so awesome. I love the rich looking finish.
I love this table!!! Thanks for sharing!!
What color paint, or stain did you use? Thanks
Great build! I love it! Could you please update this post to show a picture of what the legs look like at the bottom (the “feet” you created)? Thanks!
Would you mind sharing the paint color on your walls? Thanks so much!
Hi Kim, the color is Palladian Blue from Benjamin Moore. : ) I LOVE it!
Love the rustic appeal of the desk. May try it myself one day if I can figure out how to paint it like that.
I note that the frame of the table (attached to the legs) appears to be squared and milled, while the top still retains rounded edges like framing lumber. What sort of wood was actually used and how was it prepared before assembly?
Thanks,
Ed Greenberg
Would you mind shareing the color finish on this desk?
Hi Brittney, I actually did a whole post on how I did this finish : ) You can find it here: https://cherishedbliss.com/how-to-get-a-farmhouse-style-finish/ Thanks for stopping by!!
I’m a wanta be carpenter, I would love to be able to create the way you do. My daughter who is a very creative type has an interest in it. I may give it a try one day, but for mow I will stick to cooking and sewing.
I’m actually working on a DIY farmhouse inspired homework desk for my kids so I was THRILLED to come across your tutorial…it’s lovely! Thank-you!
What sort of nails did you use for the top pieces?
Your farmhouse table turned out great and I love the stain color. I love for you to share at a link party I am co-hosting. Hope to see you there. http://diy180site.blogspot.com/2016/07/dishing-it-and-digging-it-link-party-107.html
I love the finish on this writing desk. It is gorgeous! Thanks for sharing!
Great working corner!
Would you mind sharing source of your wall files? Thank you
This project is absolutely fabulous. My hubby and I will be giving it a try. Thanks!
If anyone is interested, I believe this part 2 for this article:
https://cherishedbliss.com/how-to-get-a-farmhouse-style-finish/
Great Article!!
I really like the final look of this table. I am thinking of building the same, but a little smaller so I can keep my keys and other small items. I need to get some good lumber first though.
Wow, this table looks perfect, really antique and unique. I hope that I will be able to do something similar thanks to your article. Do you have any other articles on creating such furniture? It would be interesting to see this.
Hello Ashley! Thank you very much for always great ideas!
It is very important to have a comfortable and cozy working place! And the process of creation – adorable! Thanks for sharing!
This design looks simple and smart. How it would look when a small drawer with this table?
Good day! I ordered a term paper on the subject “Security of operating systems” on the topic “Guaranteed data destruction”. I really liked that they explained everything calmly and easily to me, discussed and accepted the application. I was a little worried about the quality of the work, because I had never ordered a job on the Internet yet, but everything was done with high quality, I passed it with an A. I believe that if your deadlines are tight and you need to urgently get work done, then this site will always help out. In general, I am satisfied.
Great article, my kids loved it. In turn, I would like to share an excellent site where you can review popular essay writing services from experts. On PaidPaper.net you can find a WiseEssays review, check it here https://paidpaper.net/wiseessays-review. It will help you decide on the choice of a reliable and proven service and save you from scammers.
Nice table and easy and simple in making what is amazing . That really saves your money to buy new. But u need to have motivation to do this. U can https://best-essay-service.org/buy-motivation-letter.html if u need
Great idea how yo reuse the old furniture in the house. This is good to save your money for the best things for example https://essays-writers.com/powerpoint-poster-writing-service.html
I like writing. I’m in a perpetual search for credible essay writing services that can aid me effectively. Any pointers you might have would be greatly appreciated as I aim to excel in my academic endeavors.
Crafting impactful MBA essays is my aim, and I found an essay writing service at https://writersperhour.com/mba-essay-writers. Is anyone familiar with their offerings? I’m interested in their ability to showcase my potential effectively. If you’ve used this service, please share your thoughts on its quality. Thank you!
Tweak Your Own Cowhide Suit. Get a cowhide race suit made that is absolutely extraordinary with your decision of configuration, calfskin, insurance, style, variety and fit. custom leather motorcycle suit
https://milogears.com/en-us/products/copy-of-gear-up-for-the-ride-with-our-wide-selection-of-replica-motorcycle-suits-perfect-for-racing-riding-one-and-two-piece-high-quality-leather-suit
This program aims to bridge the gap in healthcare accessibility, providing essential medical services such as physiotherapy, nursing care, and psychological counseling via telehealth technology. benefits of sober October
https://healathome.ca/sober-october-transforming-lives-one-alcohol-free-month-at-a-time/
Leather bomber jackets for men has an exceptionally rich history, men’s aircraft calfskin coats right currently partake in a gigantic overall fame that outflanks age, sex and even region, in view of a redid appearance and work. mens leather bomber jacket
https://civicleather.com/product-category/leather-products/mens/bomber-jackets/
Harley Davidson Leather Jackets represent a perfect blend of style and functionality, designed with premium materials to ensure comfort, durability, and protection for motorcycle enthusiasts. Harley Davidson Leather Jackets
https://leatherlyte.com/collections/harley-davidson-leather-jackets
Could it be said that you are looking for a viable and normal method for arriving at your weight reduction objectives? Look no farther than Alpilean. alpine ice havk
https://wellnesscomet.com/alpilean-reviews-about-fake-or-real/
With Pre-Orders, you’re not simply shopping; you’re spearheading. Advance beyond the bend, and be quick to possess state-of-the-art innovation, style, and way-of-life items. Your opportunity to exhibit things sets precedents and rethink assumptions. esfashionlab.com
https://esfashionlab.com/
Notwithstanding, throughout recent days numerous clients have been revealing issues with getting to the application and talking with their artificial intelligence colleagues. claudeai.pro
https://claudeai.pro/
We have consistently accepted with Cowhide, you have a period of less speculation and look, which gives an underlined assertion. Mens Leather Bomber Jackets
https://holyleather.com/collections/mens-leather-bomber-jackets
AI stands for Artificial Intelligence. It refers to the development of computer systems that can perform tasks that typically require human intelligence.
claude ai
In this blog, you can get complete information about different platforms where you can get cheap deals in the field of online shopping. What are Etsy Gift Cards
https://shopzila.org/what-are-etsy-gift-cards/
Gimkit is an interactive learning platform designed to make studying fun and engaging for students.
With its game-like interface, Gimkit allows educators to create customizable quizzes and activities for their classes.
Students earn virtual currency called “Gimkit cash” as they answer questions correctly, which they can then use to purchase power-ups and other in-game enhancements
https://gimkitjoin.uk/
EA Gears is your destination for premium leather motorcycle suits, boots, and gloves. eagears.com
https://eagears.com/
You can download audio files if they are available. youtubeconverter.pro
https://youtubeconverter.pro/
banggoodappBanggood is an online retail platform that specializes in selling a wide range of products, including electronics, gadgets, clothing, accessories, home goods, and more. It operates internationally and offers competitive prices on many items. The company is known for its frequent sales, promotions, and discounts, which attract customers looking for good deals
trendyolapp Trendyol is a popular e-commerce platform based in Turkey that offers a wide variety of products including clothing, accessories, beauty products, electronics, and home goods. It operates primarily in Turkey but has expanded its reach to other countries as well
soap2dayssSoap2Day is a popular online streaming platform that offers a wide range of movies and TV shows for free. Users can watch content without needing to sign up for an account.
claude3At its core, Claude 3 is a state-of-the-art language model, a type of artificial intelligence system designed to understand and generate human-like text. However, what sets Claude apart is its unique combination of advanced natural language processing capabilities
Here you can get complete information about tech products. best graphics card under 500
https://techhelpr.org/best-gpus-under-500/
Spent my entire weekend watching movies on soap2day.to. The selection is so good that I couldn’t stop. Highly recommend it!
At HTTC Store we offer top-notch Jiu Jitsu GI products at prices that won’t break the bank. Jiu Jitsu Gi
Getting started with Slice Master Game is a breeze. slicemaster.live
Here you can get complete information about different companies of mobiles. mobilereviews.co
Besides, the connection cost tracks down the way from source to objective in an organization. ccnapracticallabs.com
LifestyleNetWorth strives to provide accurate and authentic information about celebrities and prominent peoples, including their biography, net worth, lifestyle, Age, Height, and more.
https://www.lifestylenetworth.com/
Colorado football schedule is your source for college and pro football schedules. We love football and enjoy compiling current and future football schedules for the fans.
https://coloradofootballschedule.com/
Are you shelling out cash to watch shows online? Save your money! Instead of paying for streaming services, head over to Soap2Day. They’ve got thousands of HD quality, totally free, and no ads.
https://isoap2day.com/
Find Your Dog Names
https://yourdognames.com/
ConnectionsNYT New York Puzzle section features engaging and challenging puzzles to entertain and stimulate the mind. From crosswords to Sudoku, the puzzle section offers a variety of brain-teasing activities for readers of all ages
https://connectionsnyt.pro/
Trust Scorpion GI for unparalleled quality and style in every roll. jiu jitsu gi
https://scorpiongi.com/
Welcome to Net Worth Stop,Visit NetWorthStop Your Source for the Latest on Celebrities Bio, Net Worth and Earnings! Stay Updated with the Latest Updates of Net Worth of Your Favorite Celebrities or Personalities.
Outstanding article packed with valuable insights!
Claude 3 is the latest large language model (LLM) developed by Anthropic, released in March 2024. It is a multimodal AI capable of reasoning, handling multilingual tasks, and interpreting visual data such as charts, diagrams, and photos.
Claude 3 is the latest version of Anthropic’s AI assistant, designed to provide more natural, coherent, and useful interactions with users.
https://claude3.us/
Hunt Mails makes it easier to reach the most influential people in the world. Our platform is the best resource to use if you are looking for an email address from a business mogul such as Bill Gates or a tech guru like Elon Musk. Our vast database of emails allows you to contact key figures in various industries.